
 Email
Email SMS
SMS Whatsapp
 Web Push
 App Push
 Popups
 Channel A/B Testing
  Control groups Analysis
 Frequency Capping
 Funnel Analysis
 Cohort Analysis
 RFM Analysis
 Signup Forms
 Surveys
 NPS
NPS Landing pages personalization
  Website A/B Testing
  PWA/TWA
 Heatmaps
 Session Recording
 Wix
Wix Shopify
 Magento
 Woocommerce
 eCommerce D2C
  Mutual Funds
 Insurance
 Lending
  Recipes
  Product Updates
 App Marketplace
 Academy
Welcome to our latest release notes! We’re thrilled to introduce you to four exciting features that will elevate your experience and empower you to optimize your campaigns and stay ahead in your marketing strategies:
Let’s delve into these exciting updates and unlock new possibilities for your marketing endeavors.
1. Calendar view for campaigns
Embark on an intuitive journey of campaign management with the Calendar View, providing a visual canvas for marketers to plan, execute, and analyze their campaigns with precision.
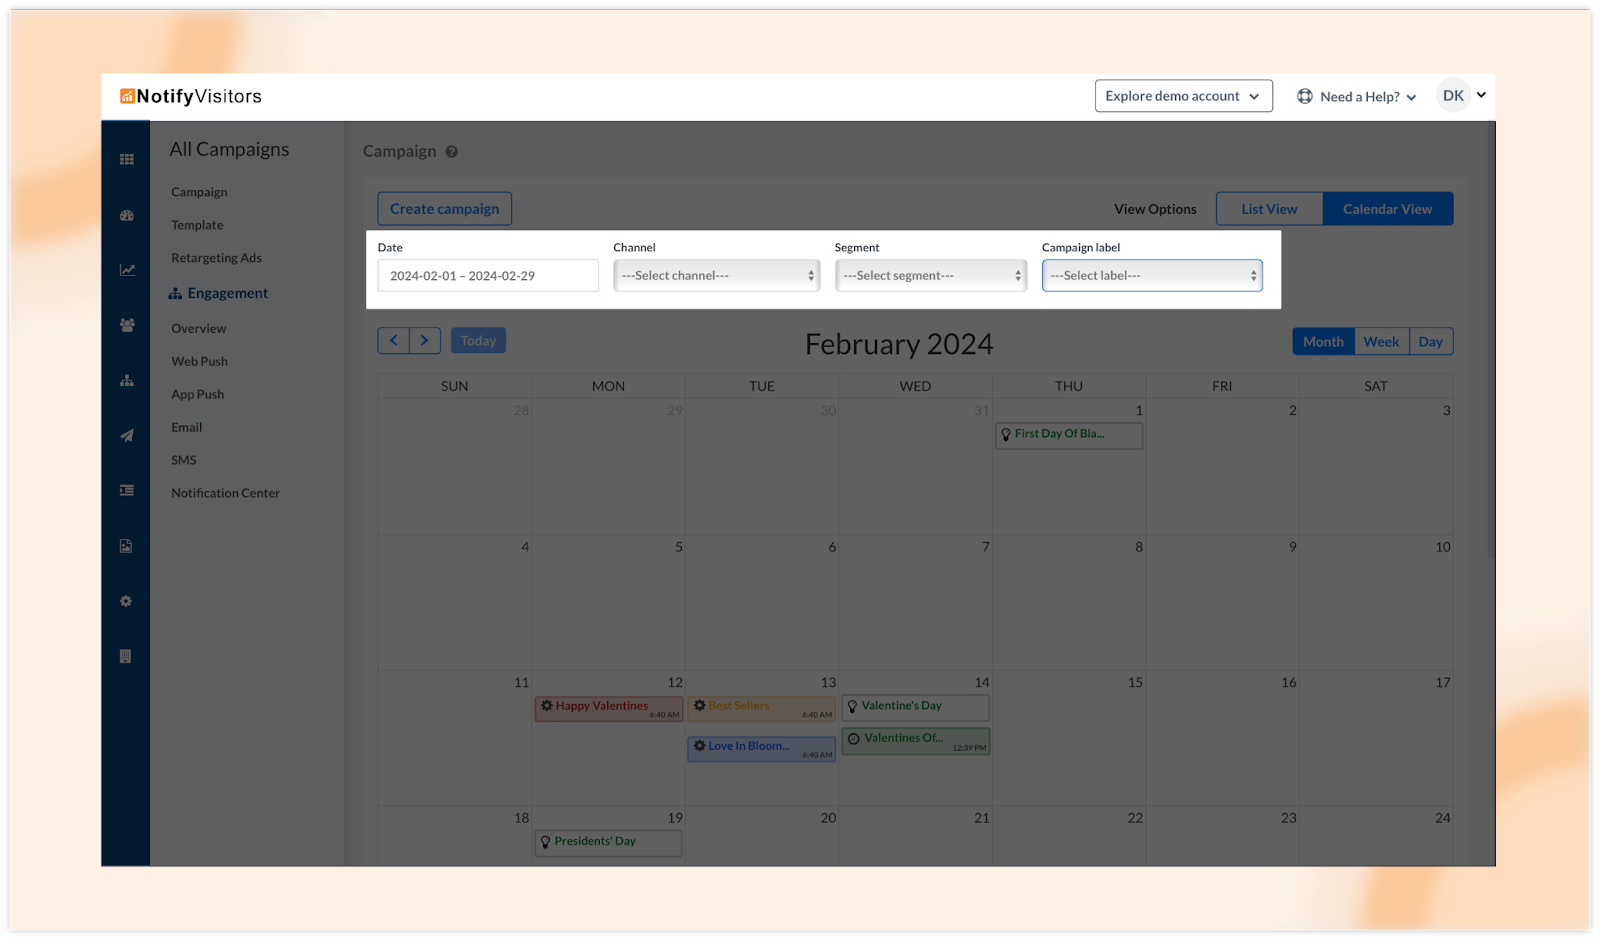
To access the Calendar View, head to the Campaign section and click on ‘View Options’ at the top right. Choose ‘Calendar View’ for a rich visual representation of your marketing timeline. Here, we delve into five key aspects to optimize your experience.
1. Filter options in calendar view:
Tailor your view by date, channel, segment, or label. This dynamic filtering system enhances campaign analysis, planning, and management.
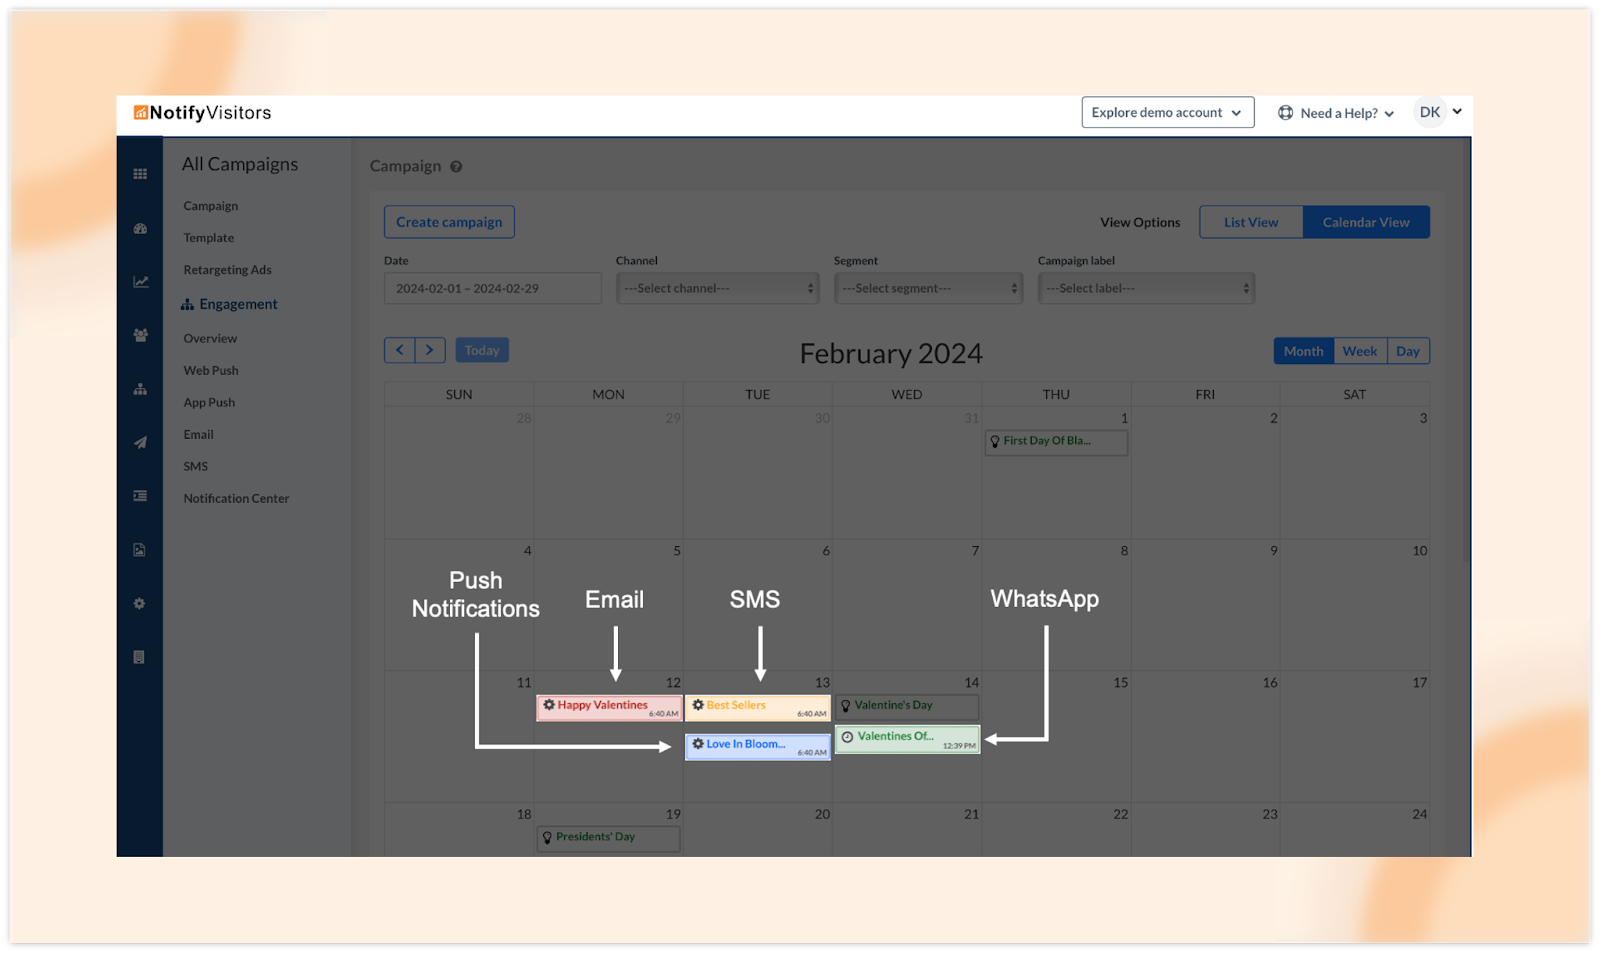
2. View campaigns across all channels:
Experience a seamless overview of all campaigns, color-coded by channel for instant recognition—blue for push notifications, red for email, yellow for SMS, and green for WhatsApp.
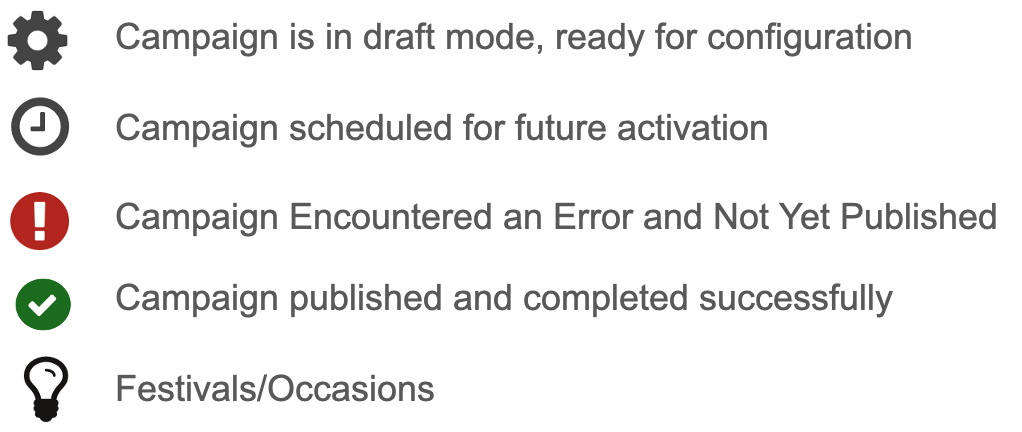
3. View campaign status:
Effortlessly identify the status of each campaign directly within the calendar, from drafts and schedules to sent & completed campaigns.
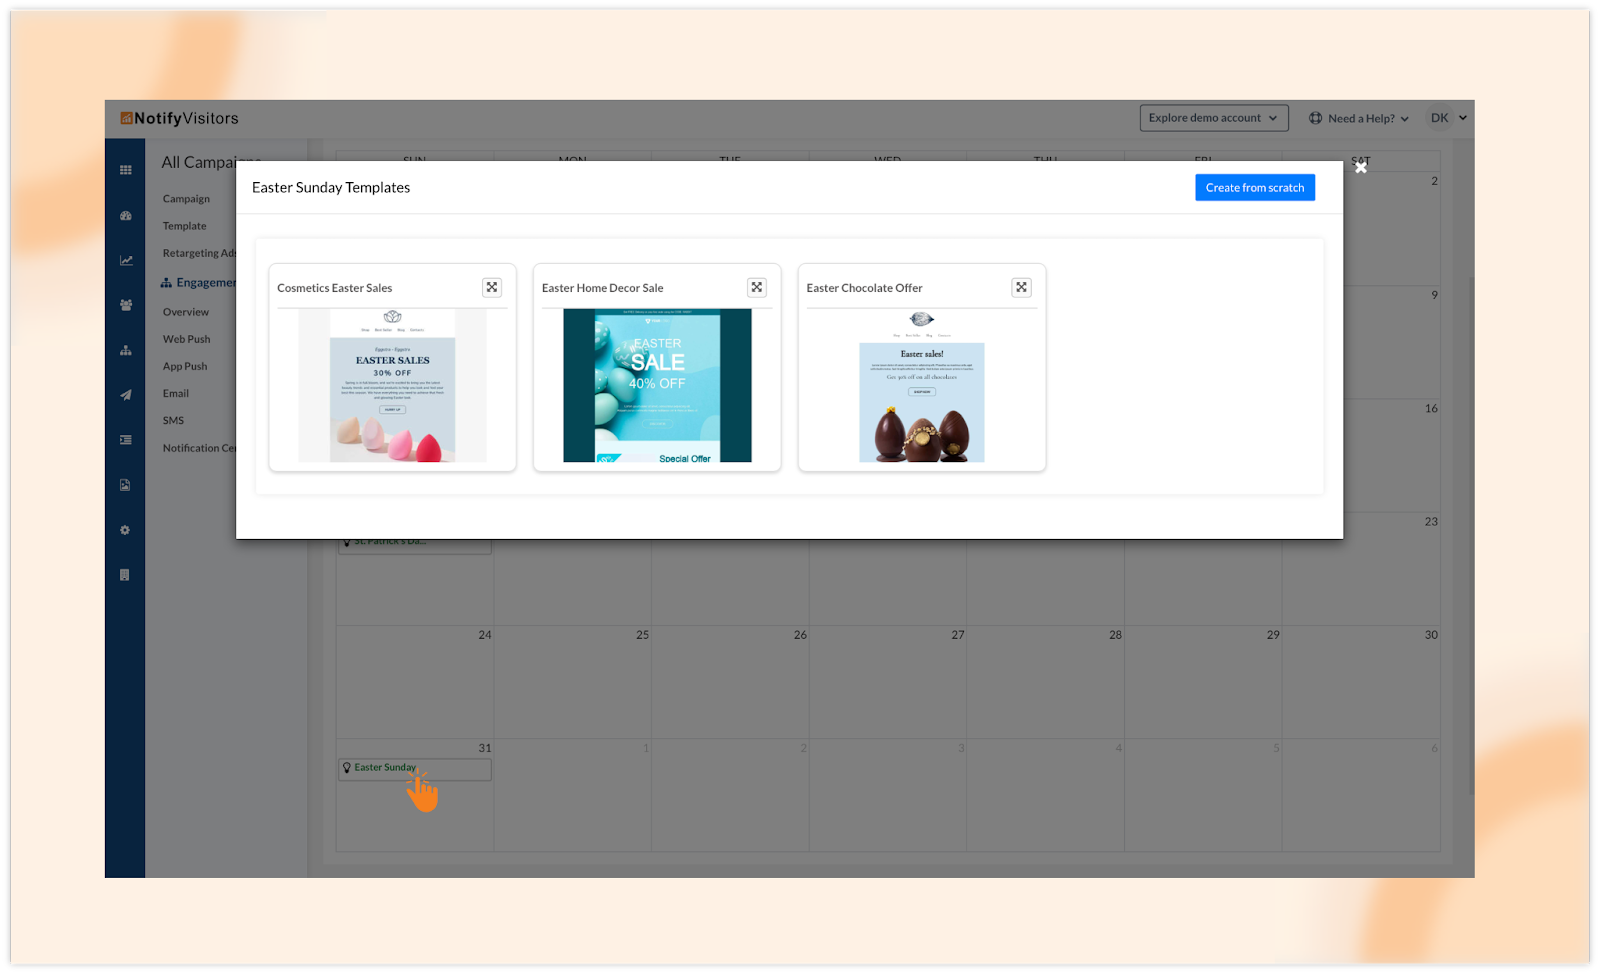
4. Festivals and holidays with related templates:
Efficiently schedule campaigns around upcoming occasions with the integrated festivals and holidays feature. Click on an event to access related email templates designed for festive marketing.
5. Campaign management options:
Create new campaigns effortlessly with the ‘Create Campaign’ button. Explore advanced options like analytics, editing, duplication, deletion, and automated resends by clicking on specific campaigns.
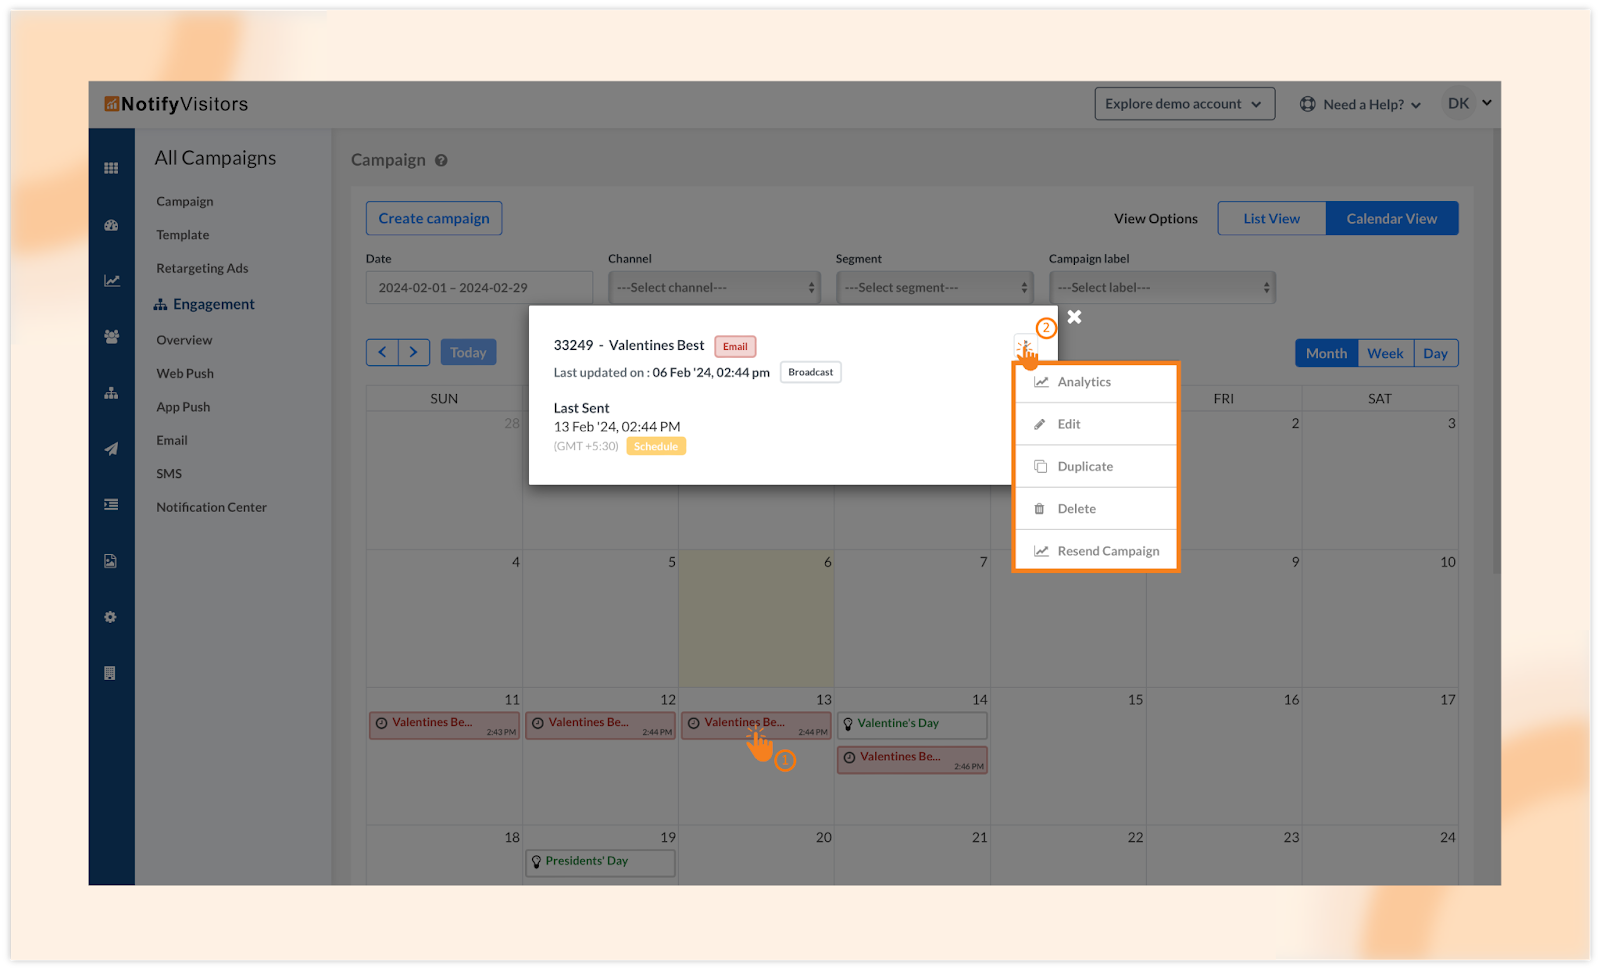
Calendar View not only simplifies campaign management but also enhances strategic planning, providing marketers with a powerful visual tool for effective marketing endeavors.
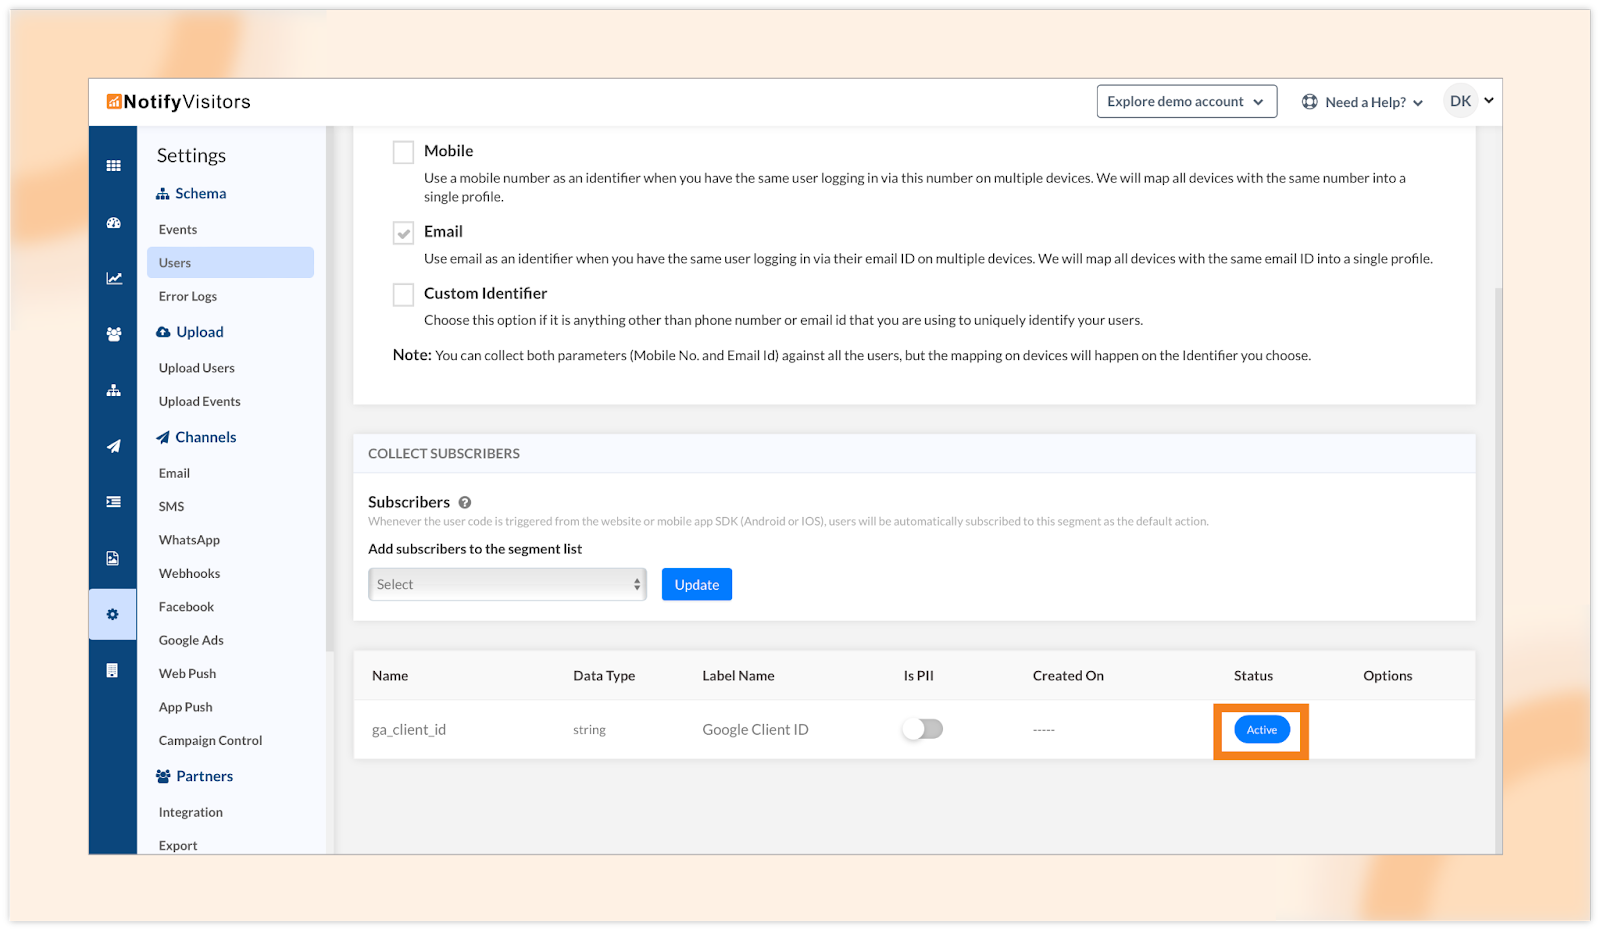
2. Tracking user’s GA (Google Analytics) ID
Get to know a lot more about your user with NotifyVisitors as we introduce a powerful addition to our user attribute tracking capabilities – the Google ID attribute. In addition to capturing various user details like name, email, phone number, city, and more, our system now seamlessly tracks the GA ID of users who visit your website/store via Google Search and create an account, enhancing your understanding of user interactions.
To track the user’s GA ID, you need to enable the Google ID attribute in your NotifyVisitors account. To do this, simply navigate to Settings, then Users, and activate the “ga_client_id” status. Once enabled, our system will start tracking the Google ID of users on your site.
Accessing this valuable data is a breeze. Head to Segments, then User List, click on a user’s name, and navigate to the Attributes section. Here, you can effortlessly view the Google ID associated with each user, providing deeper insights into their online behavior.
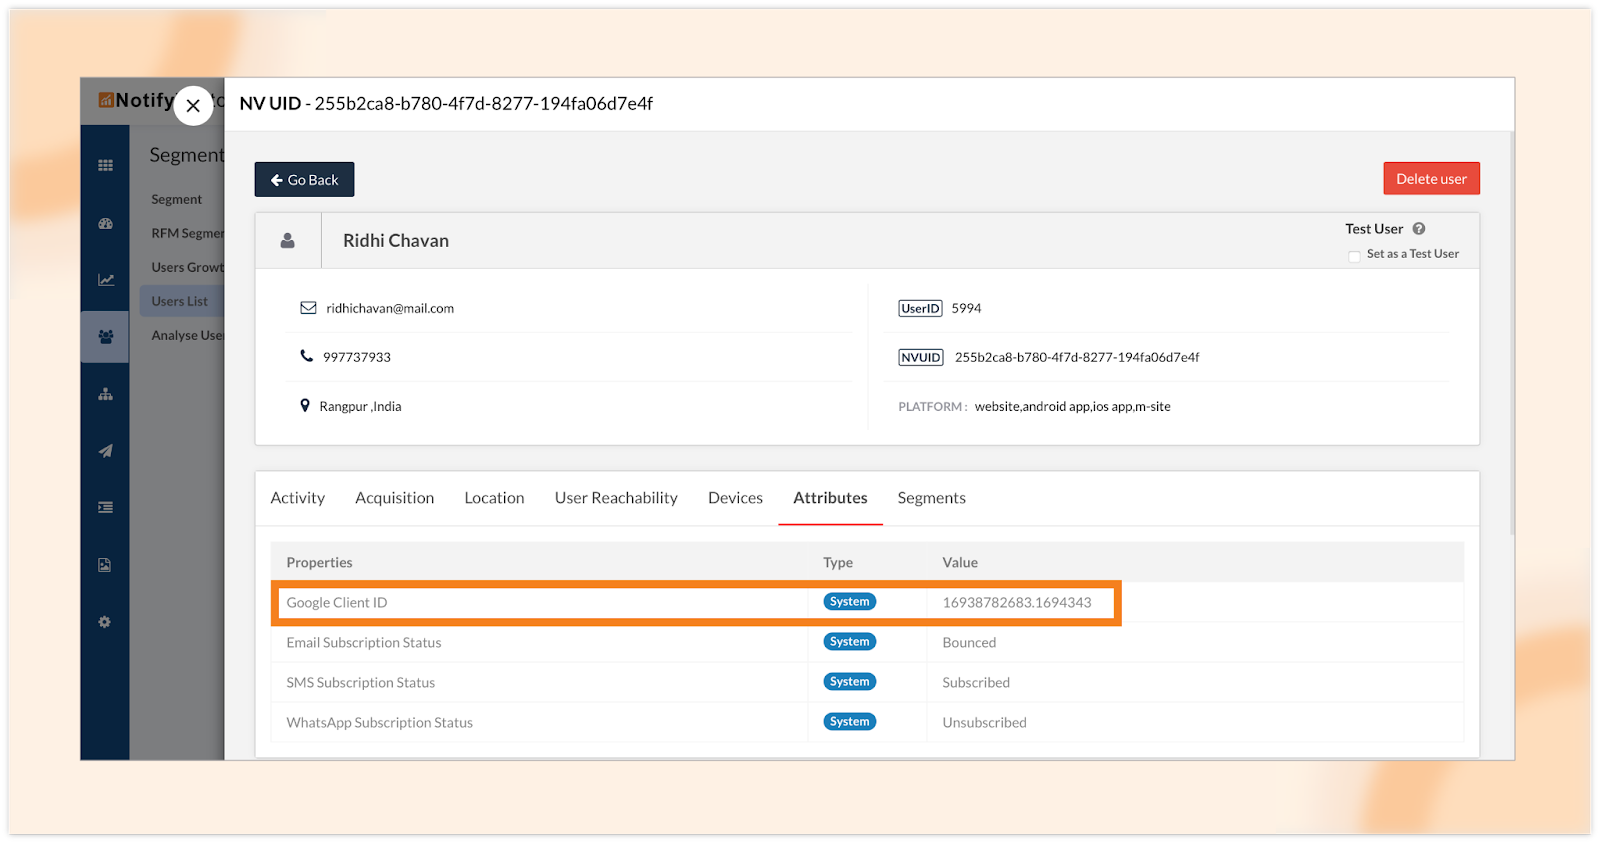
This newly introduced Google ID attribute opens doors for targeted campaigns, especially through Google Ads. Leverage this information to tailor your marketing strategies and engage with users more effectively.
3. Simultaneous tracking of users and events
Previously, our approach involved tracking users and events separately using distinct codes as:


However, this posed challenges when simultaneous tracking of users and events was required. The issue arose because when users and their actions were tracked independently, there was a potential time gap between user tracking and their registration in the software’s database. This time gap could lead to events being tagged incorrectly or not associated with their respective users.
In response to this, we used to do a manual process where a code was executed manually to track and tag events upon receiving a callback indicating that a user had been tracked.
To streamline and automate this simultaneous tracking process, we have now implemented a unified solution. We’ve created a new `UserEvent` function by combining the codes for user and event tracking. This results in a single, comprehensive code that efficiently tracks both users and events simultaneously, as shown below:

This enhancement not only eliminates the need for manual intervention but also ensures accurate and synchronized tracking of users and events performed by them.
Click here to learn more in detail.
4. Introducing the option to add private Email and SMS service providers
Expanding on our recent update introducing a private service provider for WhatsApp, we’re thrilled to unveil customizable options for private Email and SMS service providers. This enhancement enriches our platform’s capabilities, providing you with the flexibility to integrate any Email or SMS service provider of your choice, other than the ones already listed on our platform.
Private Email Service Provider (ESP)
Adding a private email service provider is now seamless. Navigate to Settings, then select the “Email” channel. Choose the “Service Provider” tab and click on “Add Service Provider.”
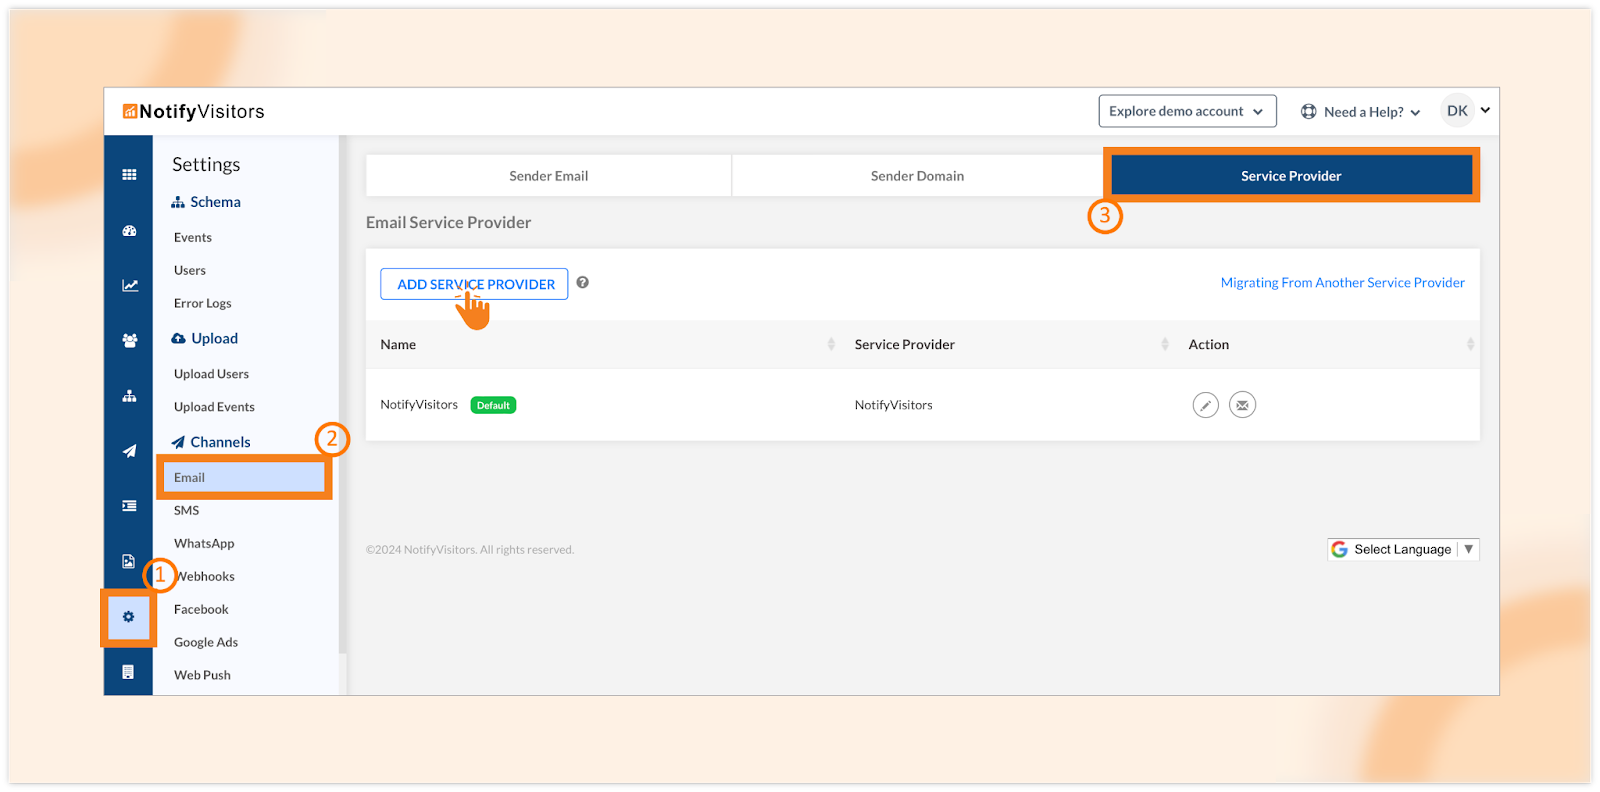
Now select “Private ESP” from the “Select service provider” dropdown menu. Complete the required fields, including name, endpoint URL, request type, basic authentication, body type & data, header, and sender email. Click “Save” to add your private ESP provider.
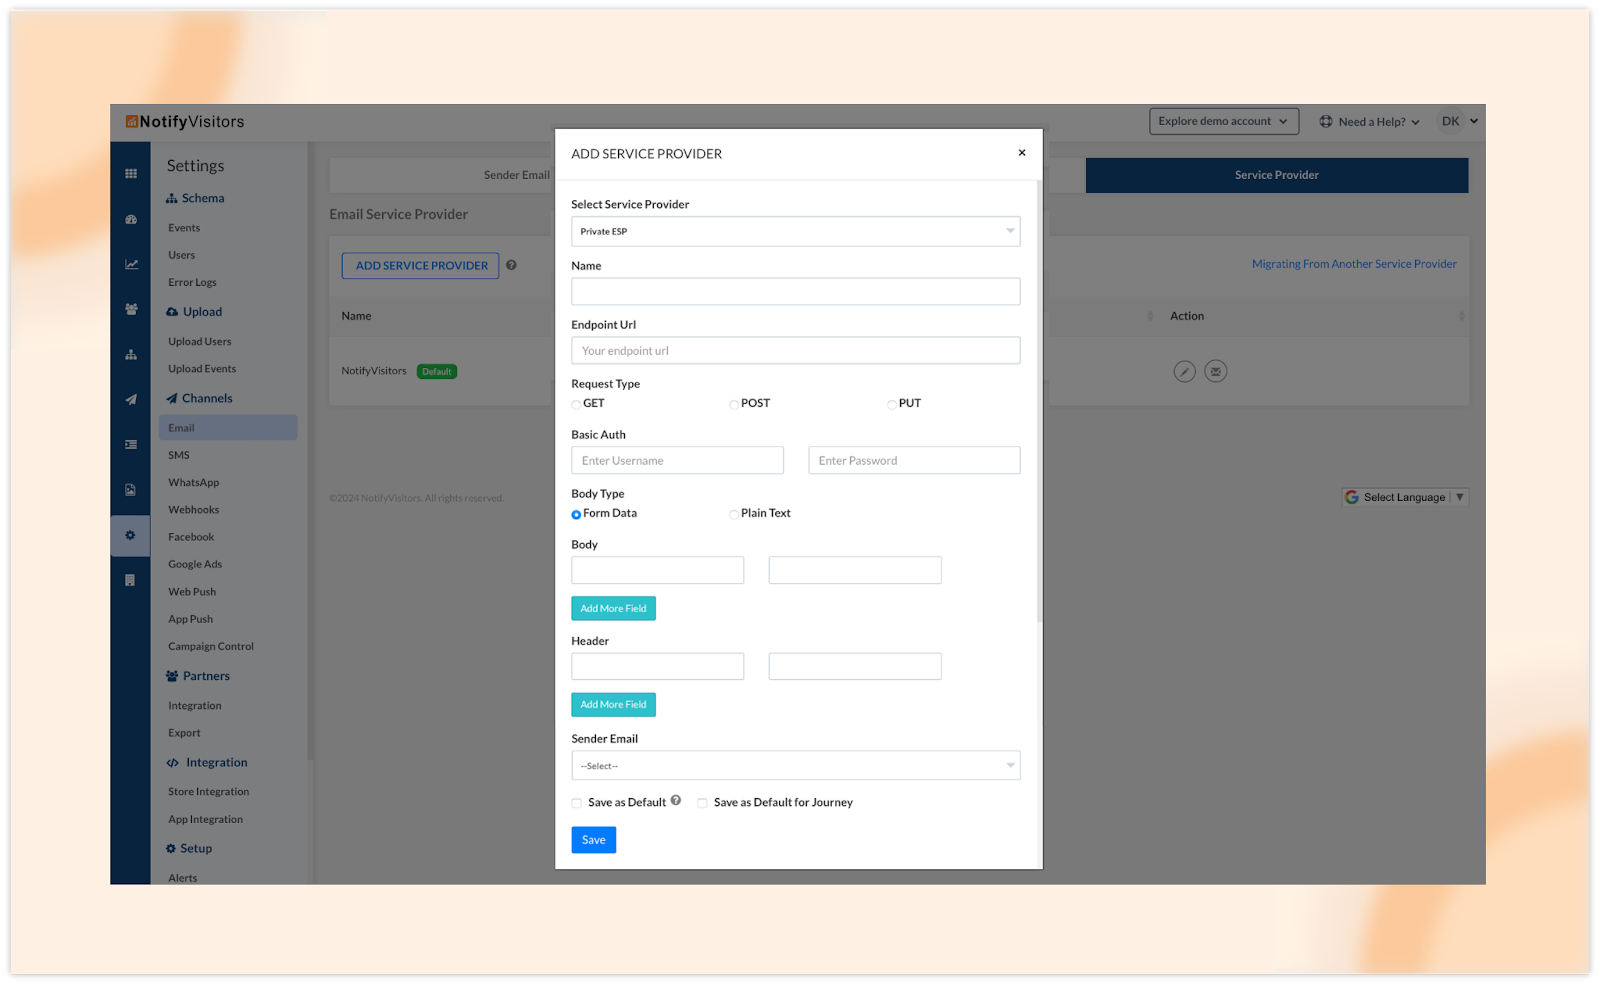
Once added, you can start sending emails using this service provider. Additionally, we offer a callback option for private service providers, enabling you to receive detailed statistics such as delivery status, opens, clicks, and more, akin to our inbuilt service providers.
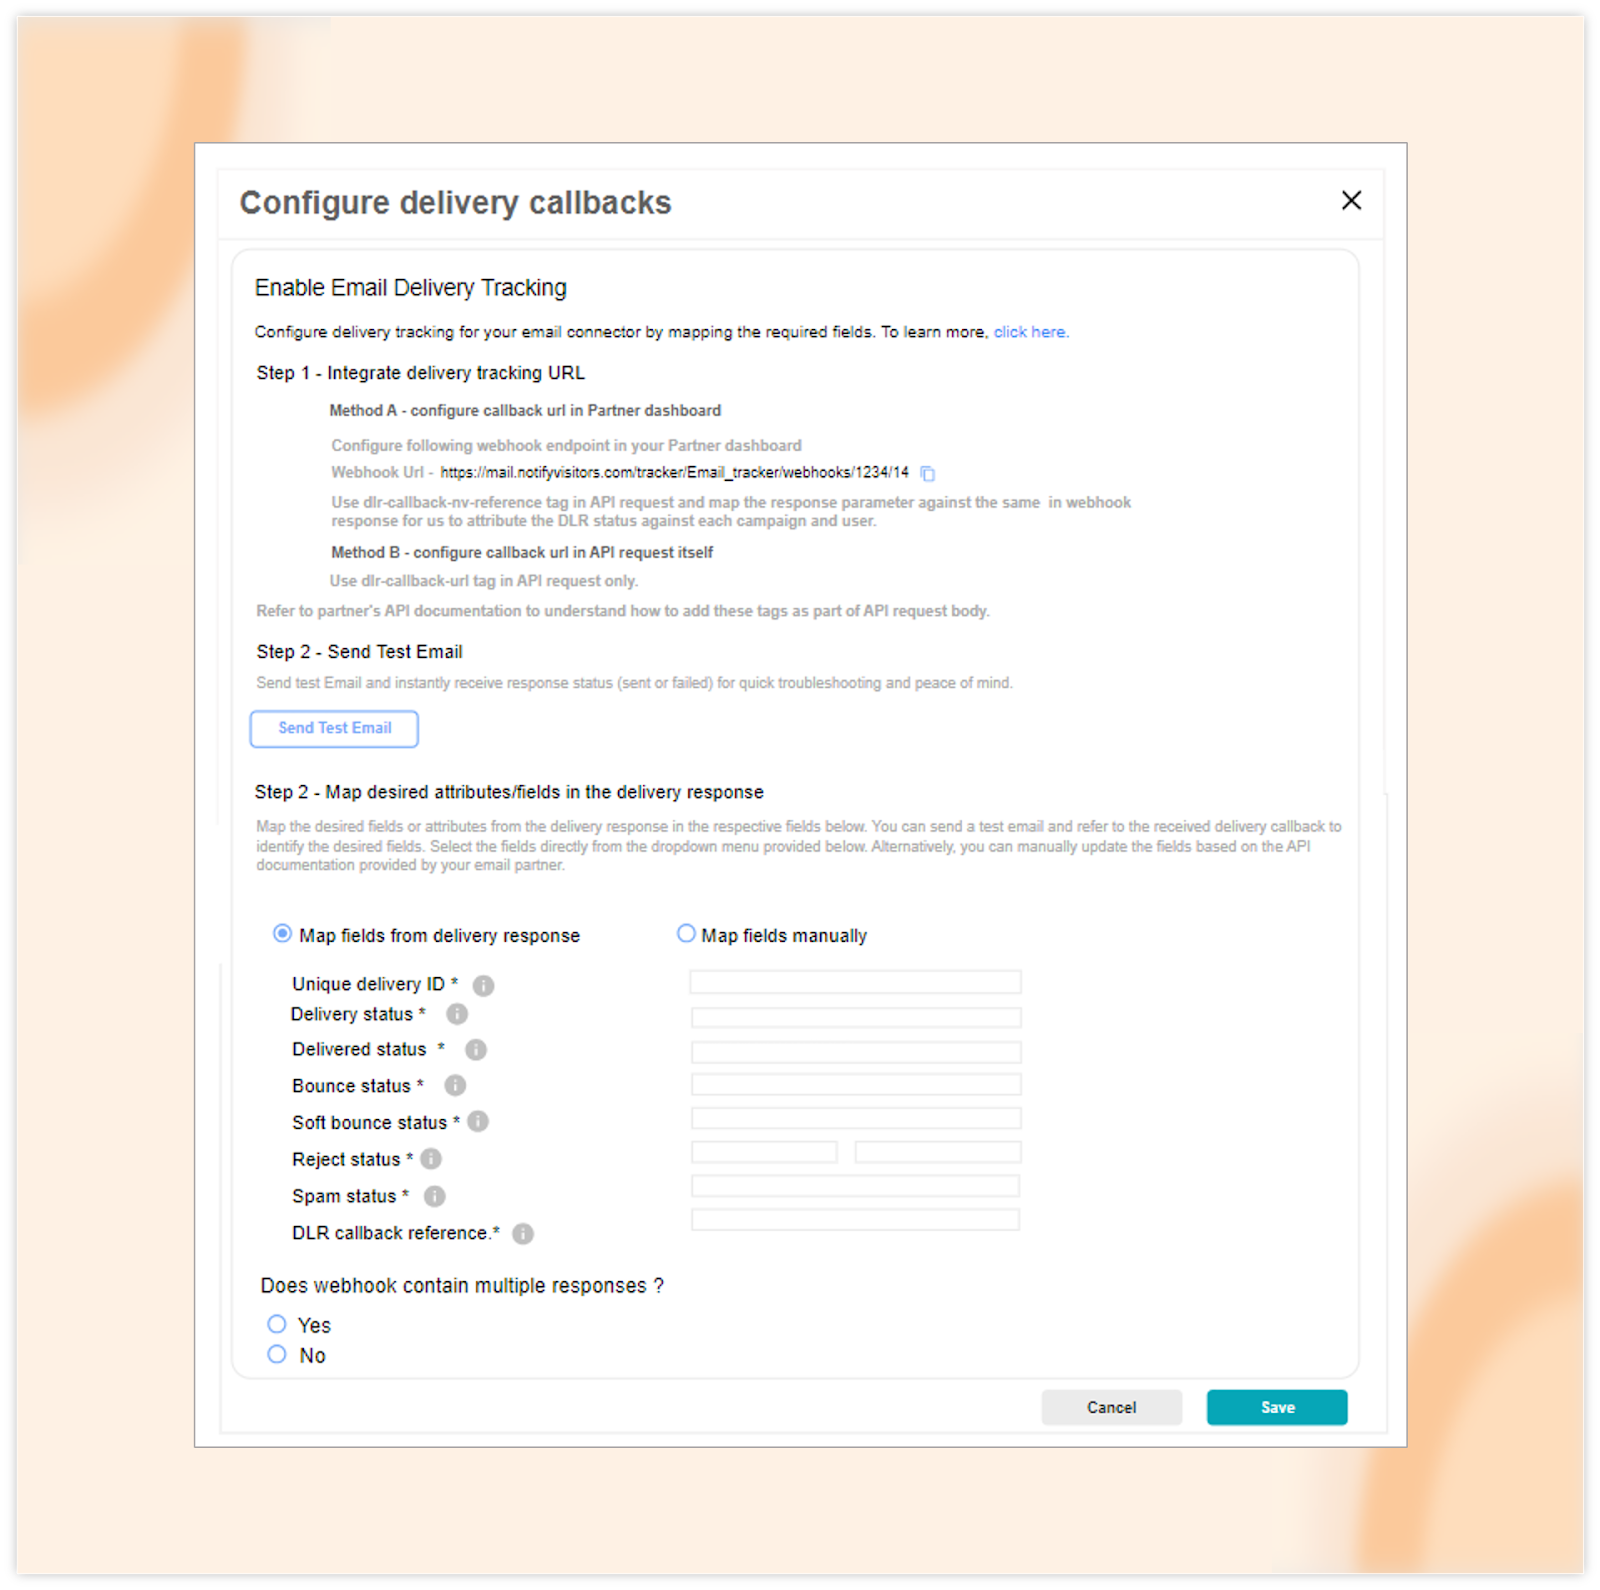
Setting Up delivery callback for private ESP
To configure the delivery callback, click on the third option (“Callback Configuration”) under the Actions header. A popup window will appear with configuration options. Follow a simple 3-step procedure: Integrate the delivery tracking URL (via webhook or API request), send a test message, and map the fields received in response to the test message.
Private SSP (SMS Service Provider)
The private SSP feature allows you to seamlessly integrate your preferred SMS service provider into our platform. To add a private SSP, navigate to Settings and select the “SMS” channel. Then, choose the “Add Service Provider” tab and click on the “Add Service Provider” button.
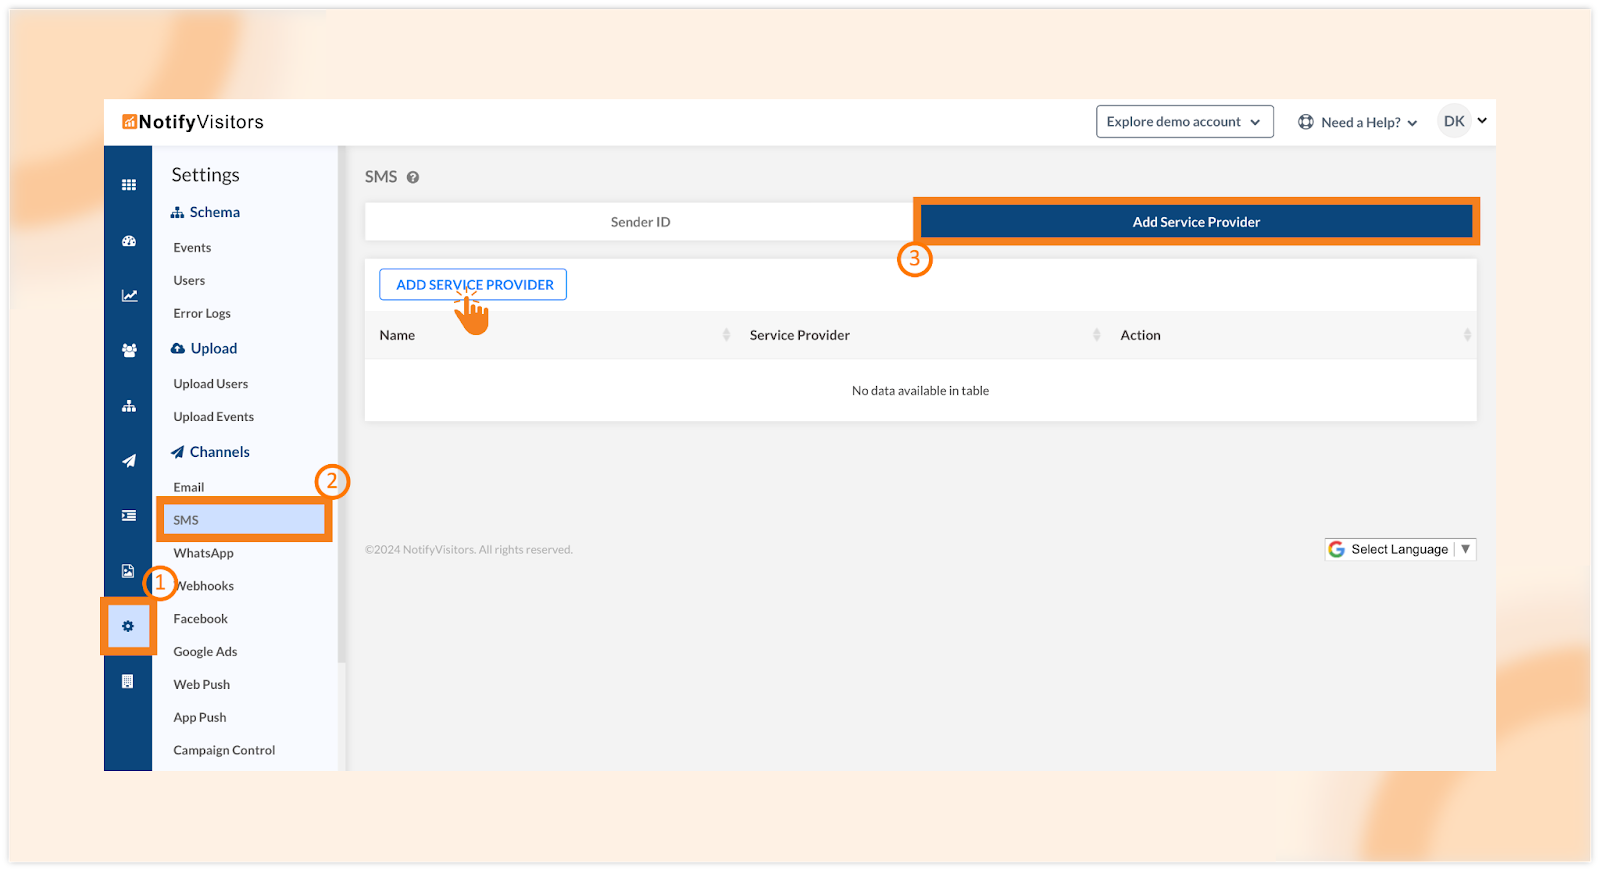
From the “Select service provider” dropdown menu, select “Private SSP.” Now, fill in the required fields such as name, endpoint URL, request type, basic authentication, body type & data, and header. At last, click “Save” to add your private SSP provider.
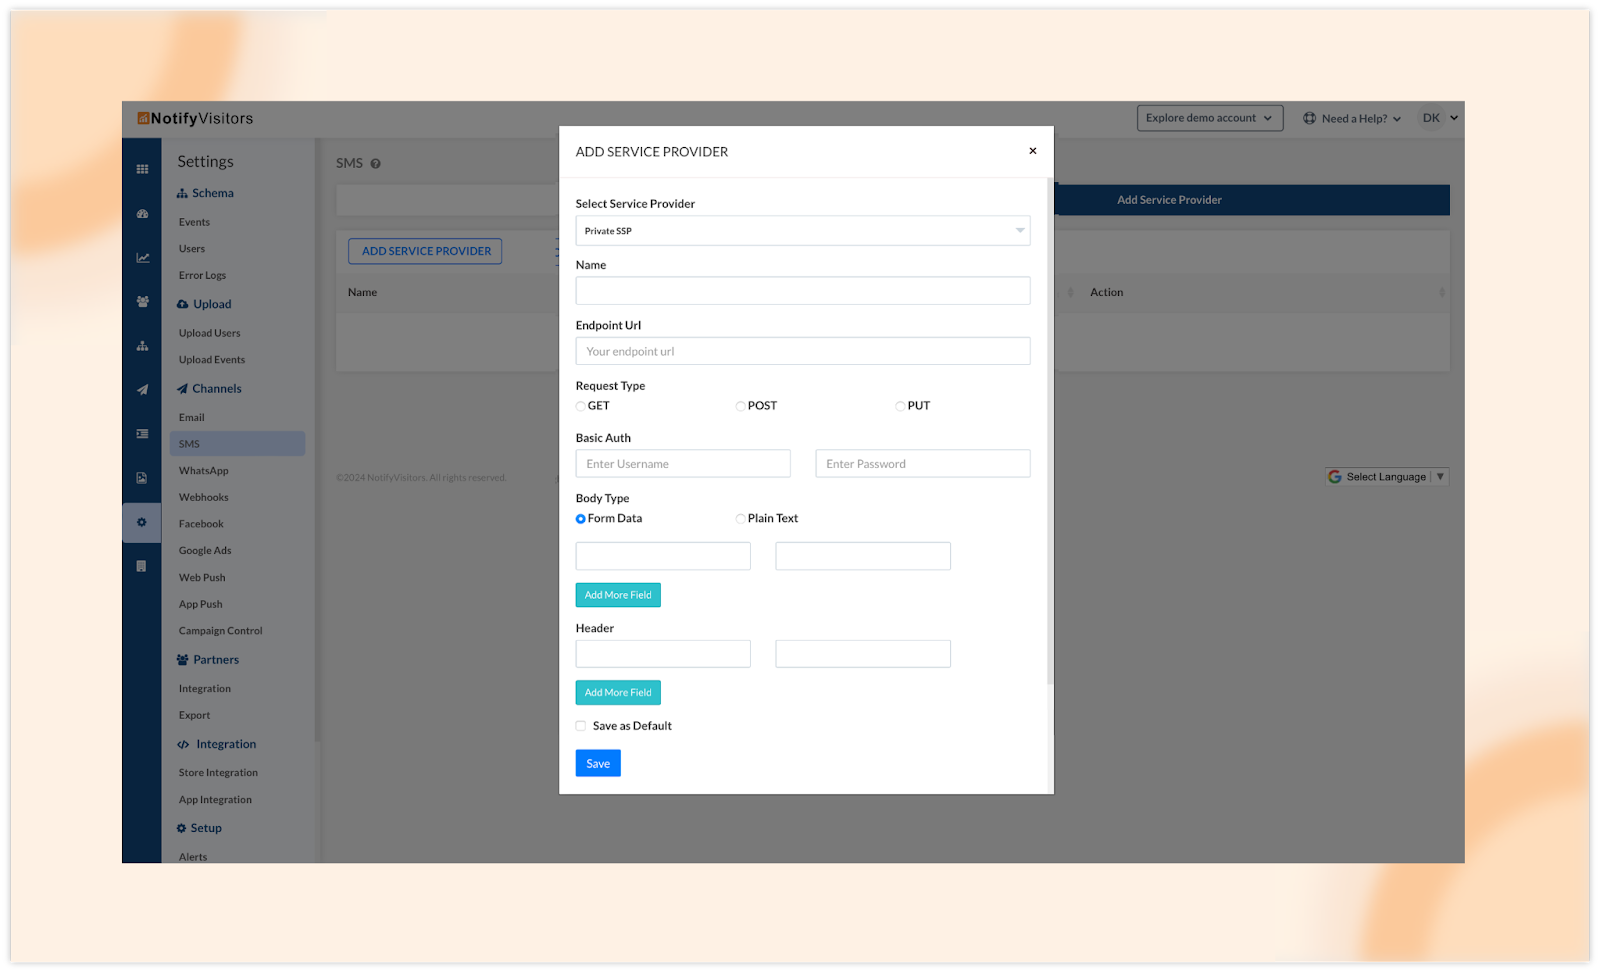
Your private SSP provider will now be added and ready for use.
Setting Up delivery callback for private SSP
To configure a callback for Private SSP, click on the callback icon under the Actions column. Follow the same procedure as done for Private ESP to set up the callback. With this, you’ll be able to view statistics such as SMS sent, delivered, clicked, failed, etc.
These new capabilities provide you with greater control over your communication channels, empowering you to tailor your messaging strategy to your specific needs.
Conclusion
These four exciting features mark a significant step forward in enhancing your experience with NotifyVisitors. From the intuitive Calendar view for campaigns to the seamless integration of private Email and SMS service providers, we’re committed to providing you with the tools you need to optimize your marketing strategies.
To stay informed about our latest releases and access these features immediately, click the “Allow” button at the top of your screen for push notifications. For inquiries, suggestions, or a demo, reach out to us at support@notifyvisitors.com. Our dedicated team is ready to assist, ensuring you maximize the benefits of these exciting enhancements.
Thank you for choosing NotifyVisitors as your trusted partner in marketing success. We look forward to continuing to empower you with innovative solutions to drive your business forward.

In this edition of our Release Notes, we are thrilled to introduce a highly anticipated feature – Coupon Codes. This Read more

Welcome to our latest release notes! This month brings four exciting features to enhance your experience: seamlessly sync NotifyVisitors segments Read more

Welcome to our latest release notes! This month, we're excited to introduce four exciting features: WhatsApp URL Tracking, Private WhatsApp Read more

Welcome to our latest release notes! This month, we're thrilled to bring you three exciting new features that enhance your Read more

