
 Email
Email SMS
SMS Whatsapp
 Web Push
 App Push
 Popups
 Channel A/B Testing
  Control groups Analysis
 Frequency Capping
 Funnel Analysis
 Cohort Analysis
 RFM Analysis
 Signup Forms
 Surveys
 NPS
NPS Landing pages personalization
  Website A/B Testing
  PWA/TWA
 Heatmaps
 Session Recording
 Wix
Wix Shopify
 Magento
 Woocommerce
 eCommerce D2C
  Mutual Funds
 Insurance
 Lending
  Recipes
  Product Updates
 App Marketplace
 Academy
Welcome to our latest release notes! This month brings four exciting features to enhance your experience: seamlessly sync NotifyVisitors segments with Google Ads for targeted precision, receive timely alerts for Scheduled Campaigns and Event Occurrences, analyze campaigns revenue in-depth with the Split feature, and streamline segment management with the addition of labels.
Explore these all new updates to optimize your campaigns and stay ahead in your marketing strategies!
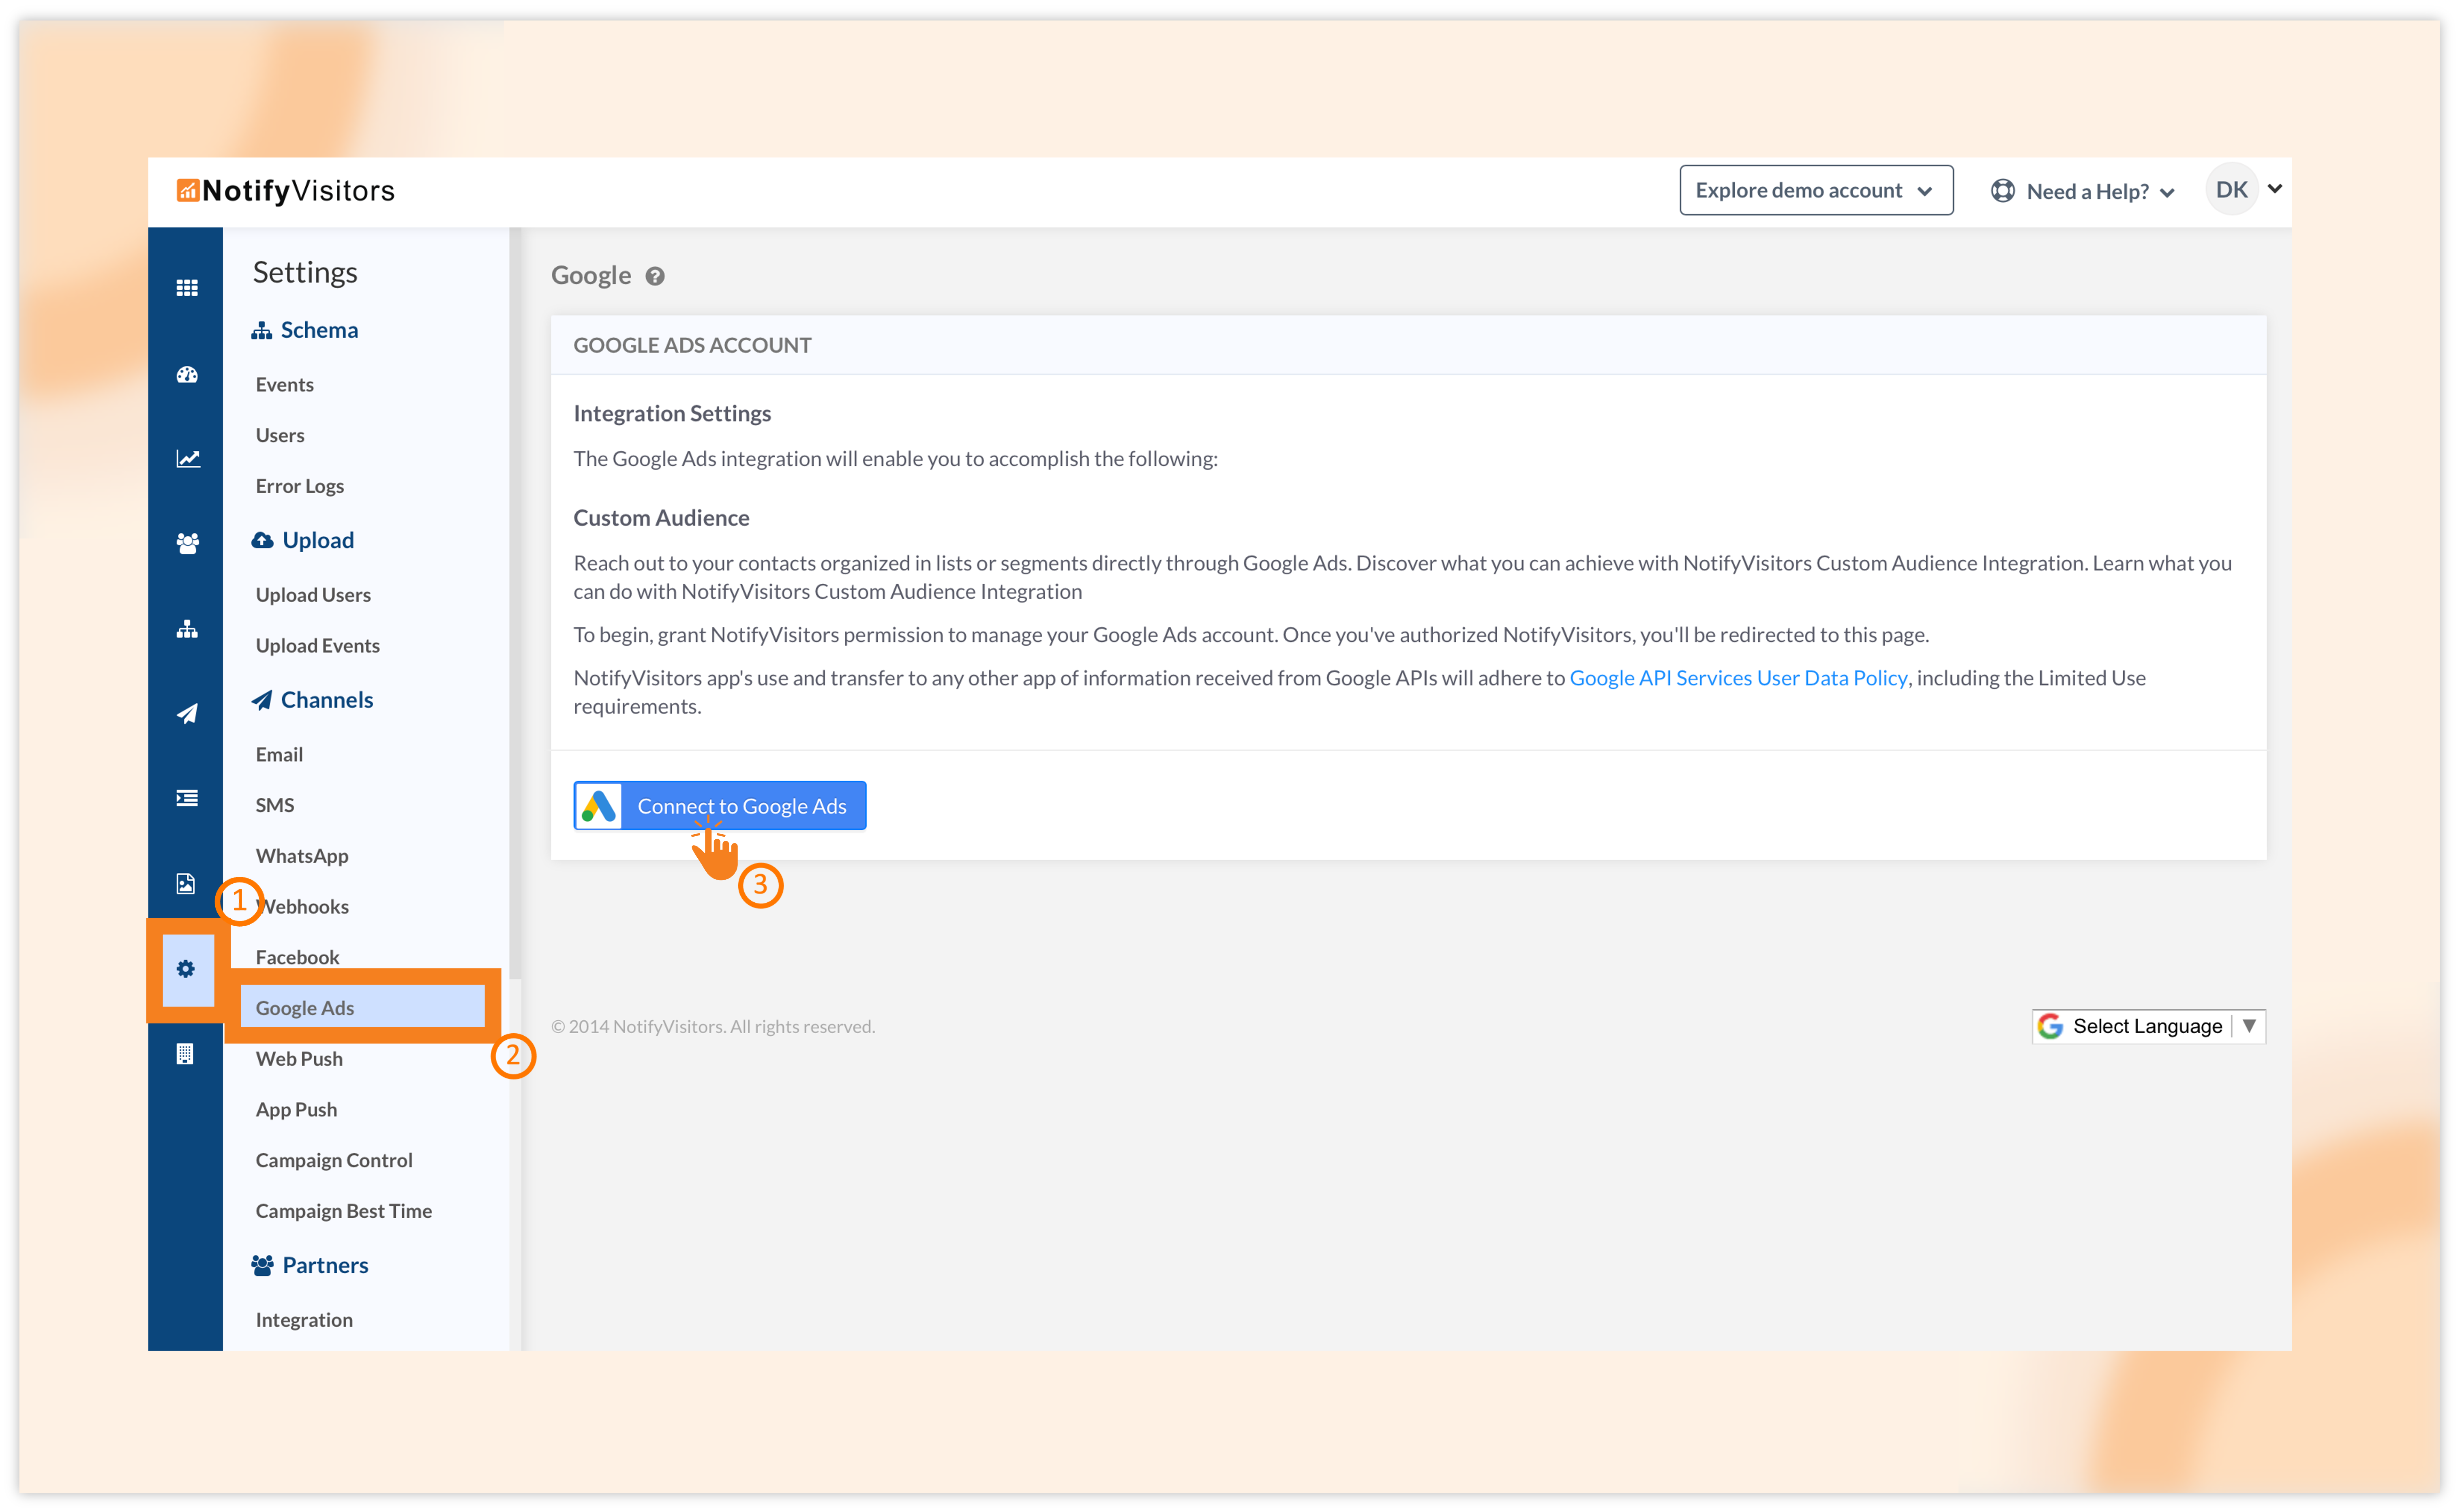
1. Sync your NotifyVisitors segments with Google Ads to display personalized ads.
Now, you can seamlessly integrate your Google Ads account with NotifyVisitors for targeted advertising to your user base. Follow these steps: Go to Settings > Google Ads, and click on the “Connect to Google Advertising” button.
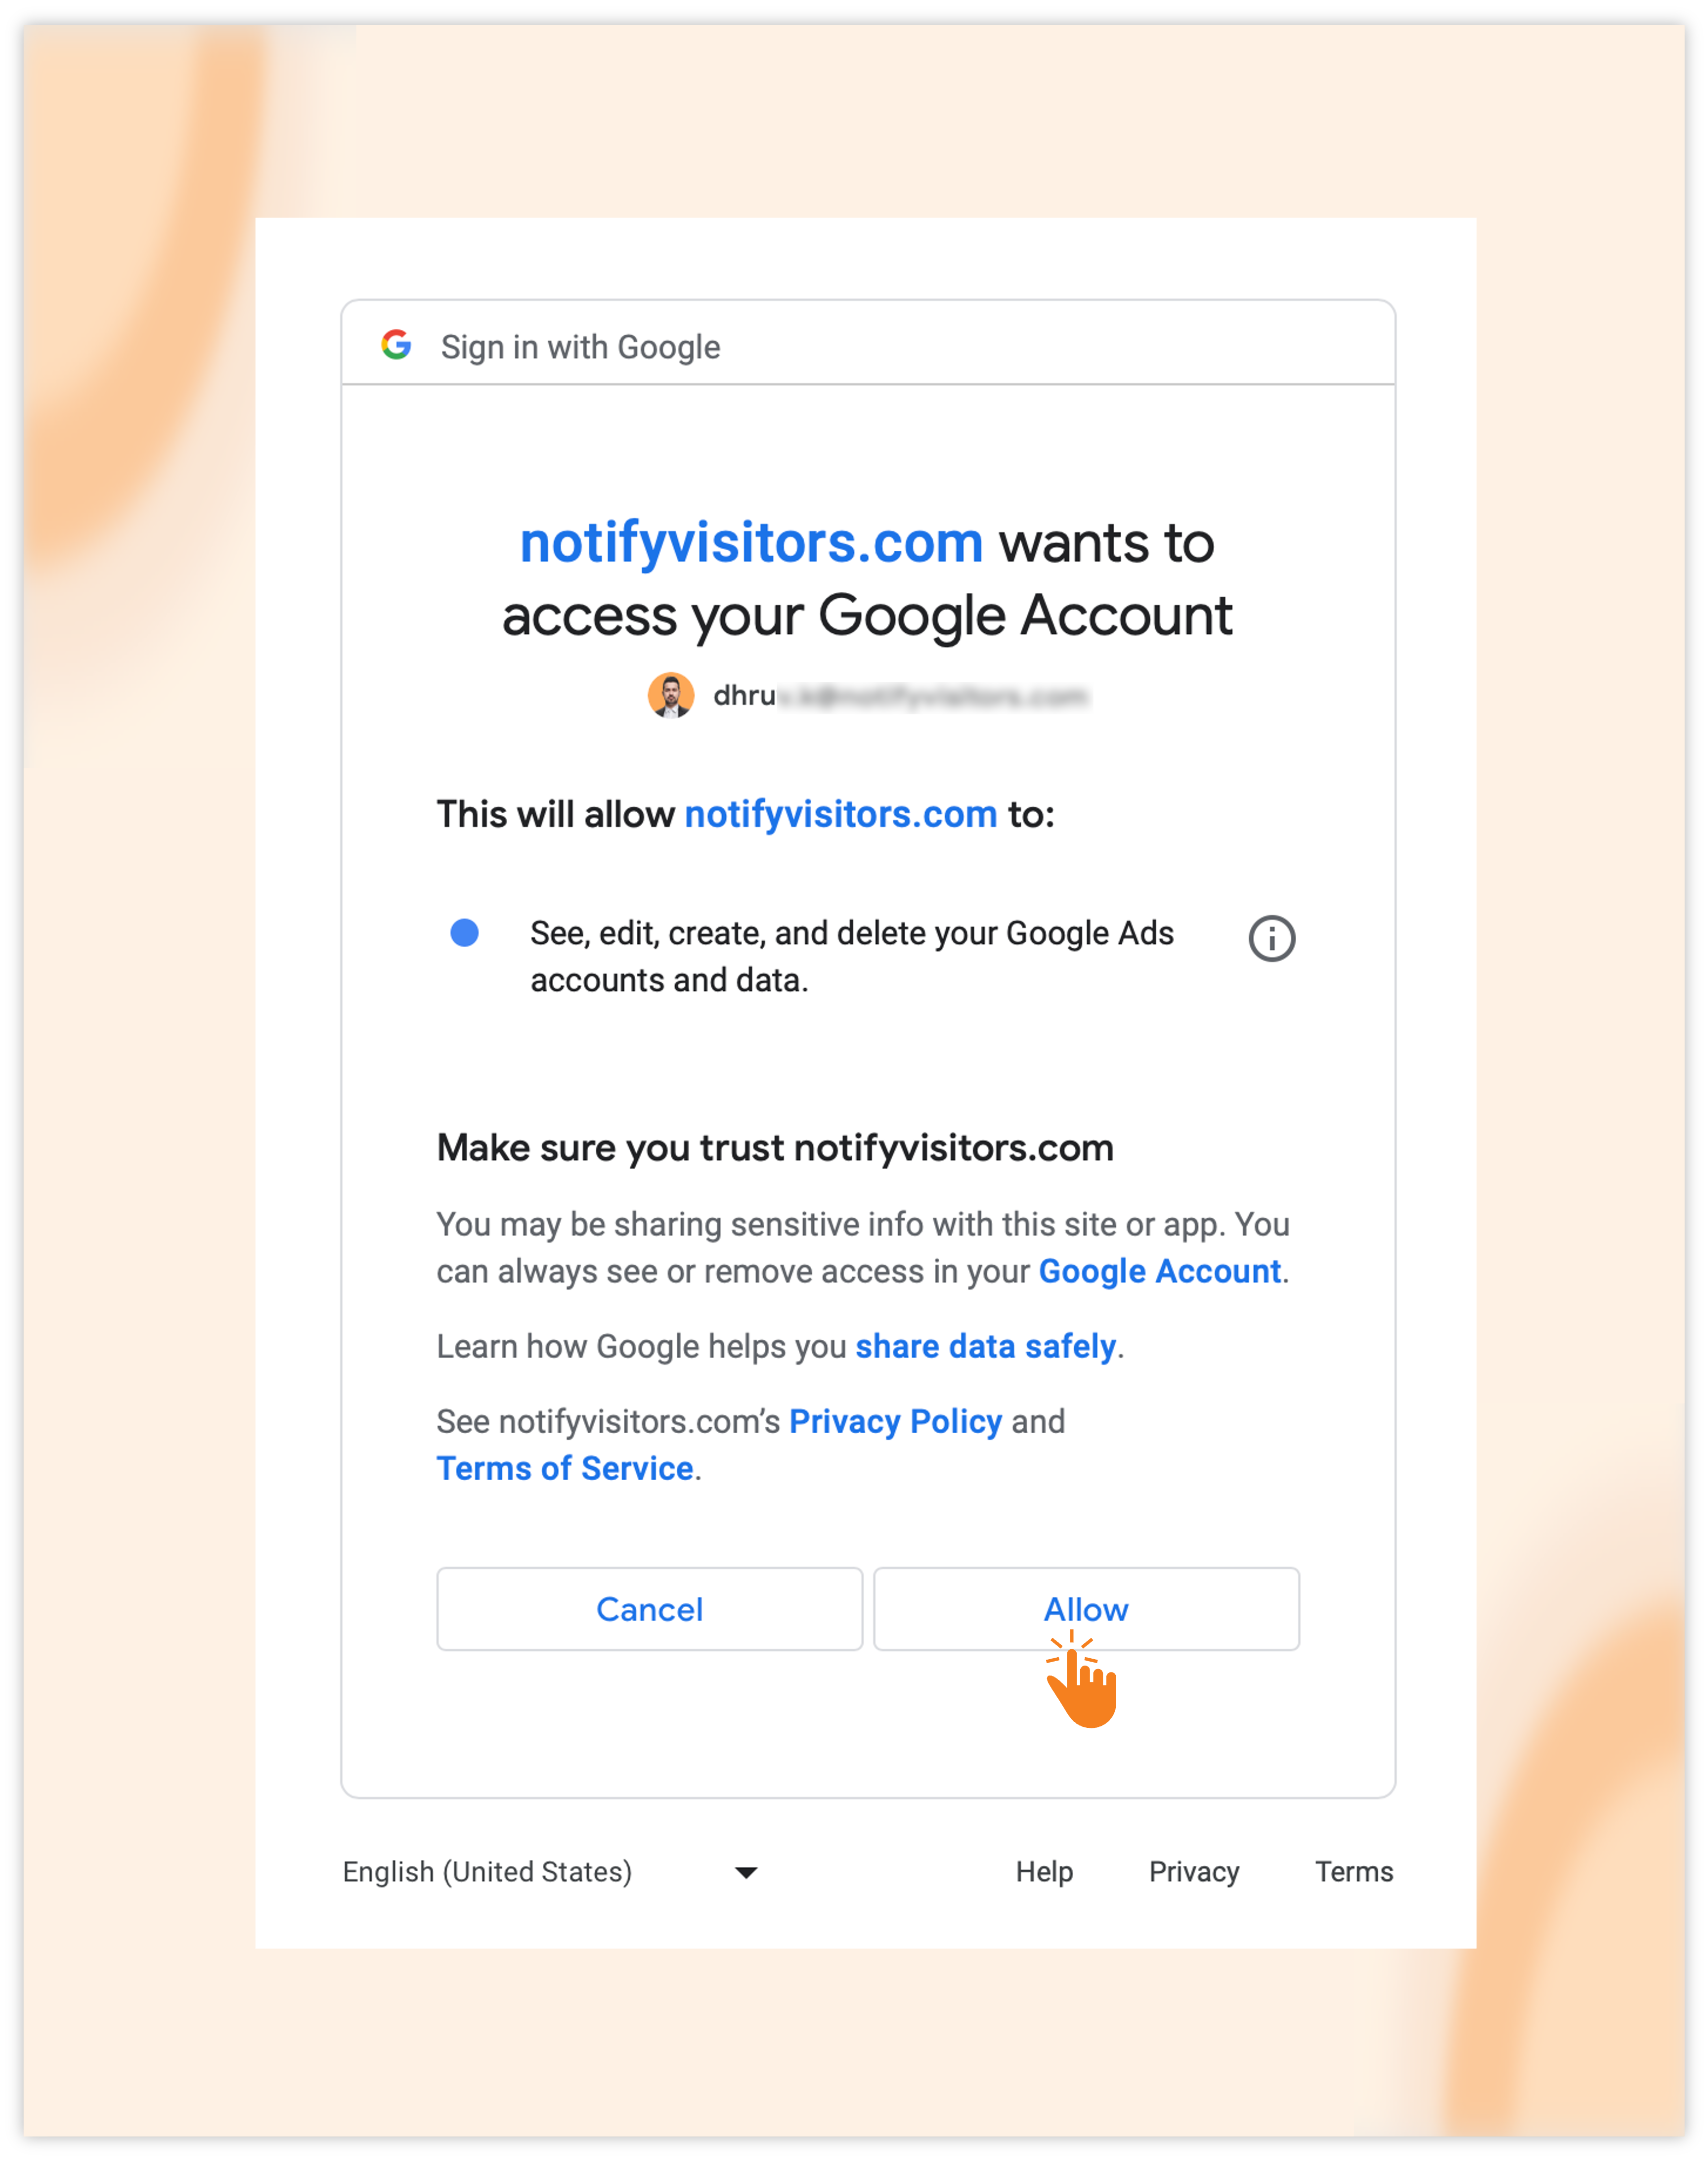
A popup window will appear requesting data sharing permissions; click “Allow” to establish the connection.
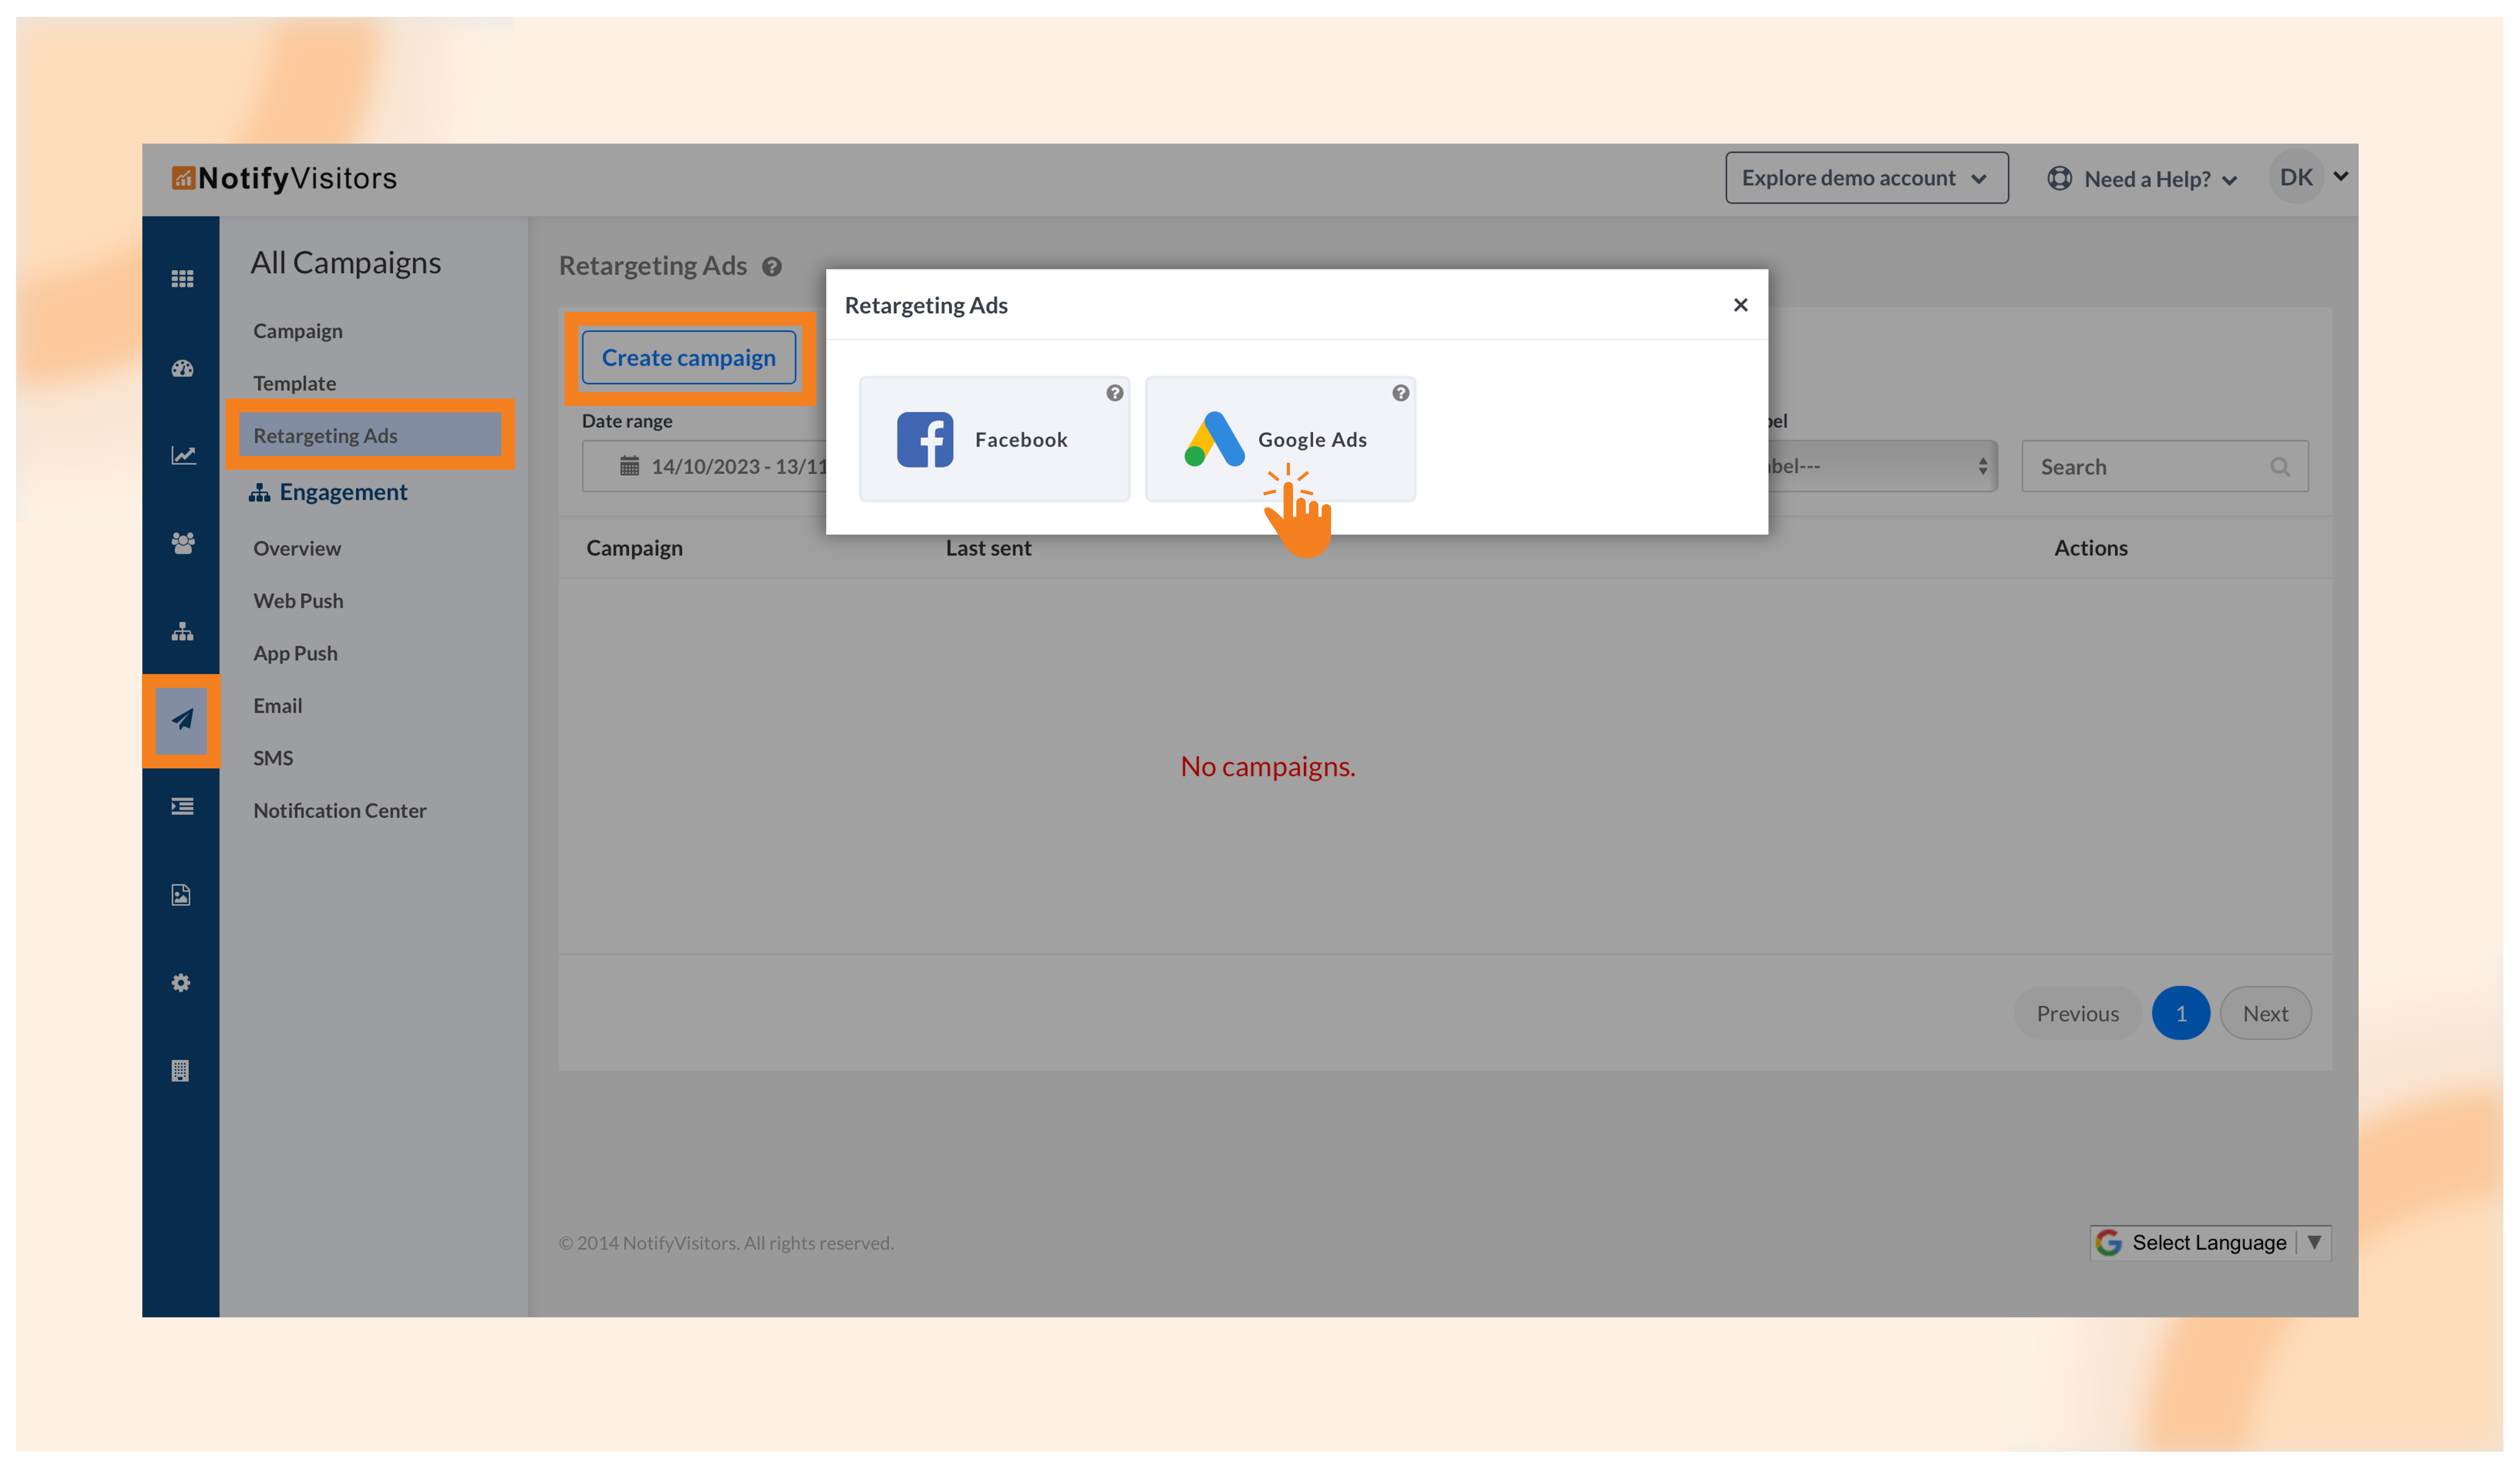
To initiate an advertising campaign, navigate to the Campaigns section and choose Retargeting Ads. Click on “Create Campaign” and select “Google Ads.”
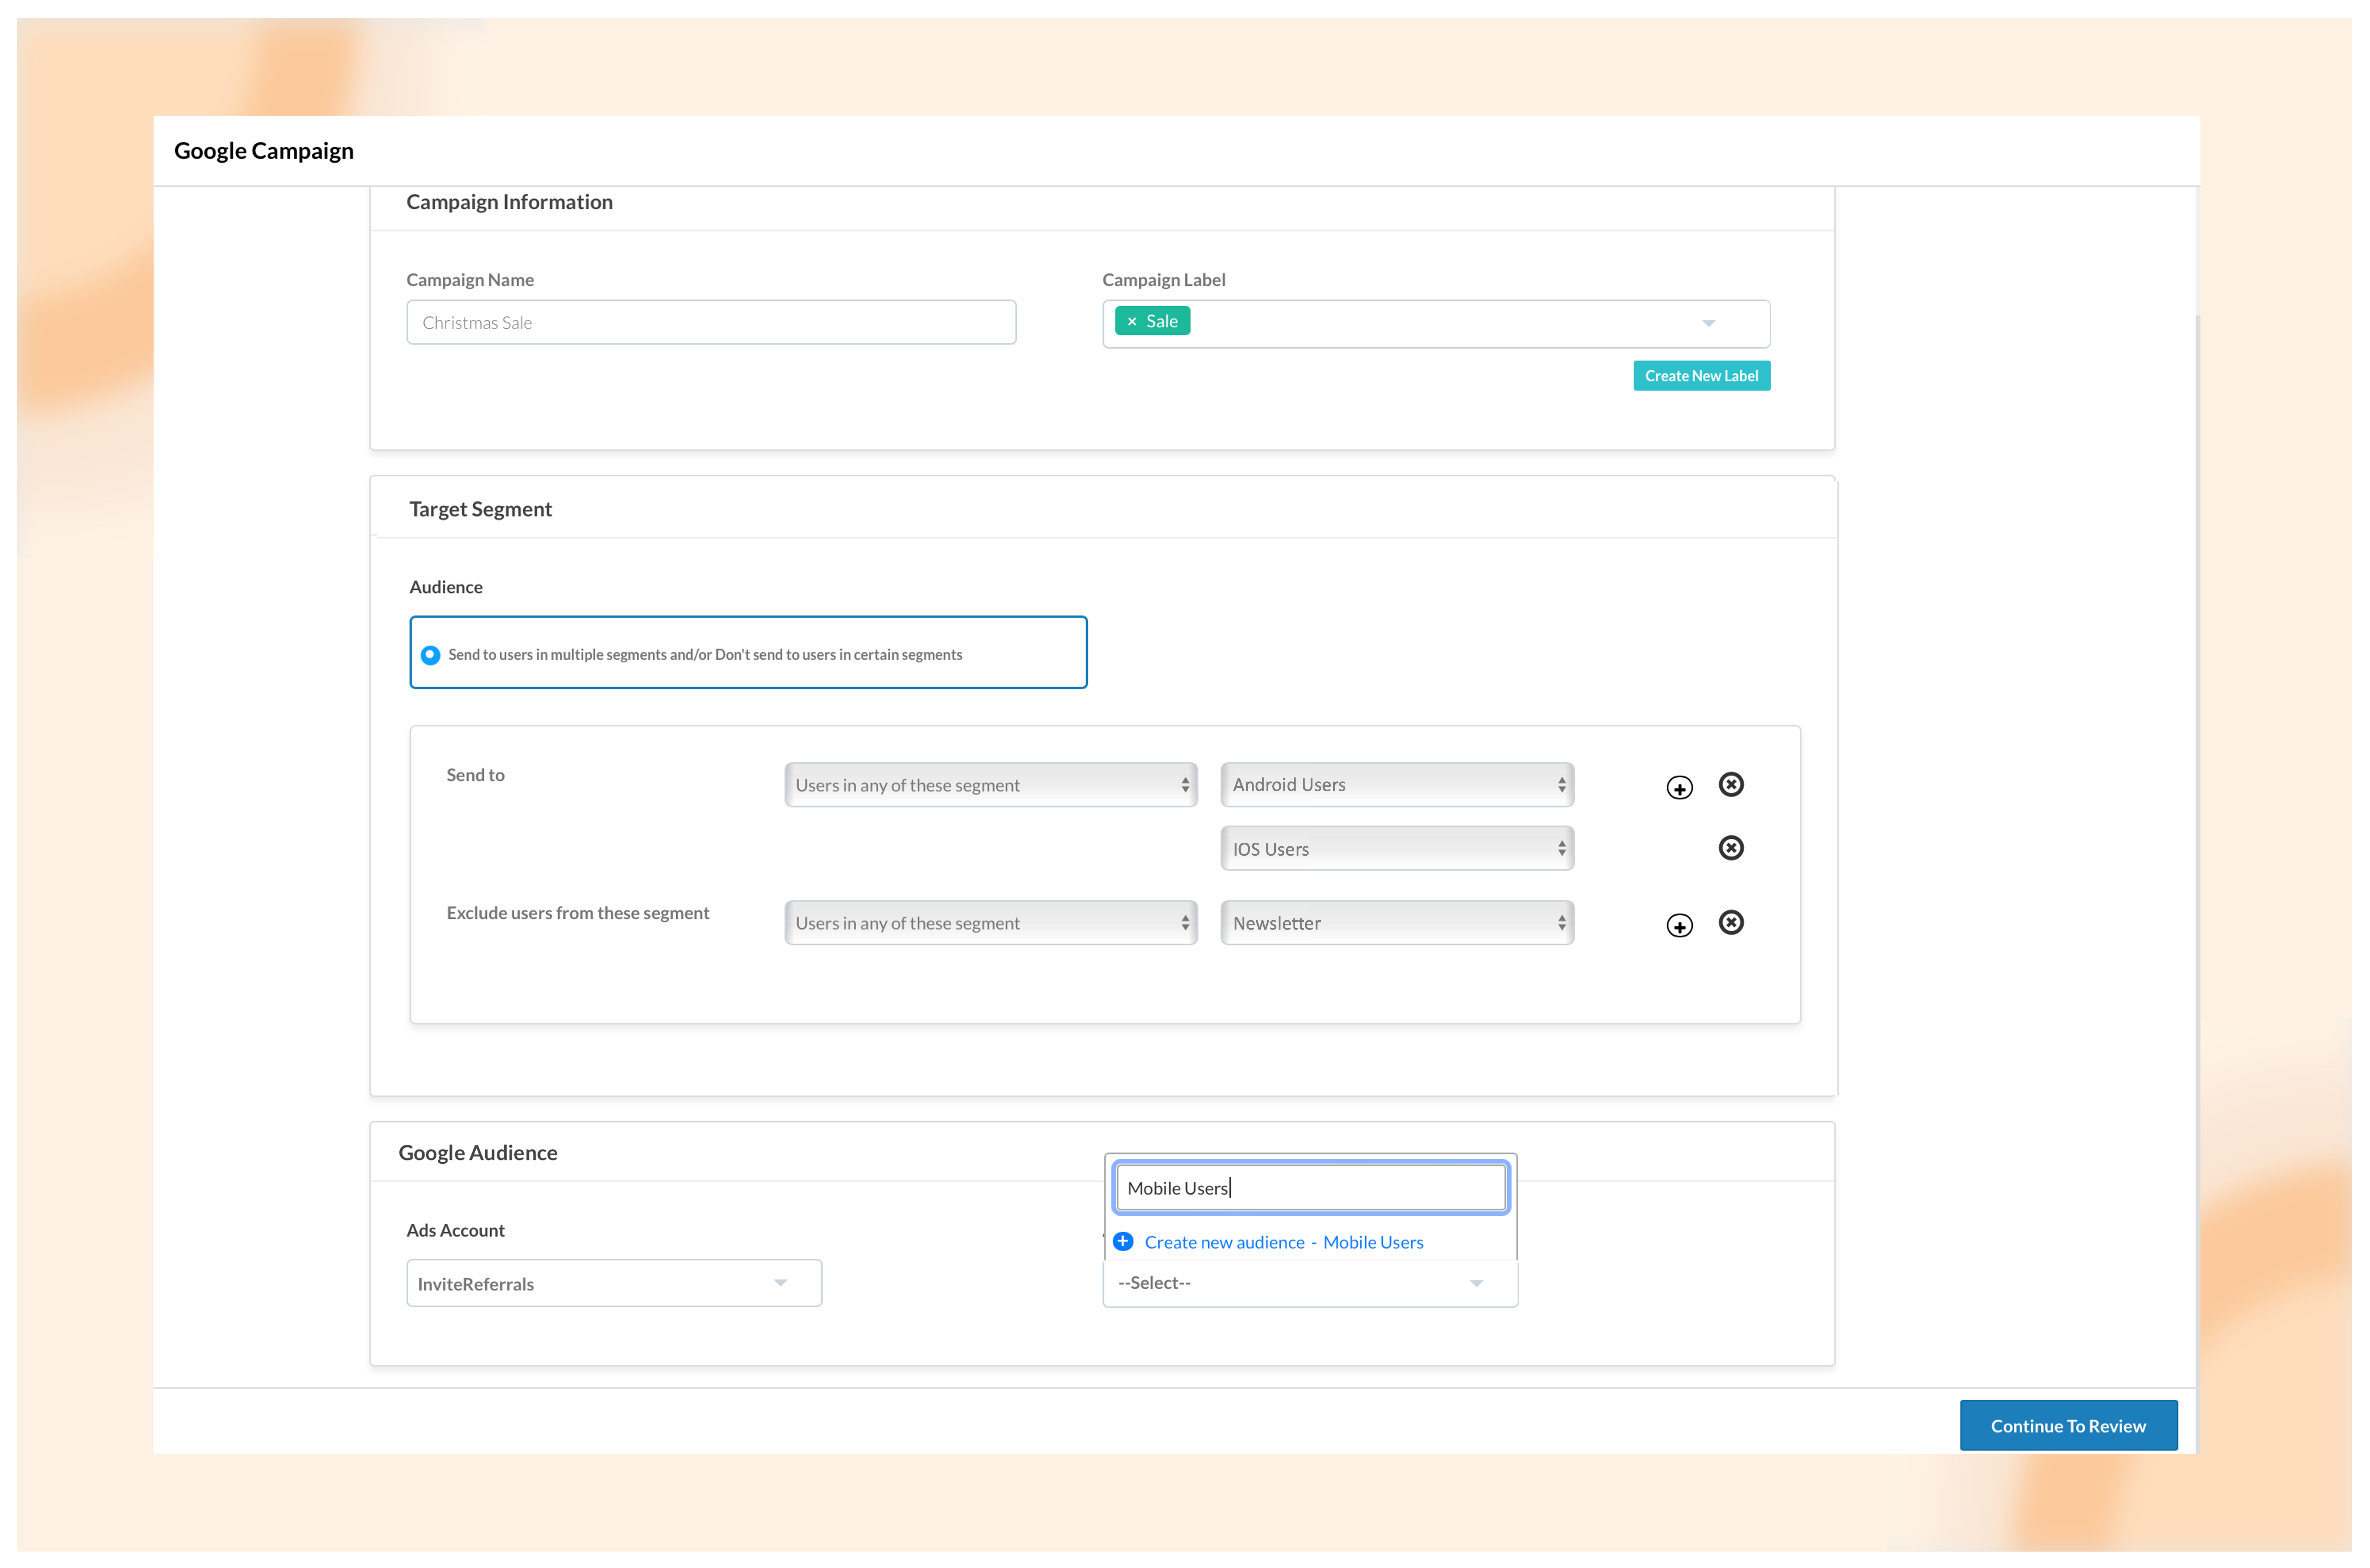
You’ll be directed to a campaign creation interface where you need to input campaign details such as name, label, target segment (choose the segment to sync with Google Ads), and Google audience (pick your preferred Google Ads account and select or create an audience list).
After completing the information, click on “Continue” to review. Double-check the details, and then choose “Continue to Send/Schedule.”
Here, you can opt for a one-time campaign by sending it immediately or scheduling it for a later time. Alternatively, you can set up a recurring campaign, automatically syncing new users from your NotifyVisitors segment to your Google audience list.
Finally, click on “Finish,” and your campaign will either be sent immediately or activated based on your chosen scheduling option.
2. Alerts for scheduled campaigns and event occurrences
We’ve introduced alert options for both your scheduled campaigns and event occurrences to enhance your monitoring capabilities.
Scheduled campaigns:
For scheduled campaigns, this feature is particularly useful for detecting any failures in your scheduled campaigns. Now, you can schedule your campaigns with peace of mind. If an issue arises and a campaign fails, our system will automatically send you an email containing essential information such as the campaign name, failure time, scheduled time, campaign ID, and the reason for the failure. This allows you to take immediate action.
To set up an alert, navigate to Settings > Alerts, then click on “Create New Alert.”
Enter your alert name, choose “Activity Status” from the metrics change dropdown, and select your campaign channel from the second dropdown—or opt for all activities. Lastly, enter the email address where you want to receive alerts and click on “Create.”
If you choose a specific campaign channel (e.g., email), you will receive alerts for any failed scheduled email campaigns. If you select all activities, you will receive failure alerts for all campaign channels.
Event occurrences:
For event occurrences, you can configure alerts for increases or decreases in the value of a specific event. For instance, you can set up alerts to notify you if your revenue event decreases by more than 20% compared to the previous week.
To create an alert for event occurrences, follow the steps mentioned earlier. In the metrics change dropdown, choose “Event Occurrences,” then select the specific event from the second dropdown. If you want alerts for specific event attributes, click on the filter button to add attributes.
Specify the frequency for event alerts (daily or weekly), choose whether the alert should be triggered by an increase or decrease in the event’s value, and define the value criteria (specific value or percentage). If you opt for a percentage, our system will compare it with the previous week or yesterday, depending on your weekly or daily preference. Finally, enter your email address and click “Create.”
3. Introducing the split feature in campaign revenue for attribute-based comparison
When it comes to campaign revenue, we provide several filtering options, including filtering based on events or via attribution models. Additionally, we have incorporated attribute filter options, enabling you to filter data based on events with multiple conditions. While these features have greatly expanded filtering capabilities, the ability to compare different attributes was previously unavailable.
To address this, we are excited to introduce our new “Split By” feature in the campaign revenue section. This feature opens up a wide range of possibilities. For instance, you can choose a platform from the dropdown menu, hover over the bars of a specific channel (e.g., app push), and instantly see the revenue generated across different platforms such as Android, iOS, or web. You can also view this data in a tabular format.
Likewise, you can experiment with various attributes to compare revenue, offering a more comprehensive understanding of your campaign performance. This enhancement provides a versatile tool for analyzing and comparing revenue across different dimensions, enriching your insights into campaign effectiveness.
4. Segment labels
Similar to the labeling feature in campaigns, we’ve now introduced the labeling functionality in segments. This allows you to categorize and group similar segments together, streamlining the process of locating and managing segments effectively.
To utilize this feature, follow the standard procedure for creating a segment. Once you have defined the criteria for the segment and clicked on “Create,” you will be prompted to assign a name to your segment. In the same window, you will now find the option to choose a label. From the dropdown menu, select one of your existing labels or enter a name to search. If you input a new name, you will be prompted to create a new label.
Once labels are applied to your segments, you can filter these segments by selecting a particular label from the “Segment Label” dropdown menu.
This feature enhances the organization and accessibility of segments, offering a more efficient way to manage and navigate through your segmented data.
Conclusion
Experience seamless integration with Google Ads, proactive alerts, in-depth campaign analysis, and enhanced segment management – all crafted to empower your marketing endeavors with precision, insights, and operational efficiency. Embrace these updates to position yourself at the forefront of delivering targeted, impactful campaigns. Anticipate continued success with our evolving platform.
To stay informed about our latest releases and access these features immediately, click the “Allow” button at the top of your screen for push notifications. For inquiries, suggestions, or a demo, reach out to us at support@notifyvisitors.com. Our dedicated team is ready to assist, ensuring you maximize the benefits of these exciting enhancements.

Welcome to our latest release notes! This month, we're excited to introduce four exciting features: WhatsApp URL Tracking, Private WhatsApp Read more

Welcome to our latest release notes! This month, we're thrilled to bring you three exciting new features that enhance your Read more

Welcome to our latest release notes! This month, we're introducing two new features: Control group and WhatsApp communication preferences. Control Read more

Greetings and welcome to our latest release notes! In our continuous pursuit of improvement, this month's focus has yielded significant Read more

