
 Email
Email SMS
SMS Whatsapp
 Web Push
 App Push
 Popups
 Channel A/B Testing
  Control groups Analysis
 Frequency Capping
 Funnel Analysis
 Cohort Analysis
 RFM Analysis
 Signup Forms
 Surveys
 NPS
NPS Landing pages personalization
  Website A/B Testing
  PWA/TWA
 Heatmaps
 Session Recording
 Wix
Wix Shopify
 Magento
 Woocommerce
 eCommerce D2C
  Mutual Funds
 Insurance
 Lending
  Recipes
  Product Updates
 App Marketplace
 Academy
Greetings and welcome to our latest release notes! In our continuous pursuit of improvement, this month’s focus has yielded significant enhancements across several key areas.
Firstly, our latest update includes a game-changer: product feed feature. With this powerful addition, you can effortlessly implement cross-selling and upselling recommendations to your customers. Whether it’s showcasing best-selling products, most-viewed items, or personalized suggestions, this feature empowers you to boost your marketing efforts and enhance the customer experience.
Additionally, we’re excited to introduce the WhatsApp Unsubscribed event. Now, you can seamlessly track when users opt out of receiving WhatsApp messages. This valuable insight enables you to refine your messaging strategy and optimize content delivery.
Last but not the least, we’ve streamlined the WhatsApp template approval process. This means a more efficient and user-friendly experience when creating WhatsApp templates, making it easier than ever to communicate with your audience through this popular messaging platform.
Now, let’s delve into these features in detail.
Product feed feature added in brand assets
Our new Product Feed feature is designed to facilitate the delivery of personalized product recommendations to your customers through email. To make use of this feature, you’ll need to sync your Shopify catalog with NotifyVisitors. It’s important to note that this feature is currently exclusively available for Shopify stores.
To initiate the synchronization process, navigate to the “Settings” section, select “Store Integration,” and then choose “CMS.” Within this section, click on the “Configure” button. Here, you’ll find the option to enable the “Sync Catalog Data” feature. Once activated, your catalog data will automatically synchronize every 24 hours.
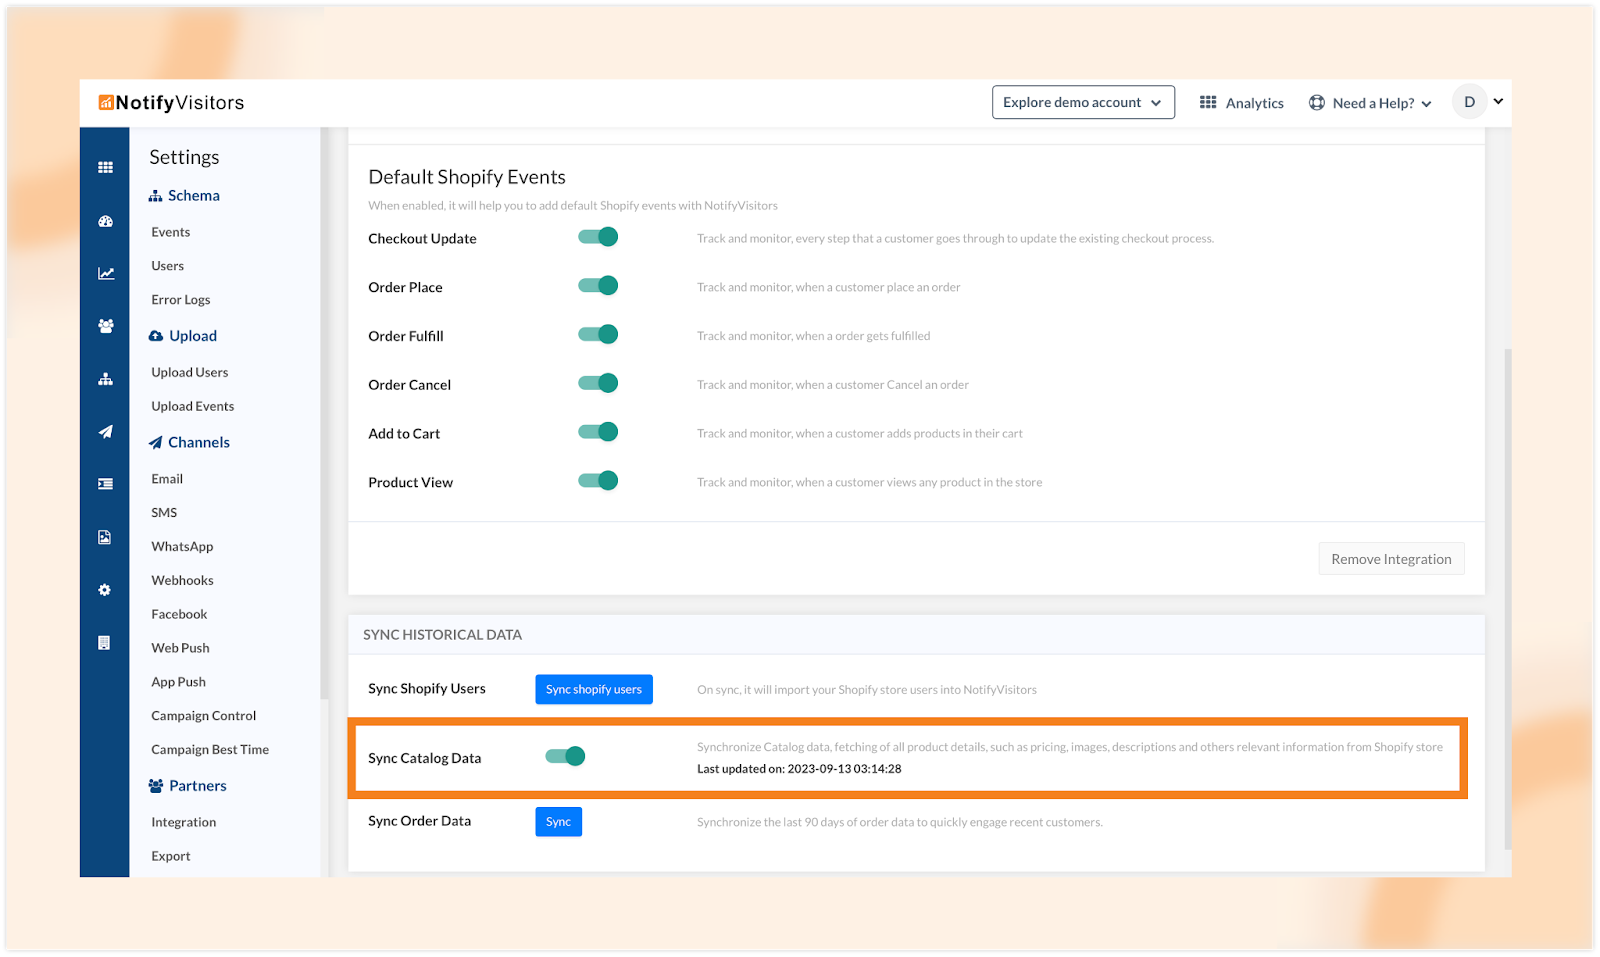
After successfully syncing your catalog, you’ll notice a catalog entry has been created under “Brand Assets” > “Catalog.”
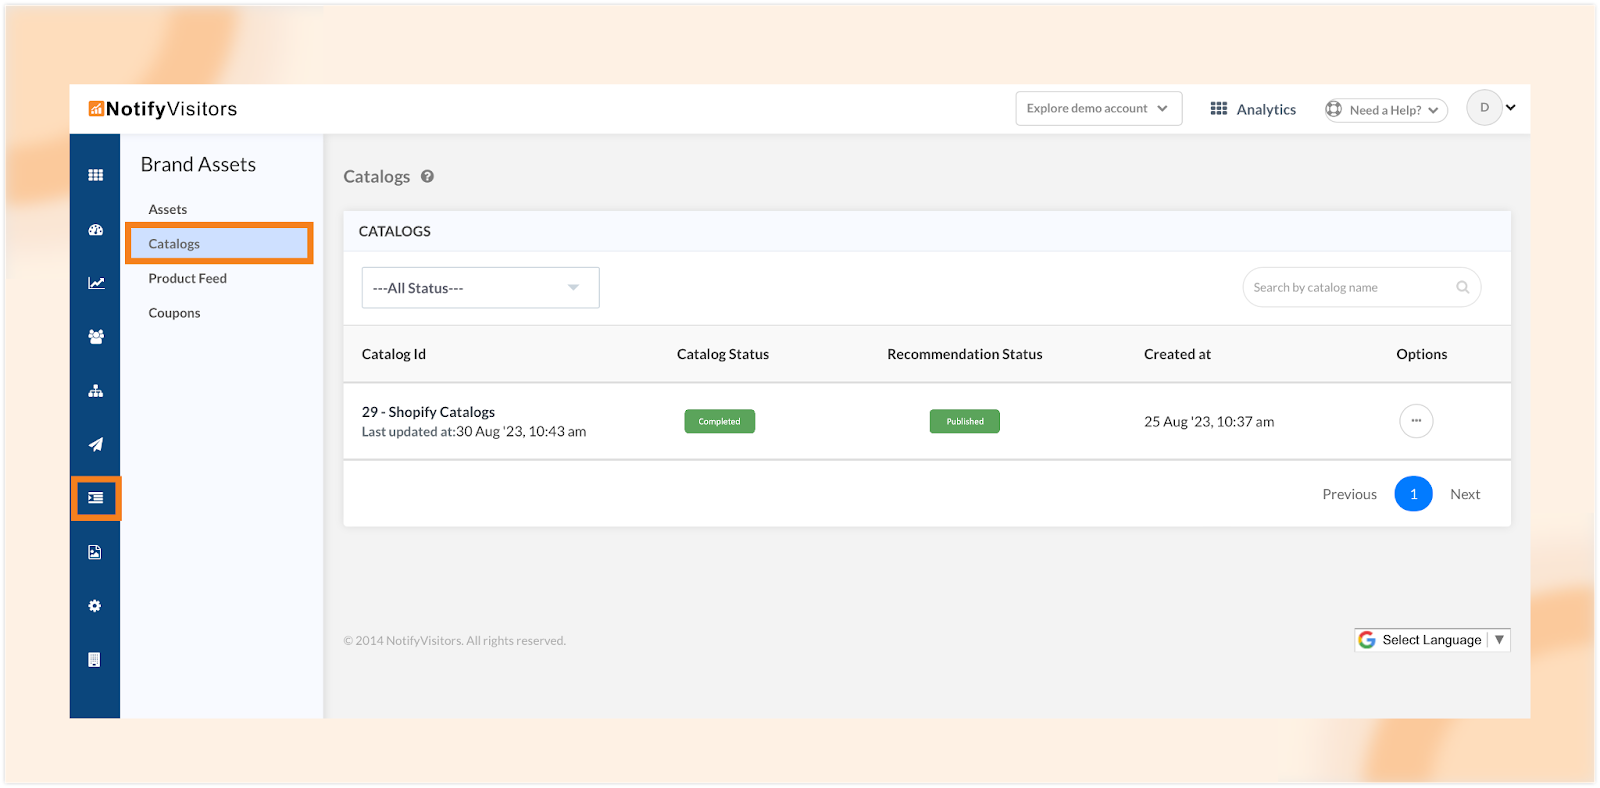
Now, with your synchronized catalog in place, you can create dynamic product feeds based on various parameters such as best-selling products, most-selling products, etc.
To create a new product feed, head to “Brand Assets” and access the “Product Feed” section. Here, you can click on “Create New Product Feed” and provide a name for the feed. Next, choose the Shopify catalog you’ve recently synced in the previous step.
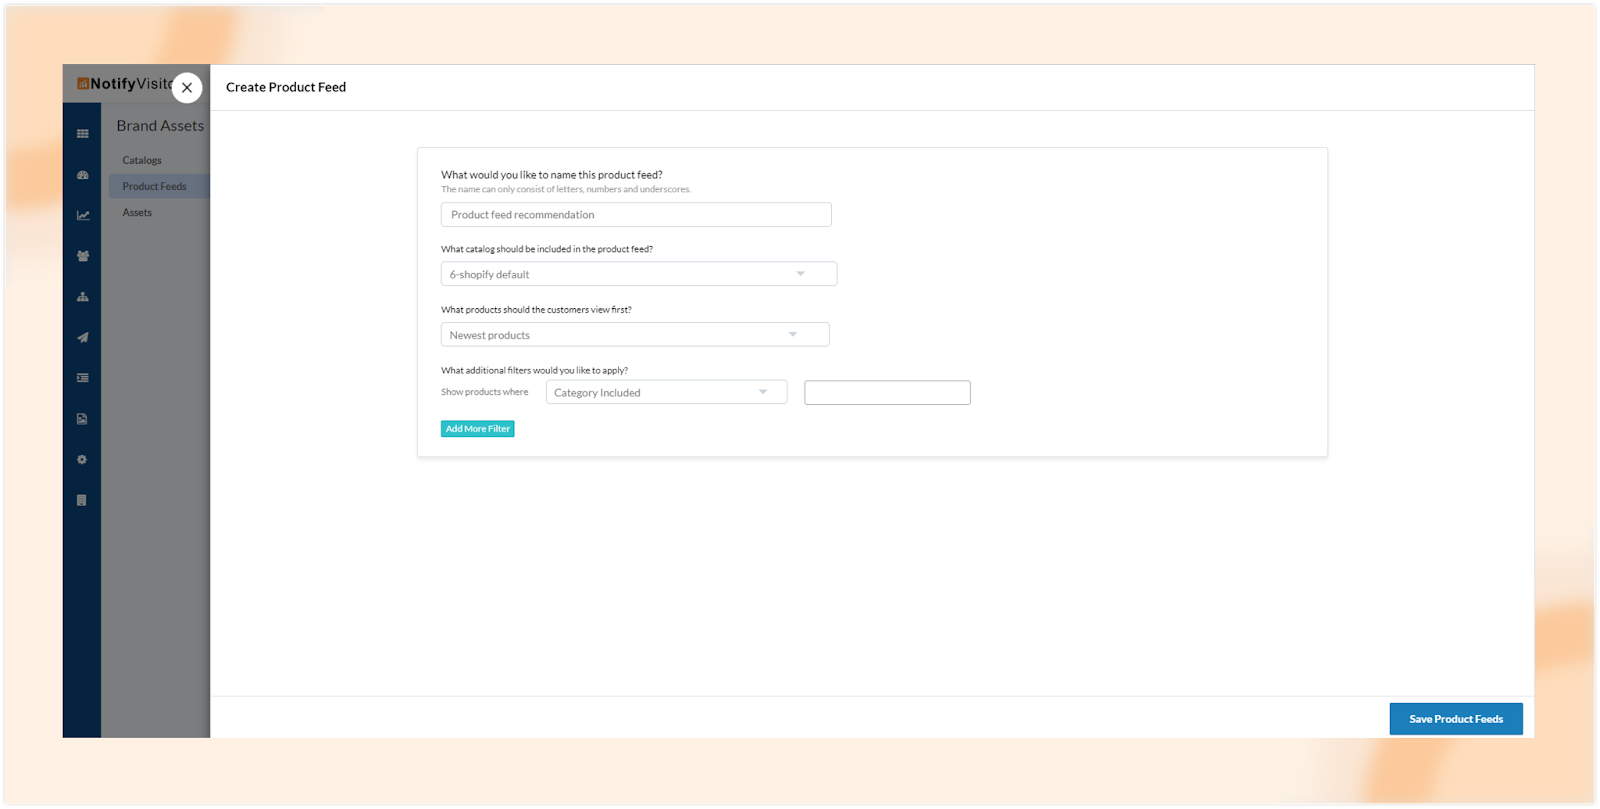
Next select the parameter from the drop down. We provide the following parameters
Classic
- Best-selling products
- Both best-selling and most viewed products
- Random products
Personalized tor each customer
- Products a customer has recently viewed
- Produces a customer may also like
- customer recently added product to cart
Furthermore, you have the flexibility to categorize your product feed and to apply additional filters by selecting the “Add Filters” option.
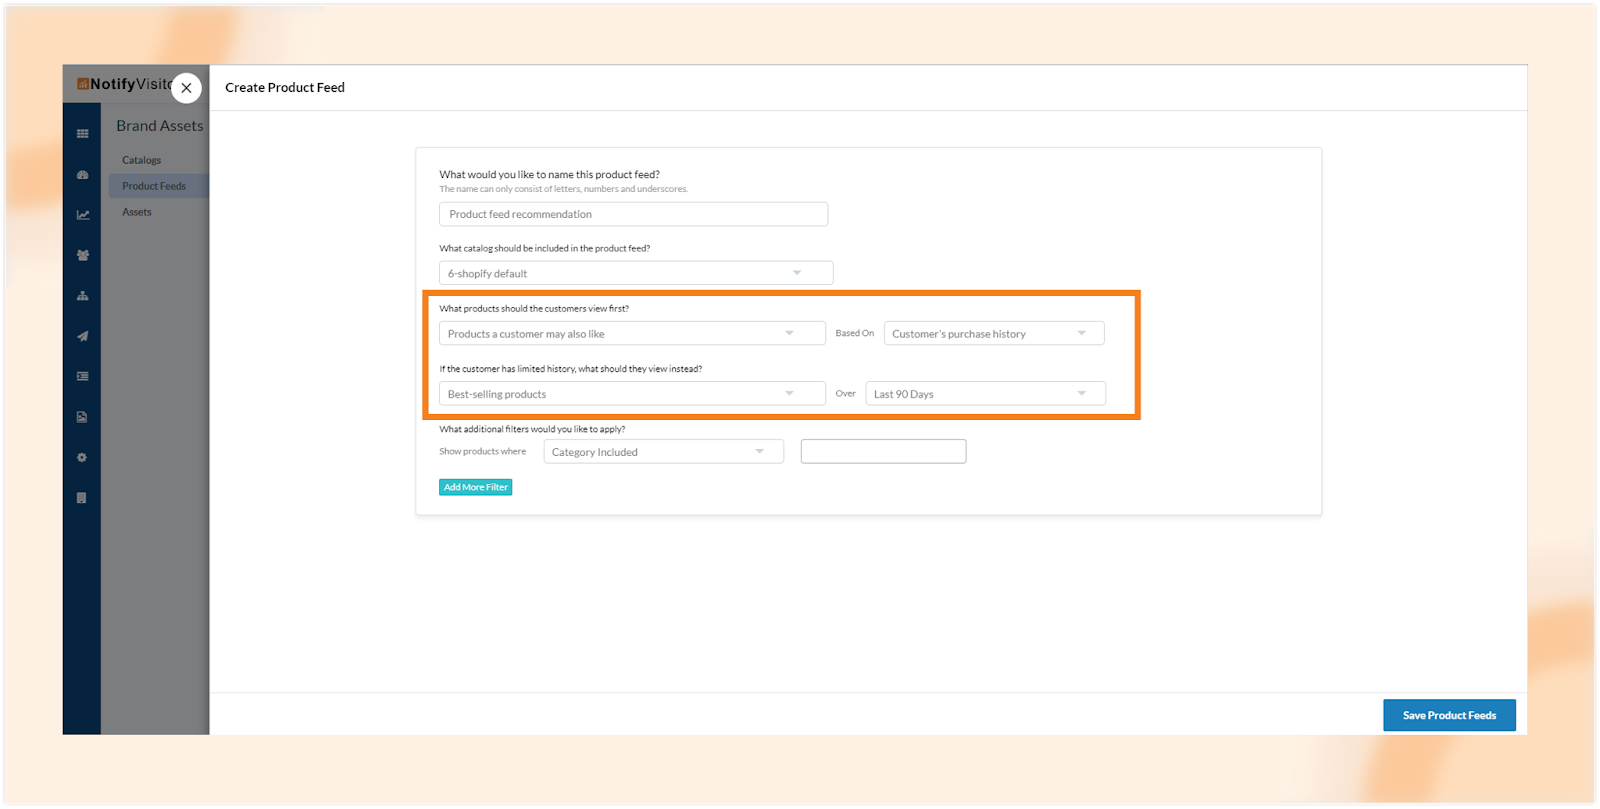
If you select any parameter from the “Personalized for Each Customer” category, it’s important to define default product recommendations for customers without a purchase history. These dynamic parameters rely on a customer’s history and behavior. In cases where a customer is new and doesn’t have a purchase history, default recommendations will be sent to them via email.
To send these product recommendations, you’ll need to create an email campaign or journey. The process is the same for both, so let’s walk through creating an email campaign as an example:
- Start by going to the “Campaigns” section and create a new email campaign.
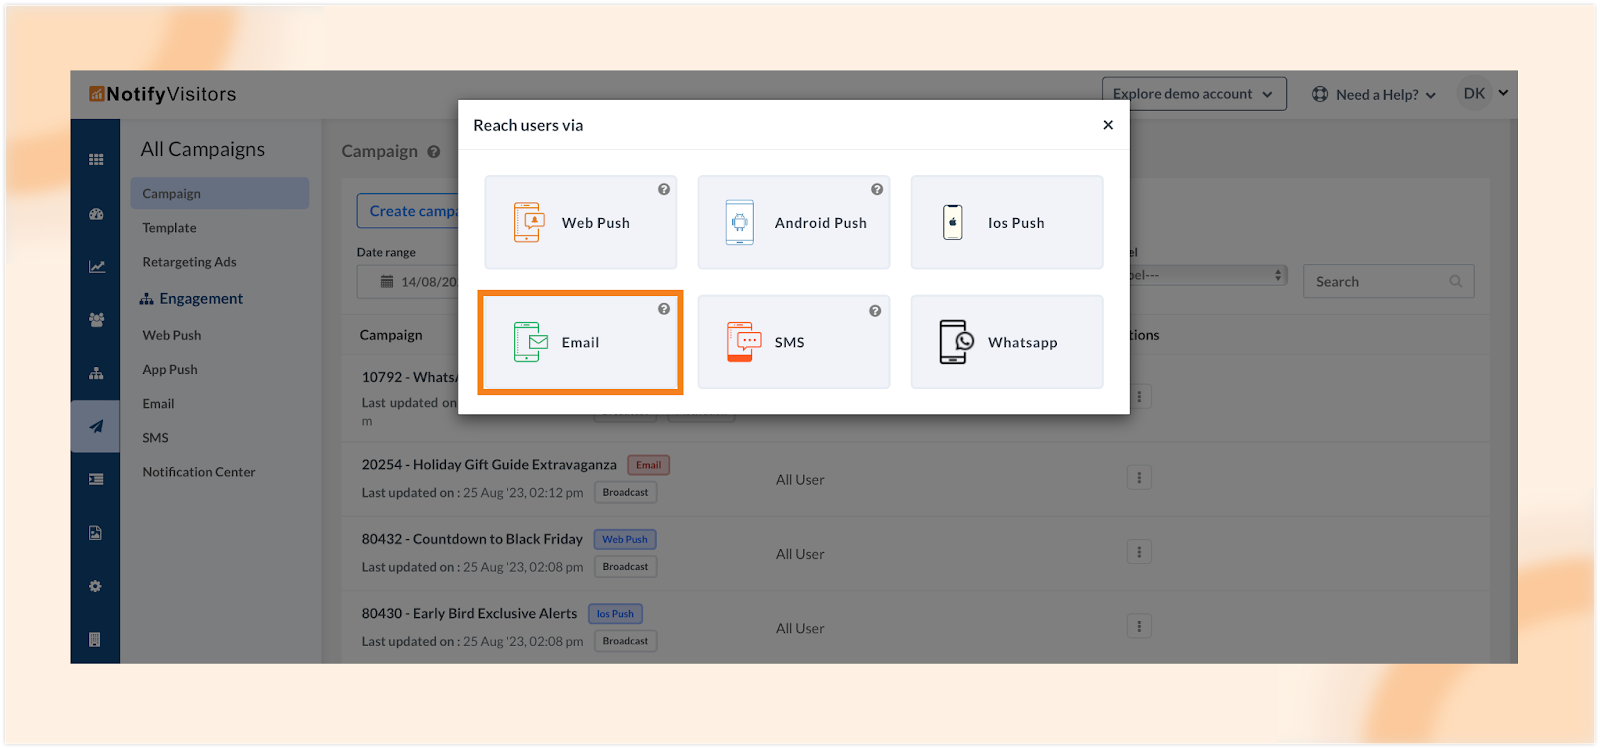
- In the email editor, provide all the required information.
- On the second page (the content page), use the drag-and-drop tool to either select an existing email template or create one from scratch.
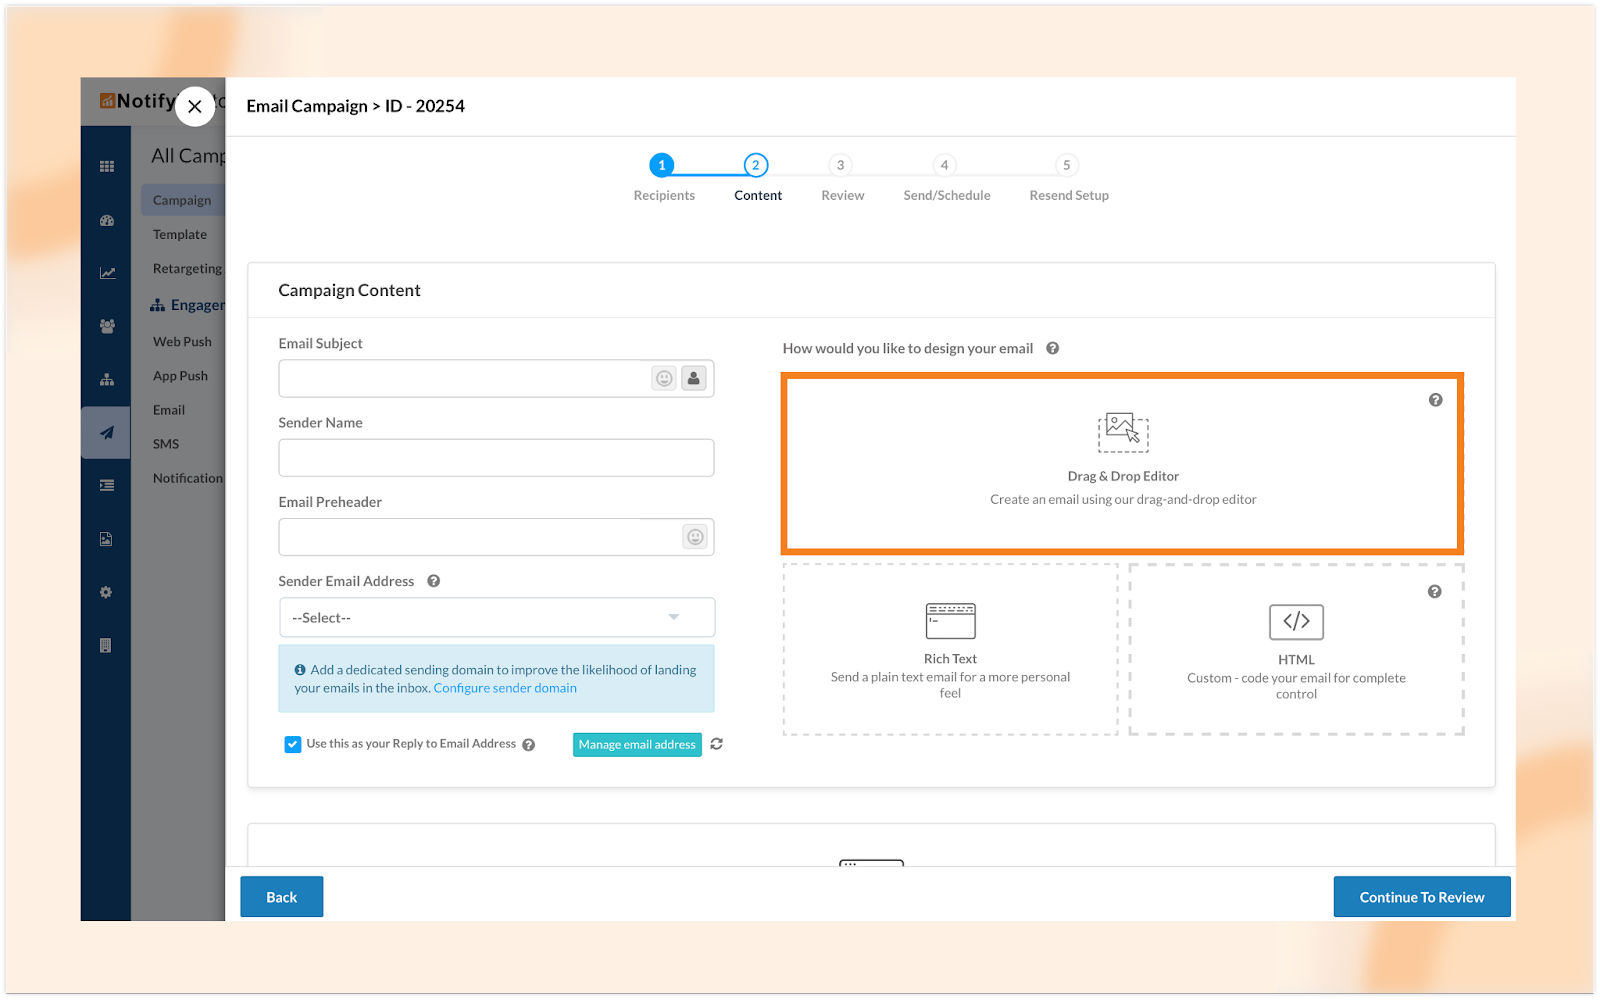
- To add the product feed to your email, click on “Rows” and choose “Search Products.”
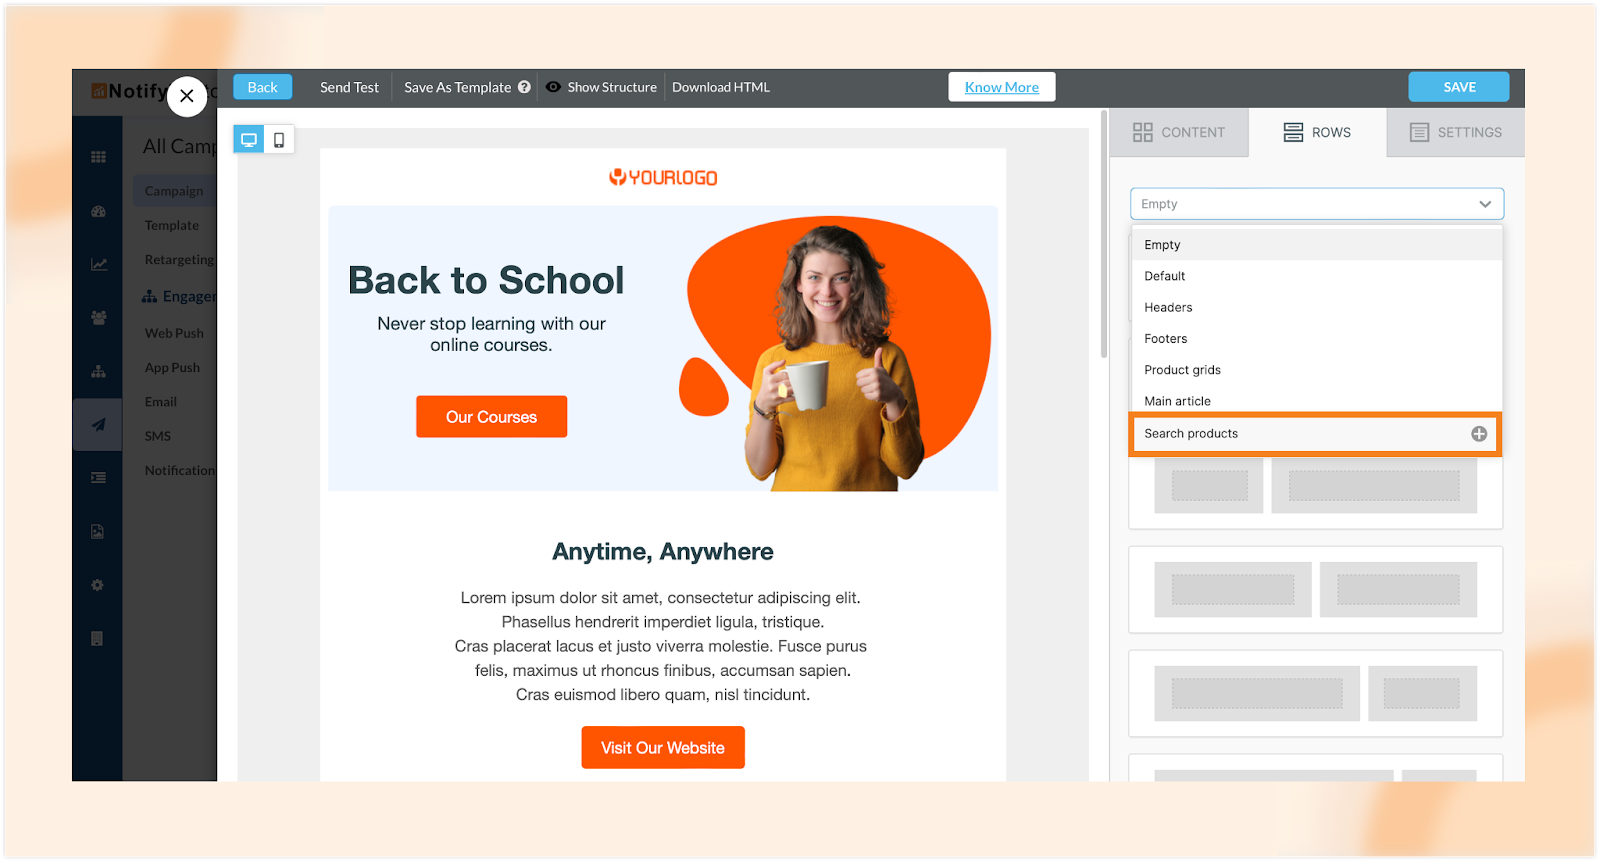
- Select the “Populate Product from Feed” option and choose the product feed you’ve previously created. Afterward, click “Next.”
- You’ll now have customization options. Configure how you want to display the products and then click “Continue.”
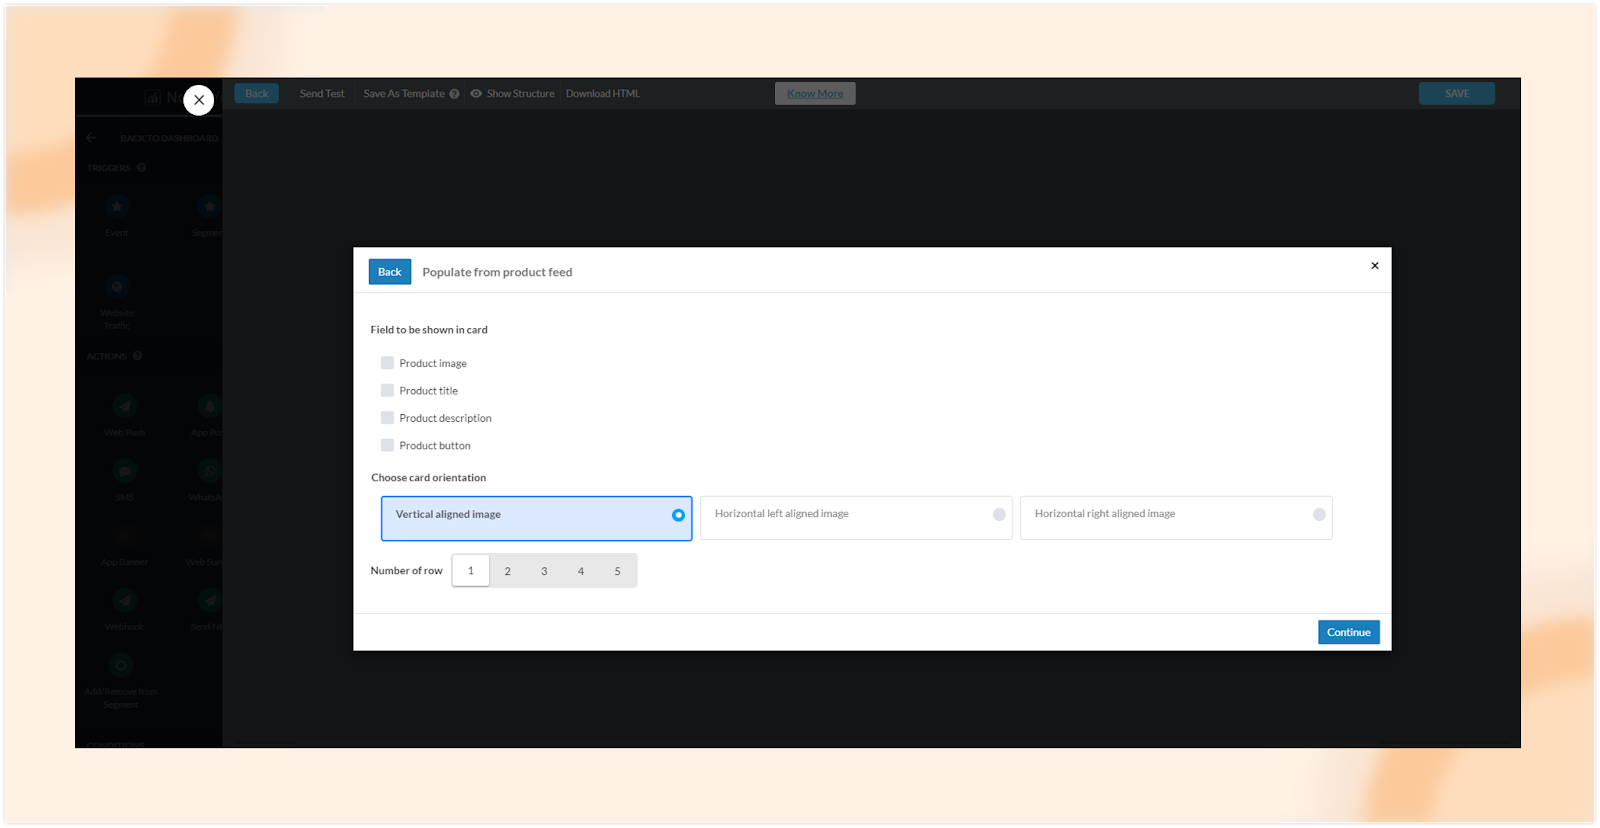
- The product catalog will be added to the “Rows” section. Simply drag and drop it into the email template.
Once you’ve completed these steps, when you send this email to your customers, personalized product recommendations will automatically appear in their email based on the selected parameter.
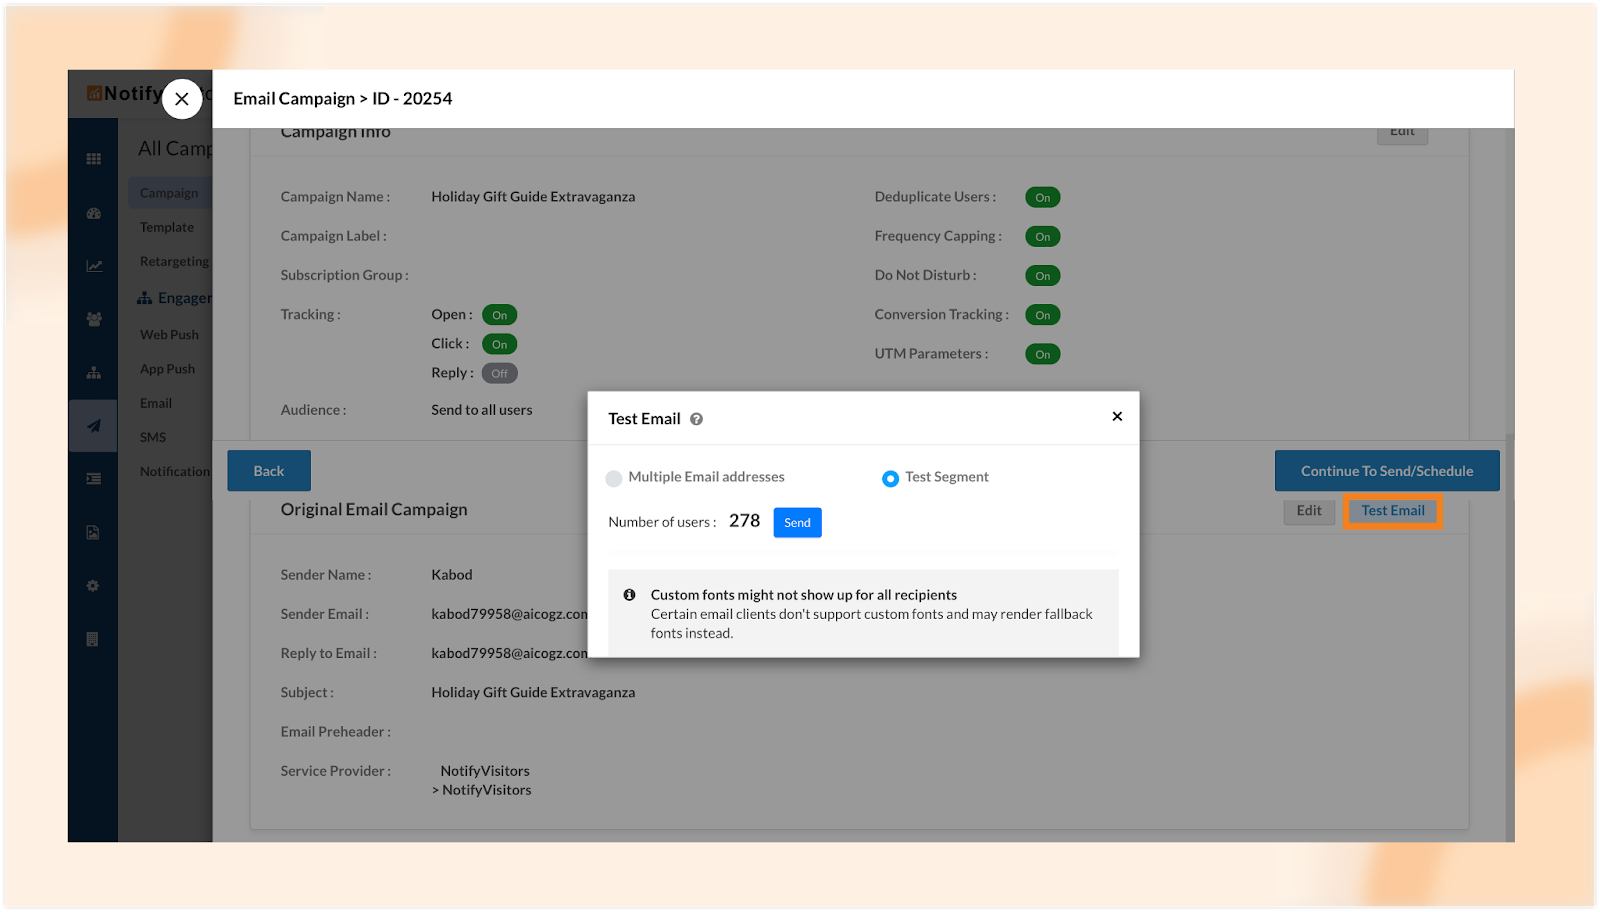
If you’d like to test this email before sending it to your entire audience, proceed with the email creation process. On the third page (the review page), you’ll find the option to send a test message. Click on this button, select a test segment, and send your test email to ensure everything looks and works as expected.
Added new event – WhatsApp Unsubscribed
We’ve introduced a new event in our list of WhatsApp events called “WhatsApp Unsubscribed.” This event is triggered when a user opts out of receiving WhatsApp messages.
To enable tracking of the “WhatsApp Unsubscribed” event, follow these steps: Go to the settings menu, click on “Events,” and then select the system events tab. From the “Filter Event” dropdown menu, choose “SMS.” On this page, toggle the “WhatsApp Unsubscribed” event to turn it on.
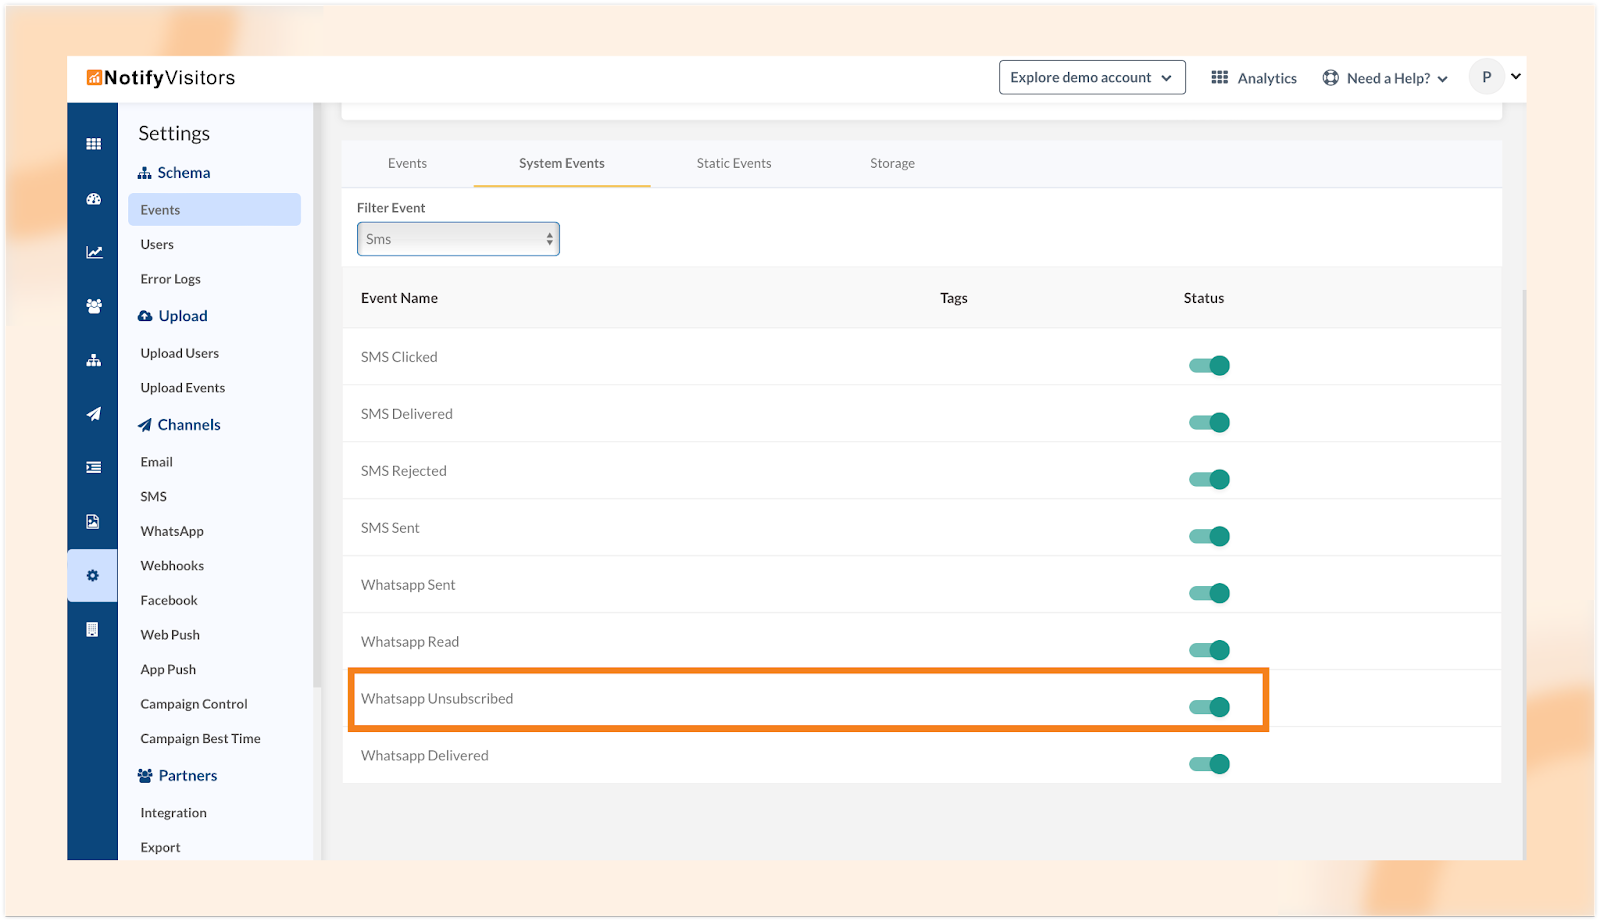
This addition allows you to track and analyze how many users are unsubscribing from WhatsApp messages, providing valuable insights for optimizing your WhatsApp content strategy.
Furthermore, you can utilize this event to create segments and run automated journeys. For instance, you can set up an email journey triggered by the WhatsApp unsubscribe event. In this journey, you can send a message like, “We’re sorry to see you go, but you can always subscribe back in the future in case you change your mind.” This automated email will be sent to users who opt out of WhatsApp messages, offering them the option to re-engage with your WhatsApp communications at a later time.
Simplified Whatsapp template approval process
Previously, when creating a WhatsApp template, you had to obtain approval from WhatsApp service providers before being able to input the exact message into the NotifyVisitors WhatsApp template editor.
We’ve now simplified this process significantly. You can now directly compose your message in WhatsApp template editor and customize all the other options according to your preferences. Afterward, simply click “Save.” Our system will automatically send the template verification request directly to Meta. The approval or rejection of your template will depend on Meta’s verification process. If your template is rejected, our system will provide a message explaining the reason for the rejection.
For a comprehensive understanding of other available options in the WhatsApp template editor and how they function, please refer to our guide titled “How to Create a WhatsApp Template.”
After filling in all the necessary options according to your requirements, click “Save.” Your template will then undergo the verification process and will be “approved” or “rejected.” If the verification process takes some time, a “pending” status will be displayed, and your template should be verified within approximately 1-2 minutes.
Note: Please keep in mind that each WhatsApp template name must be unique to avoid system errors.
Wrap Up
These improvements reflect our unwavering dedication to continually enhance our platform and provide substantial value to our users. We eagerly await your feedback and are confident that these updates will make a positive impact on your endeavors.
Furthermore, to ensure you stay informed about the latest release notes and gain immediate access to new features, we encourage you to subscribe to our push notifications. Just click the “Allow” button in the popup at the top of your screen.
Should you have any inquiries, suggestions, or if you’d like a firsthand demonstration of these new features, please don’t hesitate to contact us at support@notifyvisitors.com. Our devoted team is ready and excited to assist you in every way possible.

Welcome to our latest release notes! In this month's updates, we've focused on enhancing several key areas, including user growth Read more

We're thrilled to unveil a multitude of fresh features and enhancements through our latest release notes. Our team has been Read more

We are very excited to share a bunch of new features and improvements in our latest release notes. We've worked Read more

During this month, several significant updates have been implemented, with a primary focus on enhancing the marketing capabilities of our Read more

