


 Email
Email SMS
SMS Whatsapp
 Web Push
 App Push
 Popups
 Channel A/B Testing
  Control groups Analysis
 Frequency Capping
 Funnel Analysis
 Cohort Analysis
 RFM Analysis
 Signup Forms
 Surveys
 NPS
NPS Landing pages personalization
  Website A/B Testing
  PWA/TWA
 Heatmaps
 Session Recording
 Wix
Wix Shopify
 Magento
 Woocommerce
 eCommerce D2C
  Mutual Funds
 Insurance
 Lending
  Recipes
  Product Updates
 App Marketplace
 Academy
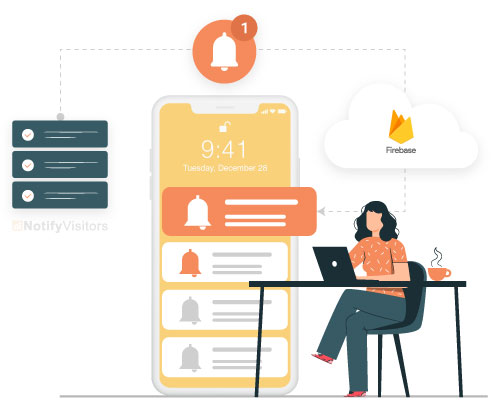
For facilitating its notification services on the Web, IOS, and Android, Firebase uses cloud services. Firebase Cloud Messaging (FCM) operates by generating unique tokens for each device and later using those for sending messages to respective devices. For sending web push notifications, Firebase generates tokens by using javascript.
In this blog, you’ll get to know everything about how to implement web push notifications firebase.
Contents
What is firebase cloud messaging?
Firebase Cloud Messaging is Google’s free mobile notification service. It lets third-party app developers send notifications to their users from Google Cloud Messaging (GCM) servers. This enables you to inform users about various data available for sync in real-time.
It upstreams messages from users’ apps to FCM servers and downstream messages from FCM servers to users’ apps and. You can use FCM to engage, retain, and re-target your users irrespective of where they’re in the world.
What are the benefits of sending web push notifications using firebase?
Following are the benefits of sending web push notifications from firebase.
- Free to start: You don’t need to pay Google for availing of the FCM push notification service. Besides, it’s easy to scale.
- No worries about permissions: Since the FCM libraries use manifest merging, it automatically adds any permission required. This decreases the amount of effort you need to take.
- Simplified registration: The address that FCM utilizes to deliver the message to a device is referred to as a “registration token”. This process now has been made asynchronous. Google library is automatically assigned a token on your behalf. So, when you request a token, you’re sent a registration token. To start messaging, you just need to send this token to your servers.
- Easy implementation: Implementing FCM is quick and easy. As its intuitive APIs are available in a single SDK, you can address customers’ issues immediately without building complicated infrastructure.
- Analytics: You get unlimited analytics for free from Firebase. You get valuable data about your users’ app usage, ad clicks, and more. Other Firebase features work well with Firebase Analytics. So, you can act on everything.
- Cross-platform support: Since APIs are available in a single SDK for C++, JavaScript, Android, and iOS, you can extend it to various platforms without altering your infrastructure.
- Common topic messaging: When you want to notify users interested in a particular topic, you just publish your message to FCM. FCM will deliver it to all the users who’ve subscribed to that topic. The best thing is that it doesn’t have any limits on topic messaging.
- Different topic messaging: FCM also allows customer segmentation to send them relevant messages. For instance, if you’re sending traffic-related notifications to your users, your users in City A will receive traffic messages pertaining to their city only, and users in City B will receive traffic messages related to their city alone.
How to send web push notifications using Firebase?
Here are step-by-step instructions to help you implement web push notifications Firebase.
1. Register Firebase App
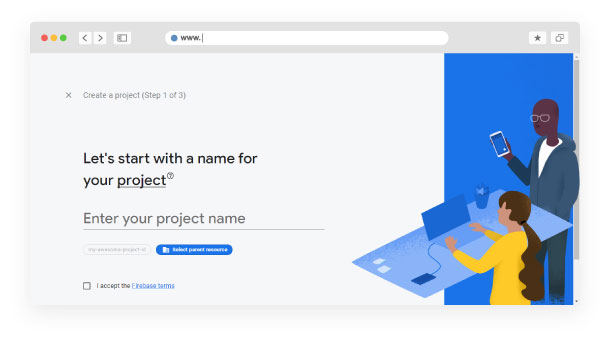
- Visit this link https://console.firebase.google.com/u/0/ and press the ‘Add Project’ tab.
- Give a project name and select the country. Then press on the ‘Create Project’ tab. Google will check the project name for its availability and uniqueness.
- Now click the ‘accept terms & conditions’ tab to continue. Your project will be built within
- a few seconds.
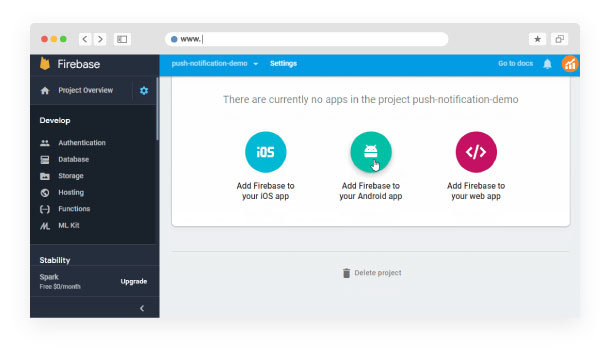
- Now add your Android/IOS/Web/Unity app to your project. Since this blog focuses on web push notifications Firebase, you need to proceed by clicking on the web icon shown as </>.
- Give your app a nickname. This nickname is for users alone. So, you can use this feature to facilitate better differentiating between the apps in a project for internal usage.
- If your project isn’t running on an HTTPS server, add hosting for it. If not, just skip this step. Check out some best web hosting promo code here.
- Now click on ‘Register app’.
- Now that your app is registered, you’ll receive a Firebase SDK, which is a code. Copy this code
down. It’ll come into use in the forthcoming section. In case you don’t copy this now, you may retrieve it from the ‘Settings’ section.
2. Add firebase to your project
- Go to the dashboard. On the sidebar, you’ll find the ‘Settings’ icon. Click on it. In the menu that you’re presented, click project settings.
- When the Settings page (General Settings) opens, scroll down to the page’s bottom and copy the code shown for the selected CDN.
- Include the following code in your HTML file at the end. Also include the CDN script for firebase messaging.
< script src = “https://www.gstatic.com/firebasejs/8.3.2/firebase-app.js” > </script>
<script src = “https://www.gstatic.com/firebasejs/8.3.2/firebase-analytics.js” > </script>
3. Operating Firebase service
1. For the code mentioned at the top, add the code given at the bottom, after where you find // Initialize Firebase.
// Initialize Firebase
firebase.initializeApp(firebaseConfig);const messaging=firebase.messaging();//Custom function made to run firebase service
getStartToken();//This code recieve message from server /your app and print message to console if same tab is opened as of project in browser
messaging.onMessage(function(payload){console.log(“onMessage”,payload);});
2. You can write the code at the bottom in a separate js file present in your HTML page or you can append it to the code at the top in the <script> tag.
messaging.getToken() is a function used to retrieve tokens using Firebase SDK. If a token is found, it is sent to the server to be stored, else the user’s permission is sought via the RequestPermission() function.
setTokenSentToServer() is another function that utilizes local storage to assign 1 as the value of sendTokenToServer in case token has been sent to the server already and 0 in case token is not sent to server owing to the occurrence of an error when it is sent to the server or is retrieved from the firebase SDK.
4. Sending notifications from project
Now that everything you need to send notifications from the project is ready, here are details about how you can send a notification to the end-user whose token you know-
1. Initially, you need to receive a service key. Carry out the following steps-
- Open the Firebase console
- Click on the project settings
- Tap on ‘Cloud Messaging’
- You’ll find a code in the Server Key field. Copy it.
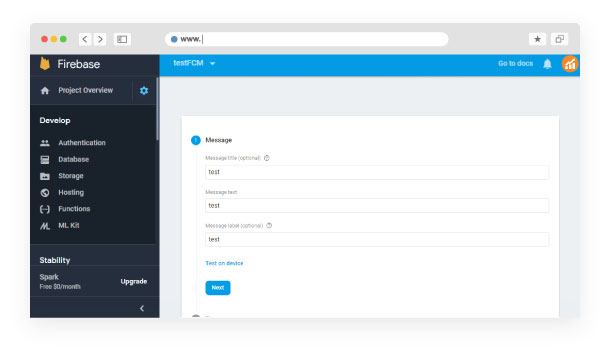
2. Sending push notifications
Let’s use the postman platform to send web push notifications from Firebase. Here are the things that you need to do is-
3. Set the POST request type.
4. Enter the URL: https://fcm.googleapis.com/fcm/send
5. Click on the Headers section.
You need to fill up two headers viz., authorization and content-type.
· Authorization: Paste the server key you have copied.
· Content-type: application/JSON (JavaScript Object Notation)
6. Now click open the Body section. Paste the user token that Firebase retrieved at the time of user registration.
7. Now send the request. You’ll be able to send push notifications to your users from the server. Note that when you send your first push notification to a user, the web browser will ask for his/her permission to receive notifications from you. Only if he/she grants permission, you’ll be continually able to send pushes. You can ensure that your user grants his/her permission by following our push notifications tips. However, it is essential to test push notifications for different platforms to make the best out of them.
Conclusion
You’d have understood by now that sending web push notifications using Firebase isn’t as difficult as it seems. It doesn’t require a lot of resources and doesn’t take much time. Besides, using web push notifications Firebase doesn’t influence the expense of your website maintenance or web application. If you still need more details on its functionality, do go through the Firebase documentation.
Also Read:
- 7 Overrated Factors of Web Push Notifications
- Web Push Notifications | A Direct Email Marketing Tactics
- 41 Web Push Notifications Stats That Marketers Need To Know
- 15 Best Push Notification Software & Tools {Compared}
- How Web Push Notifications are Effective Than Other Marketing Mediums?

