
 Email
Email SMS
SMS Whatsapp
 Web Push
 App Push
 Popups
 Channel A/B Testing
  Control groups Analysis
 Frequency Capping
 Funnel Analysis
 Cohort Analysis
 RFM Analysis
 Signup Forms
 Surveys
 NPS
NPS Landing pages personalization
  Website A/B Testing
  PWA/TWA
 Heatmaps
 Session Recording
 Wix
Wix Shopify
 Magento
 Woocommerce
 eCommerce D2C
  Mutual Funds
 Insurance
 Lending
  Recipes
  Product Updates
 App Marketplace
 Academy
Introducing our latest release notes! This month we’ve introduced several powerful tools aimed at increasing engagement, streamlining workflows, and providing greater flexibility in managing communication channels. These include:
- Countdown timer for website popups
- Option to add existing website popup banners in Journey
- Introduction of manual suppression feature
Let’s explore these updates!
1. Added “Countdown Timer” option for website popups
Introducing our highly anticipated feature this month – Countdown Timer. Countdown timer banners for website popups can be a great way to create a sense of urgency and encourage user engagement.
To add a timer, simply create a new website popup. Once you enter the drag-and-drop editor, click on the rows tab, and from the dropdown menu, select “Countdown Timer.”
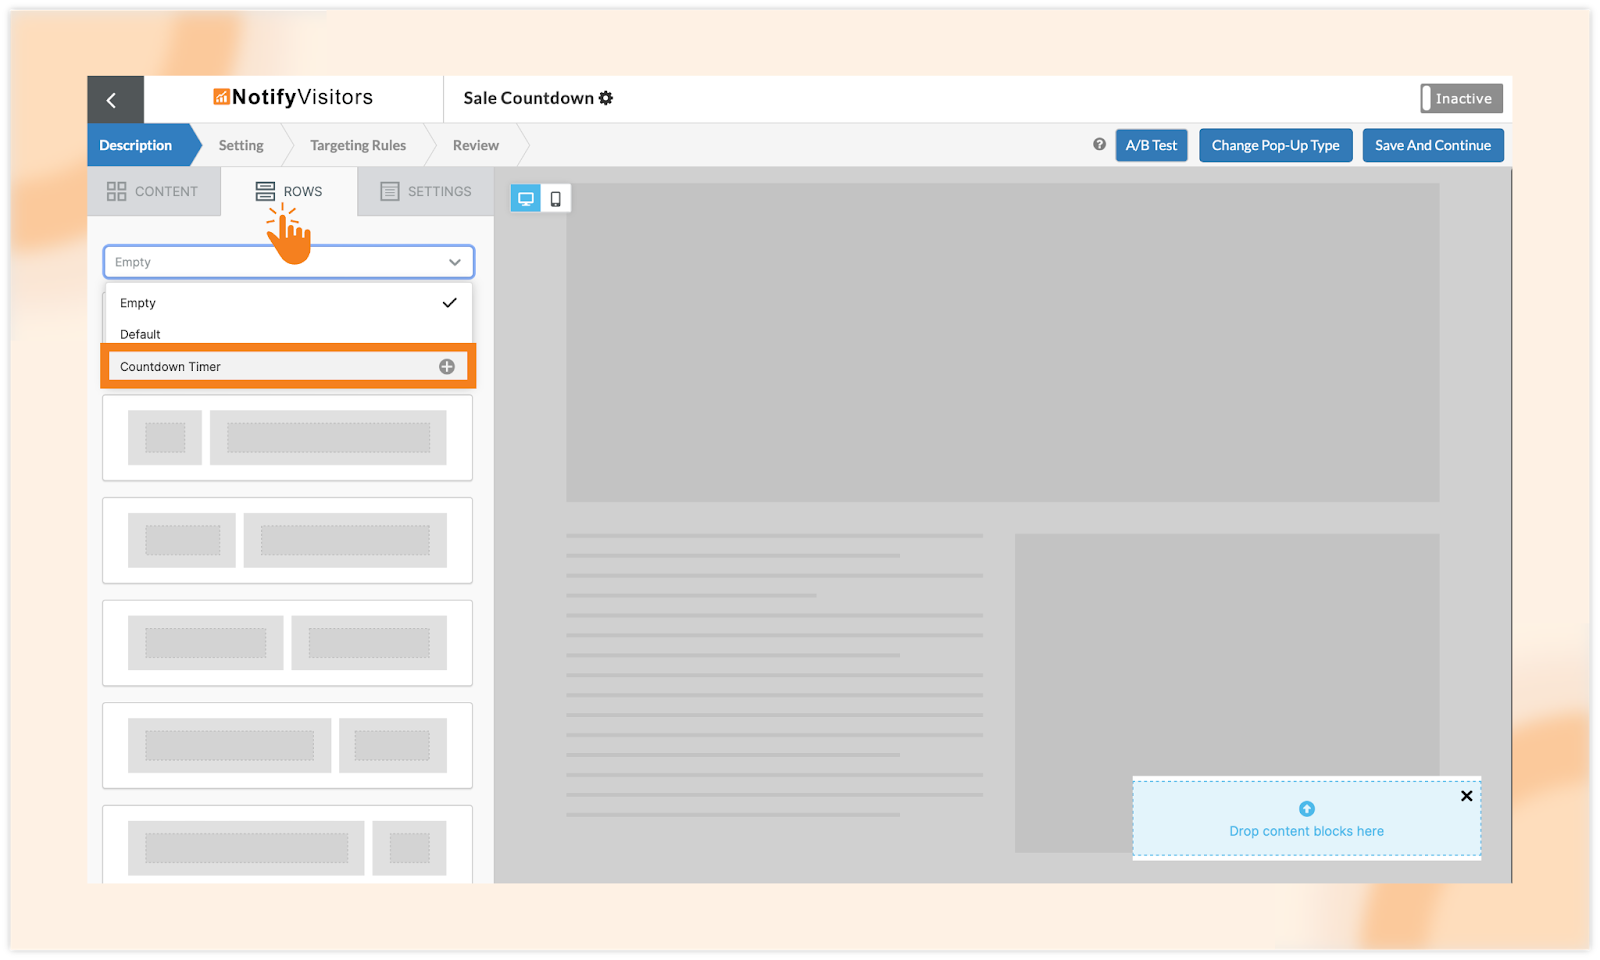
Here, you’ll be presented with two options:
- Fixed – Banner with fixed timer for all users
- Variable – Banner with dynamic timer for each session
A. Fixed countdown timer
Opt for a fixed countdown timer by selecting the “Fixed” tab. Here, specify the end date & time, timezone, and preferred animation type. Once configured, click “Finish” to seamlessly integrate the fixed timer into your popup.

B. Variable countdown timer
For a more dynamic approach, choose the “Variable” tab. Here, customize the timer by inputting the desired days, hours, minutes, and animation preferences.
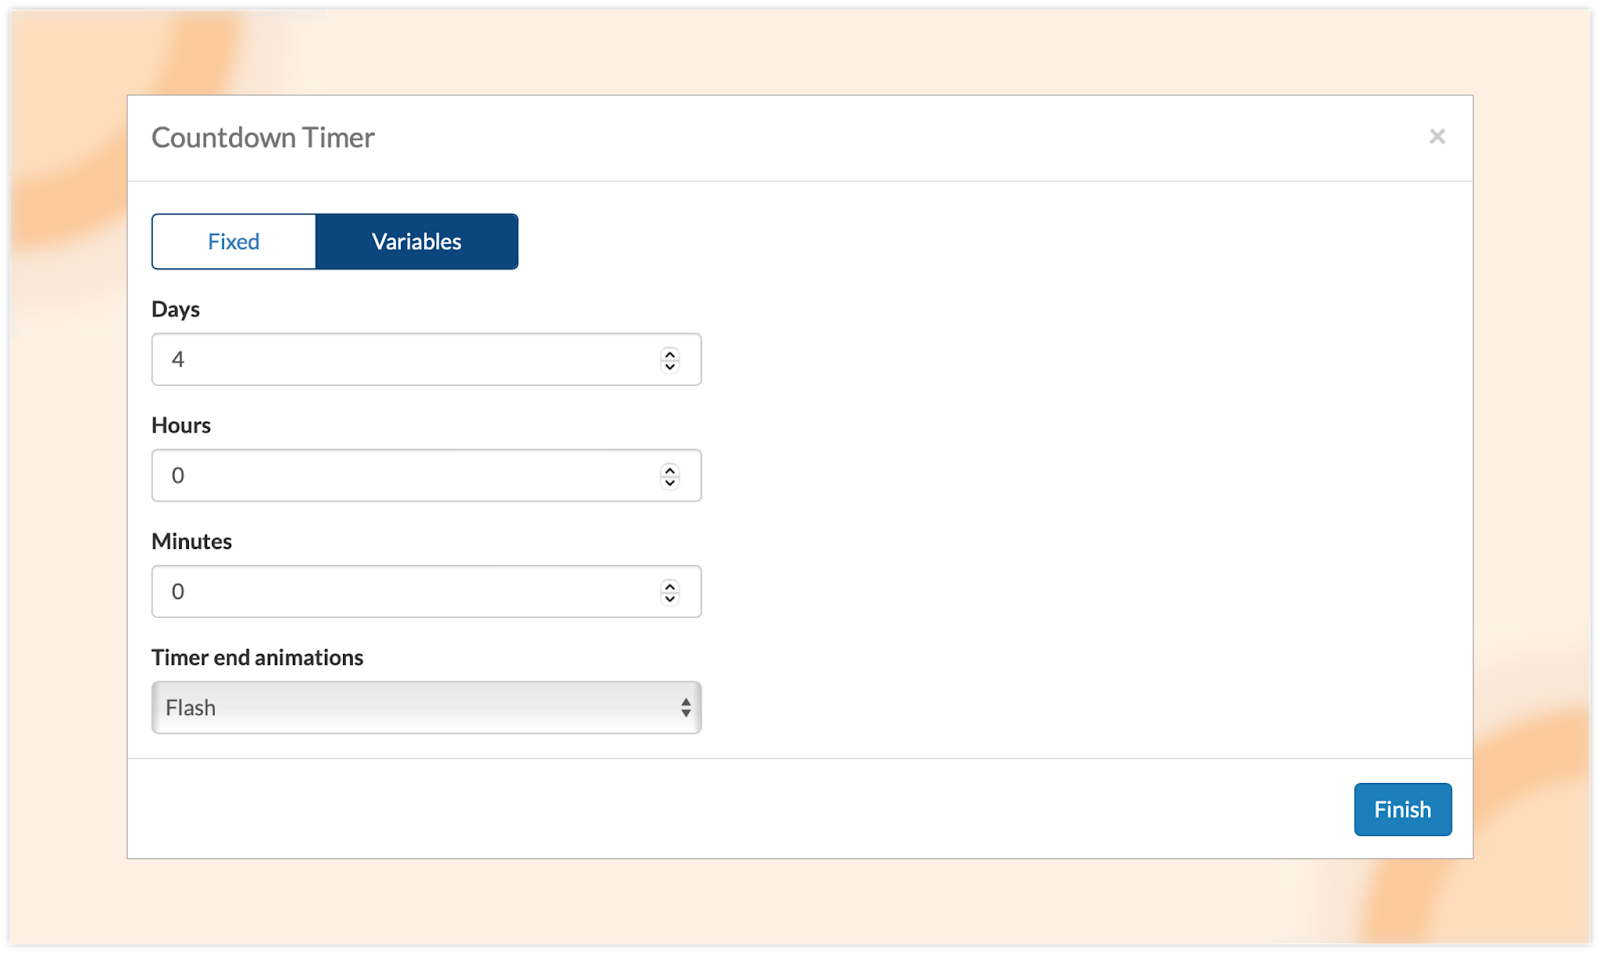
Upon completion, click “Finish” and a countdown timer row will be created. Now and drag and drop this row onto your banner, and customize it accordingly.
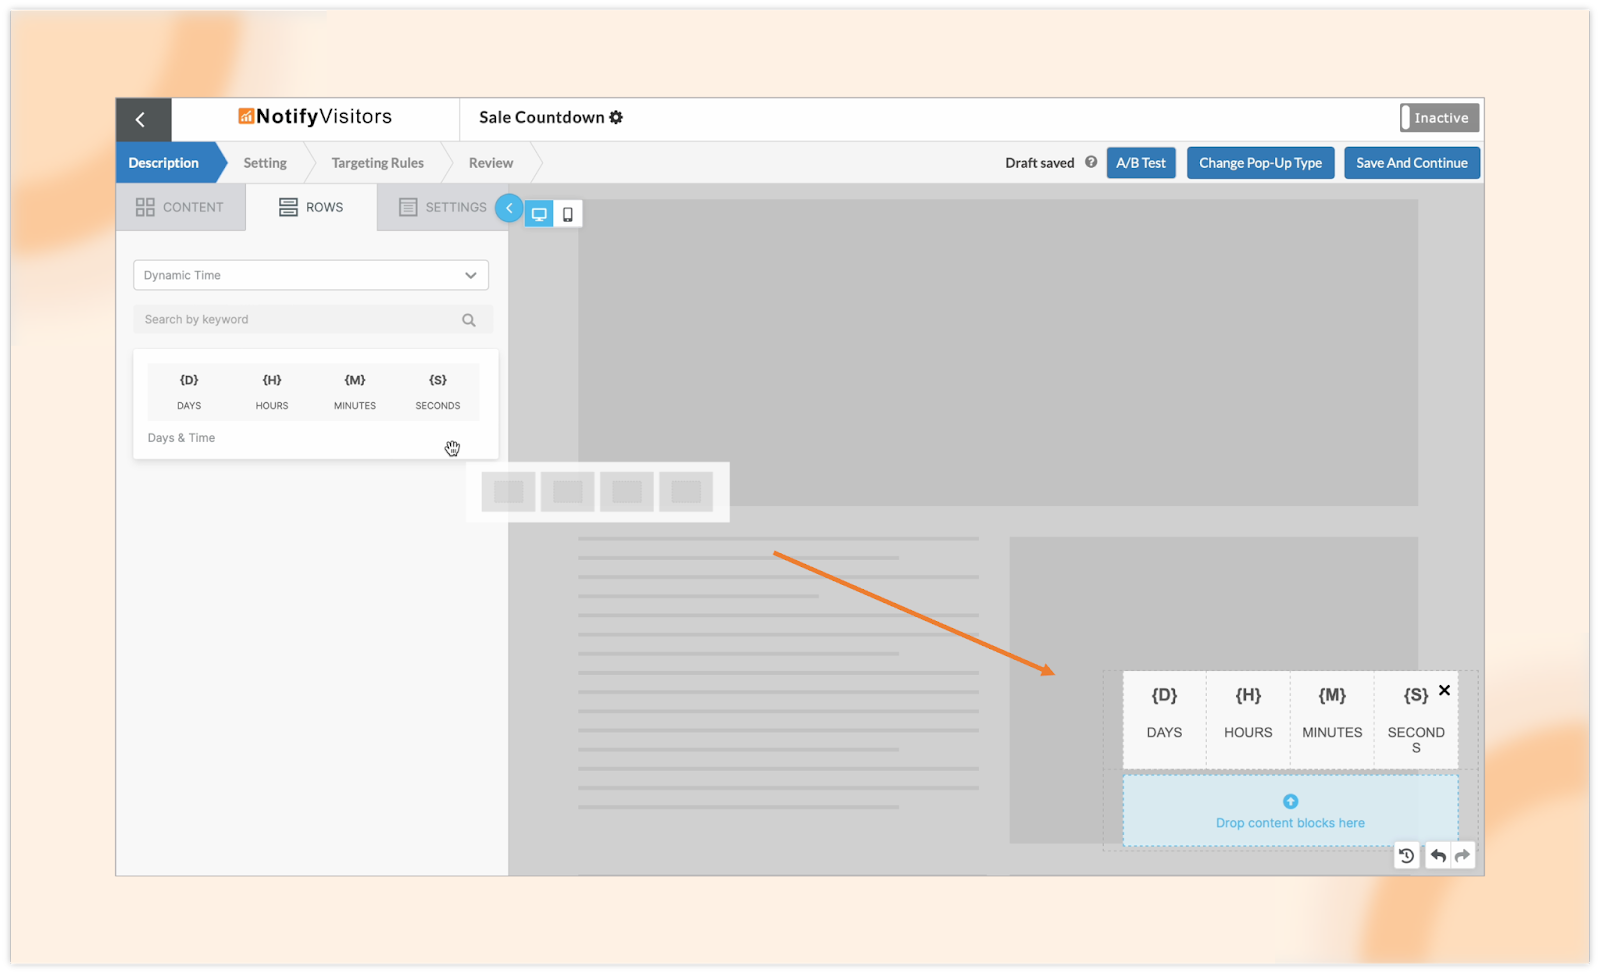
Alternatively, if you prefer a custom design for your popup banner, tailor it to your specifications regarding size, color, and other elements. Then, you can manually insert countdown tokens {D} : {H} : {M} : {S} within a row to seamlessly integrate the countdown timer into your banner.
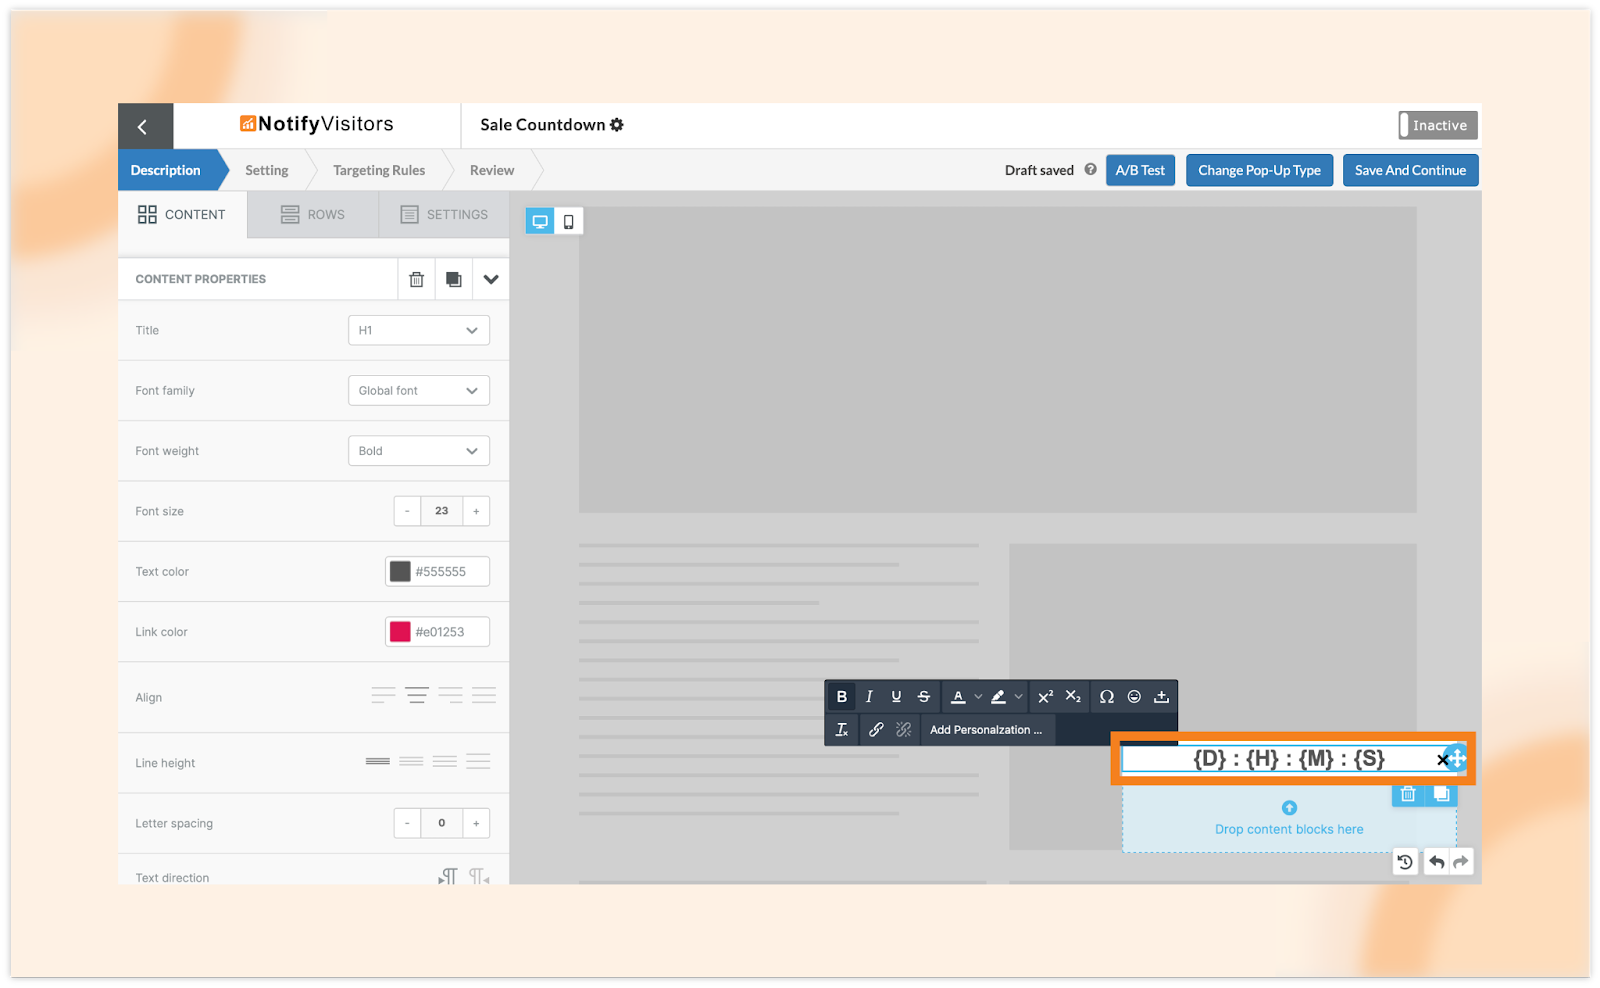
By offering both fixed and variable options, we ensure flexibility to suit diverse marketing strategies and campaign requirements. Embrace the power of the Countdown Timer feature to elevate your popup engagement and drive conversions like never before.
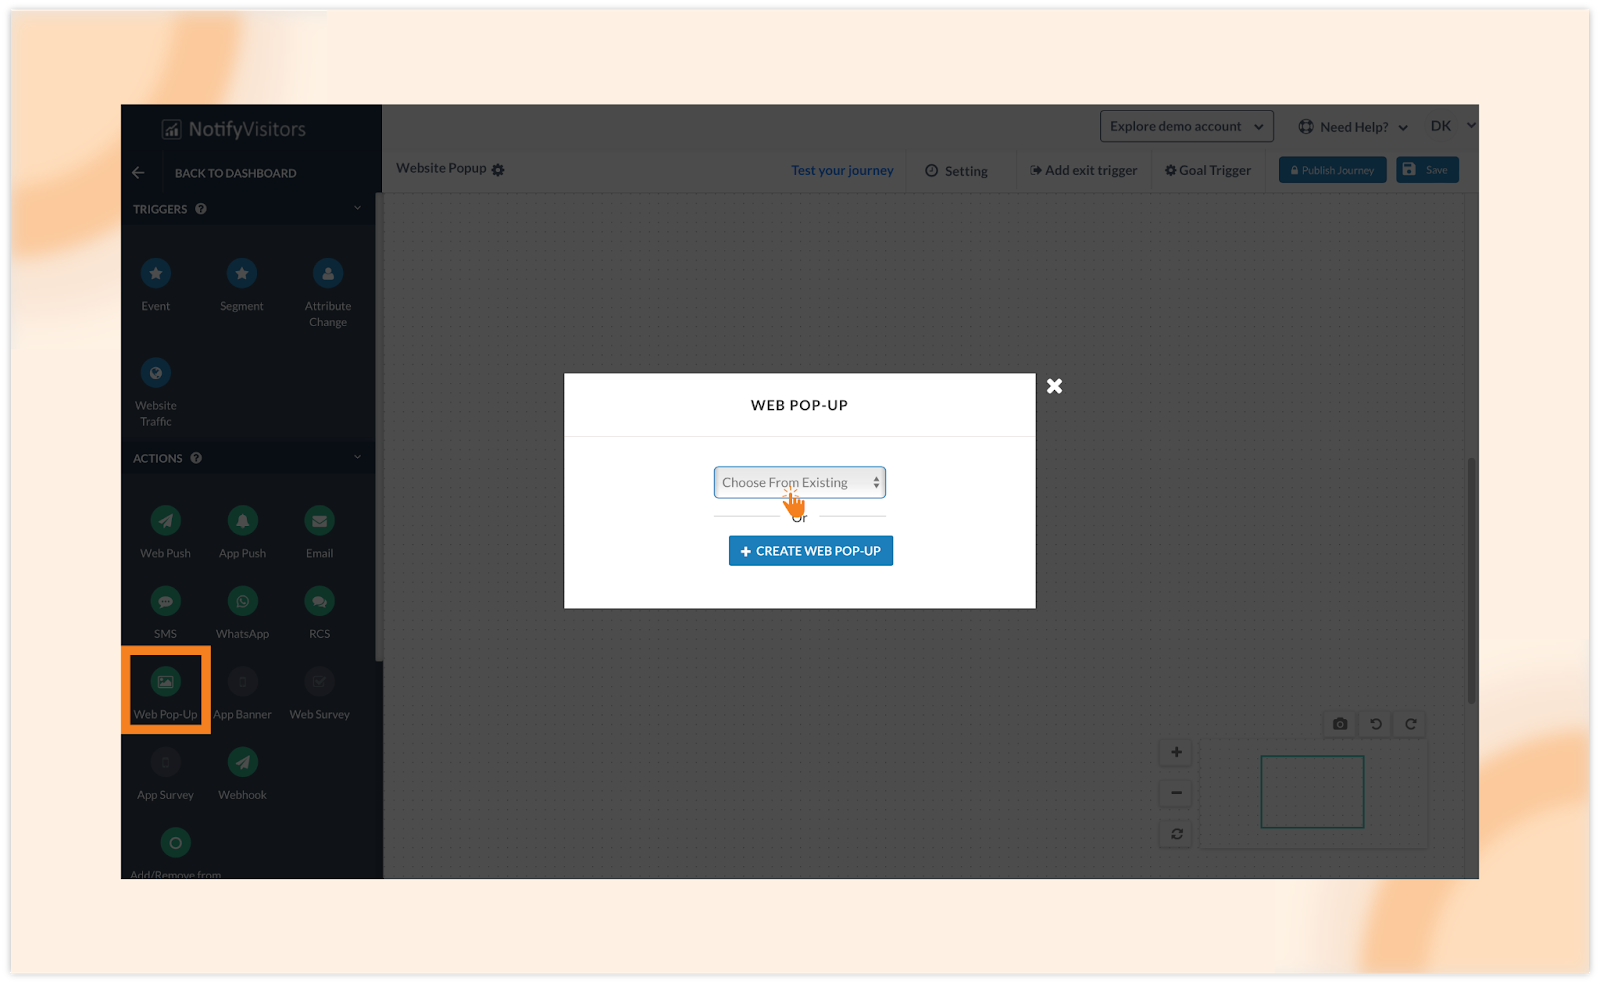
2. Use existing Web Pop-up banners in Journey
Up until now, we have been required to make new banners from scratch everytime while creating Journeys. However, we have recently introduced a new feature in Journey that allows you to utilize your existing banners by making a copy of them.
To accomplish this, all you need to do is drag and drop the “Web Pop-up” block onto the journey board when creating a journey. Then, click on the “Choose From Existing” dropdown menu and select a banner from your existing ones.
Next, give your banner a name and click on submit. This action creates a duplicate of your selected banner within the journey. Now, you have the freedom to make any necessary modifications or customizations to your selected banner.
Once you’ve finalized your changes, simply close the editor to save your updated banner within the journey sequence. With this streamlined process, you can effortlessly incorporate your existing banners into your journeys, saving time and ensuring consistency across your campaigns.
3. Introducing manual suppression of subscribers
We’ve recently made updates to our system to distinguish between manual suppression and user-initiated unsubscribes, by allocating unique attribute values to both.
Manual suppression vs. unsubscribe by user
Manual suppression involves a proactive step taken by the sender to exclude specific users from receiving communications. In contrast, unsubscribe by user is when recipients themselves opt out of receiving further communications. This differentiation allows for more precise management of communication channels and ensures compliance with user preferences.
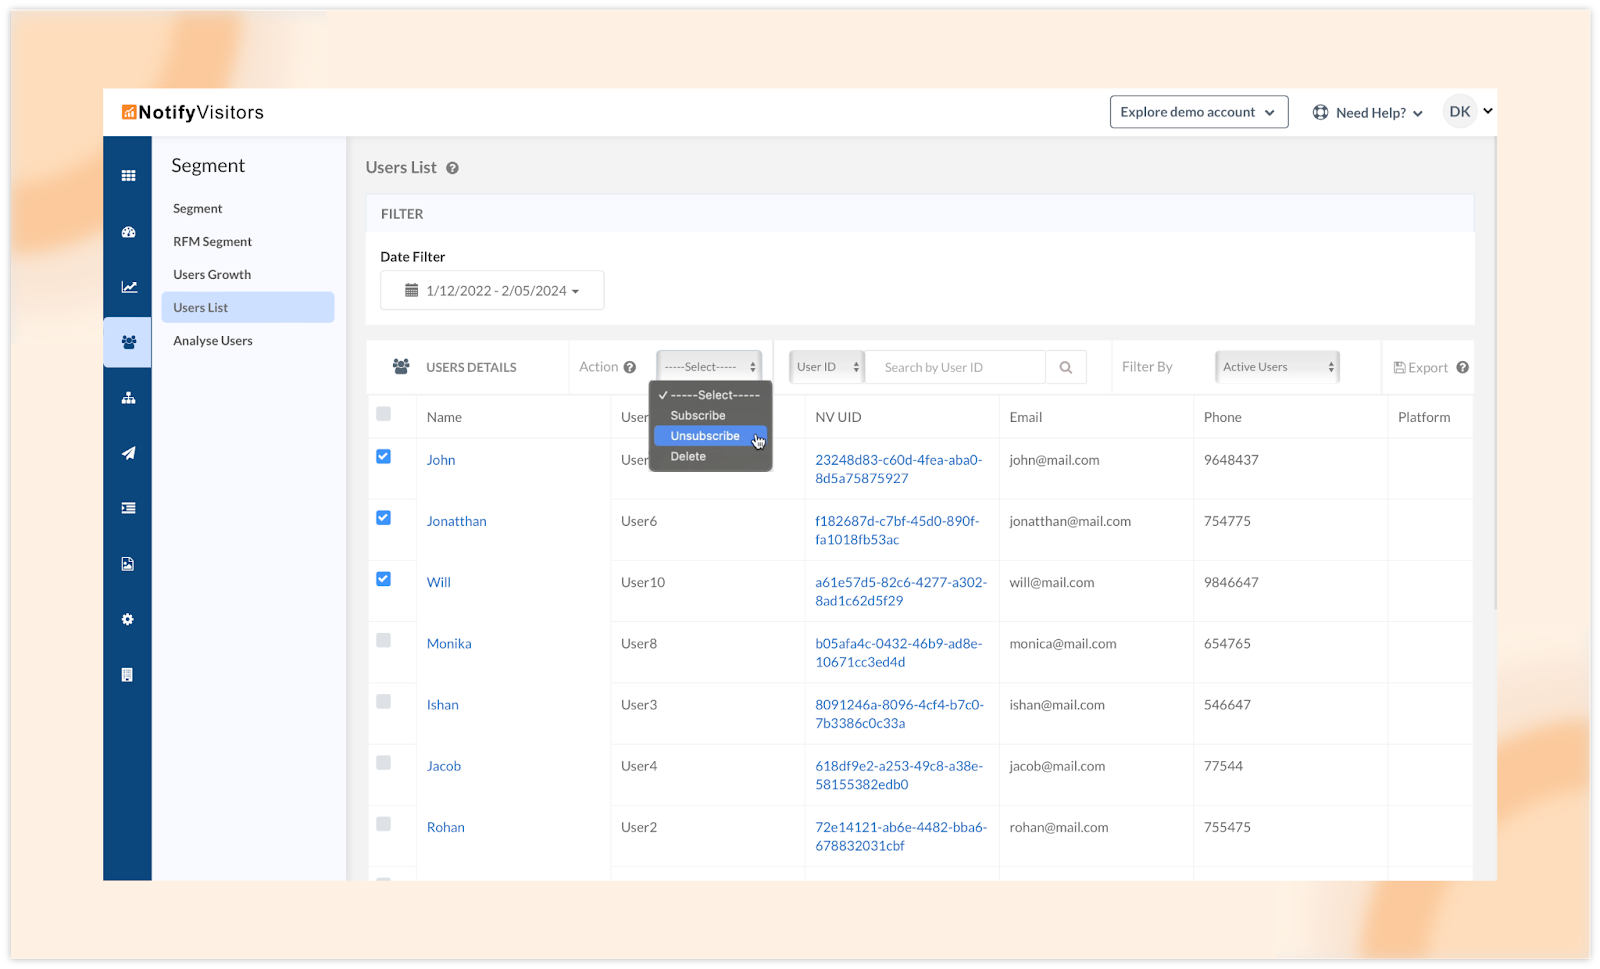
Manual suppression process
To manually suppress users, navigate to the “Segments” section and access the “User List” tab. Utilize the filter options to identify the users you wish to suppress. Tick mark the desired users and choose “unsubscribe” from the “Action” dropdown menu in the top bar.
Specify the channels from which you want to unsubscribe these users and click “Update” to apply the changes.
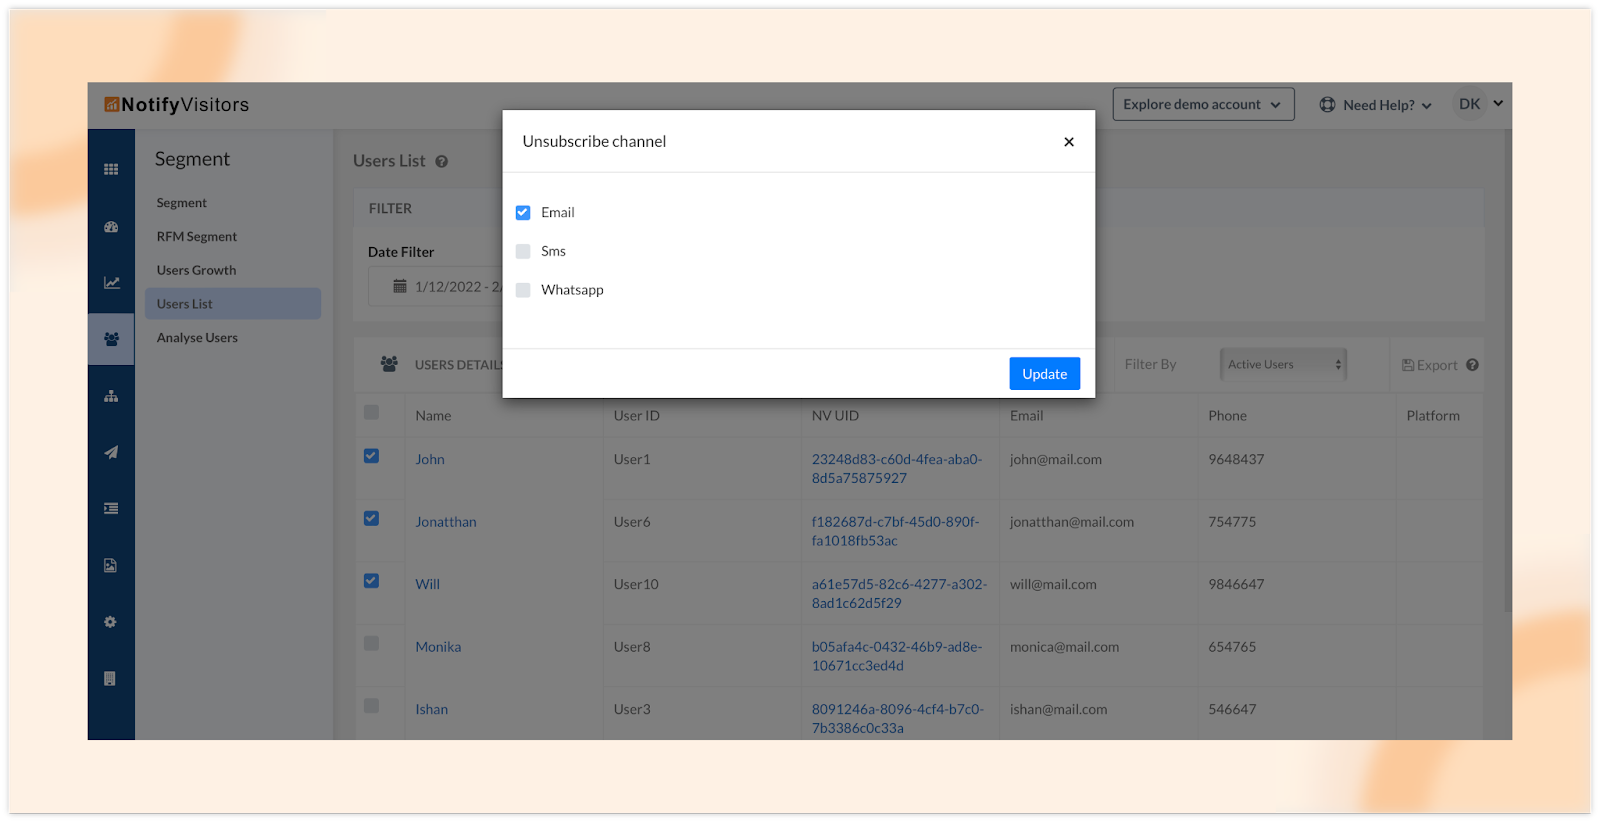
Subsequently, users will be marked as manually suppressed, and their subscription status can be viewed under the “Attributes” tab of their profile.
Bulk manual suppression
Alternatively, you can perform manual suppression in bulk by uploading a CSV file containing attribute values as “5” indicating manual suppression.
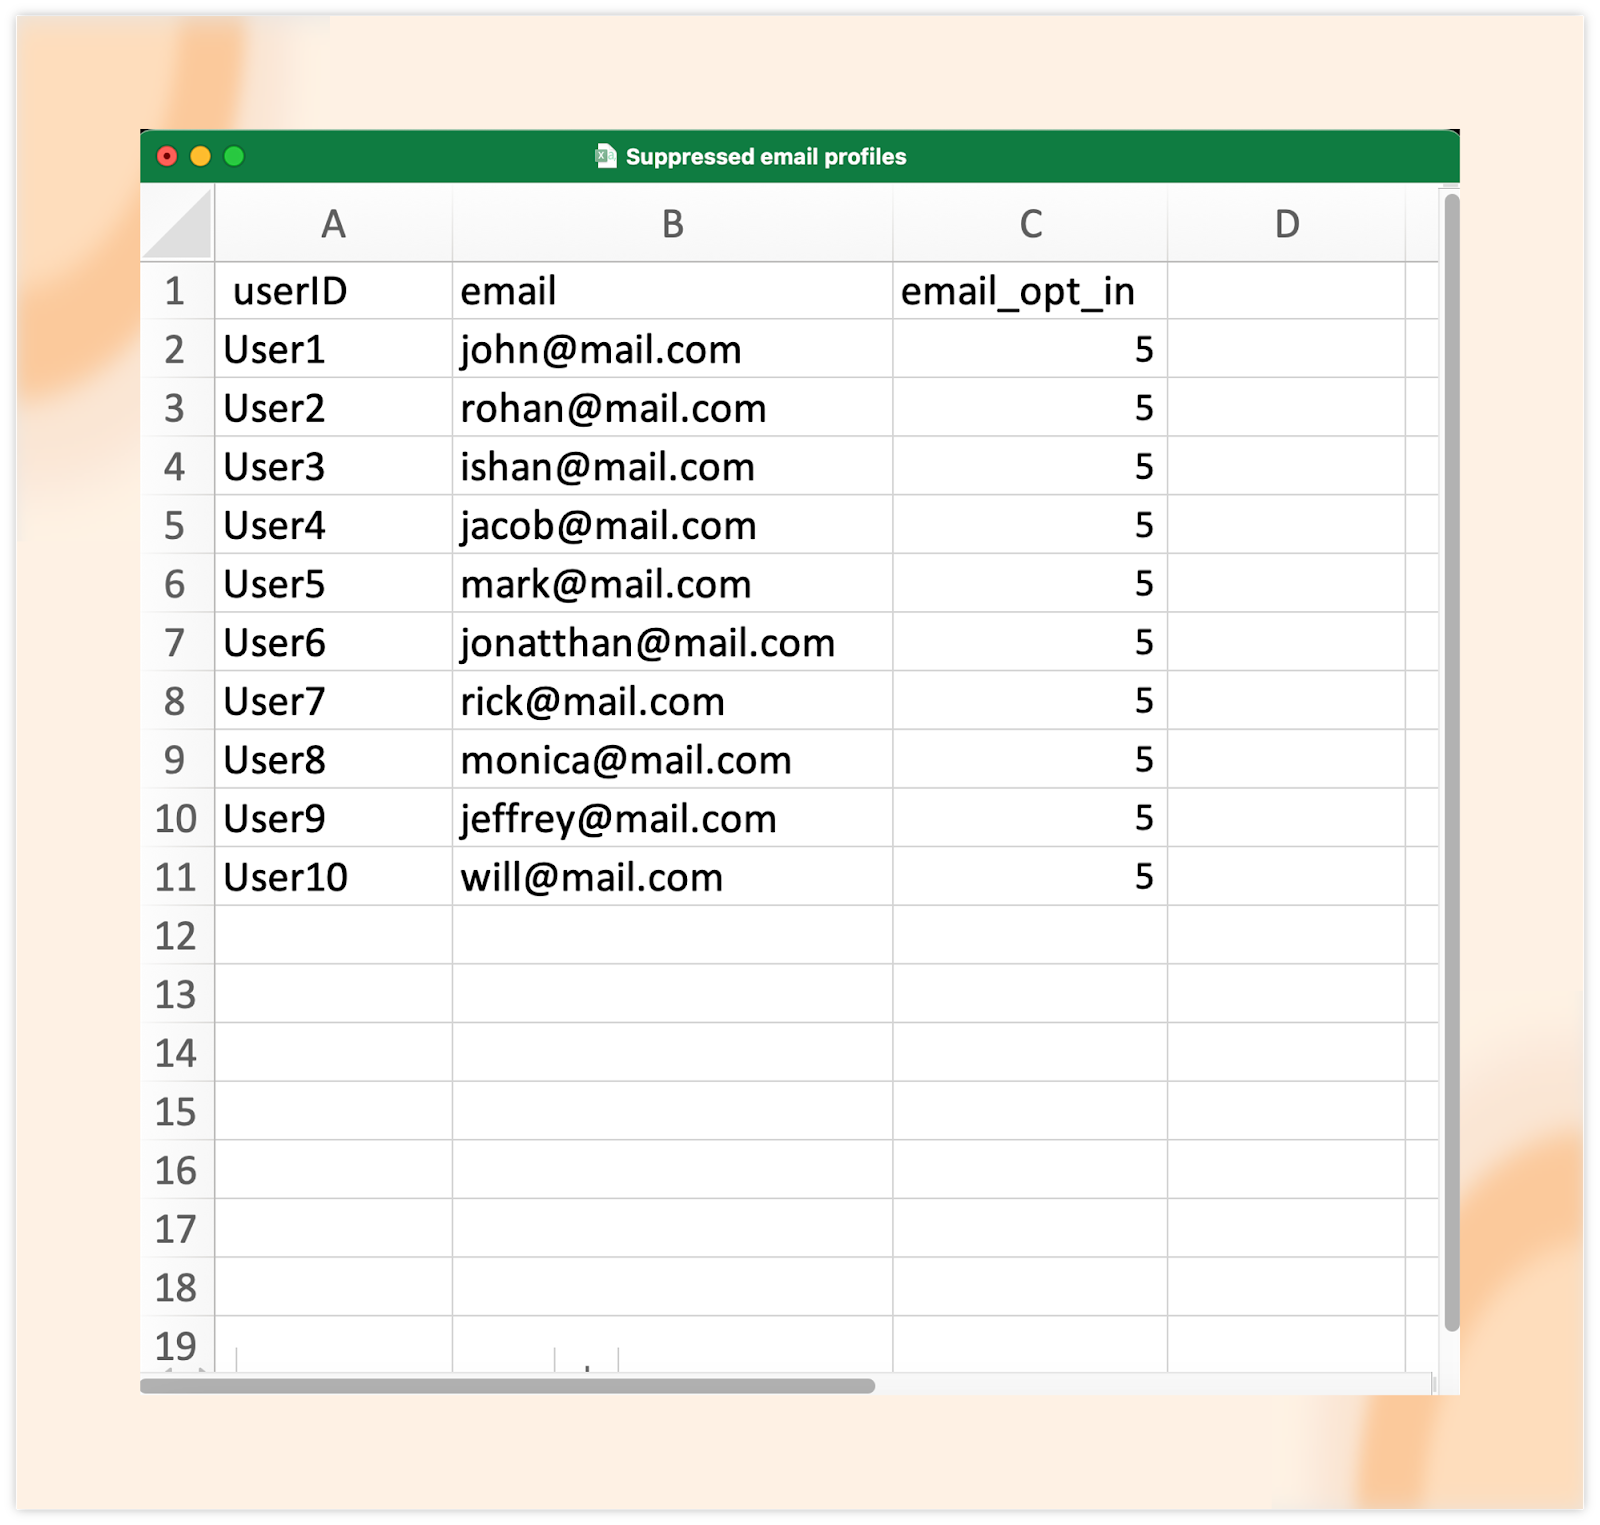
This streamlined process ensures efficient management of large user lists while maintaining precision in communication preferences.
By leveraging these functionalities, you can effectively manage communication channels, respect user preferences, and optimize your engagement strategies with precision and efficiency.
Conclusion
These updates represent our ongoing commitment to providing you with cutting-edge tools and features to help you achieve your marketing goals effectively. We’re excited to see how these enhancements will empower you to drive engagement, conversions, and success in your campaigns.
Thank you for choosing us as your partner in marketing excellence. We look forward to continuing to innovate and support your journey towards success.
Stay up-to-date with our newest releases and enjoy instant access to these features by simply clicking the “Allow” button located at the top of your screen to enable push notifications. If you have any questions, feedback, or would like a demo, feel free to contact us at support@notifyvisitors.com.

Introducing our latest release notes! We're thrilled to bring you a host of exciting features and enhancements designed to elevate Read more

Introducing our latest release notes! Get ready for an exhilarating experience as we unveil four game-changing features that will elevate Read more

Welcome to our latest release notes! We're thrilled to introduce you to four exciting features that will elevate your experience Read more

In this edition of our Release Notes, we are thrilled to introduce a highly anticipated feature – Coupon Codes. This Read more

