Email
Email SMS
SMS Whatsapp
 Web Push
 App Push
 Popups
 Channel A/B Testing
  Control groups Analysis
 Frequency Capping
 Funnel Analysis
 Cohort Analysis
 RFM Analysis
 Signup Forms
 Surveys
 NPS
NPS Landing pages personalization
  Website A/B Testing
  PWA/TWA
 Heatmaps
 Session Recording
 Wix
Wix Shopify
 Magento
 Woocommerce
 eCommerce D2C
  Mutual Funds
 Insurance
 Lending
  Recipes
  Product Updates
 App Marketplace
 Academy


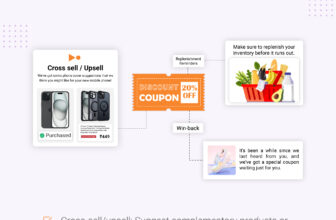
This recipe will walk you through the process of creating a customized coupon campaign that shows appreciation to customers who have left unsatisfactory or negative reviews on your website. Dealing with unhappy customers can be challenging for businesses, as it can lead to lost revenue and missed opportunities. Additionally, negative feedback can damage a company’s reputation and discourage new customers from trying your products or services.
To tackle this issue, the guide includes implementing a personalized coupon campaign to encourage unsatisfied customers to reconsider. By offering discounts, brands can motivate these customers to give your business another chance, explore different products, and provide valuable feedback.
To improve feedback via personalized discount coupons, we will create 2 automated journeys:
- At first, we will create a journey to send a feedback request email after the user places an order.
- Then, based on the feedback event collected, we will create another automated journey to dispatch coupon codes to those who left one or two stars as their feedback.
This approach aims to win back dissatisfied customers and minimize the impact of negative reviews on both current and potential customer relationships.
Table of Contents
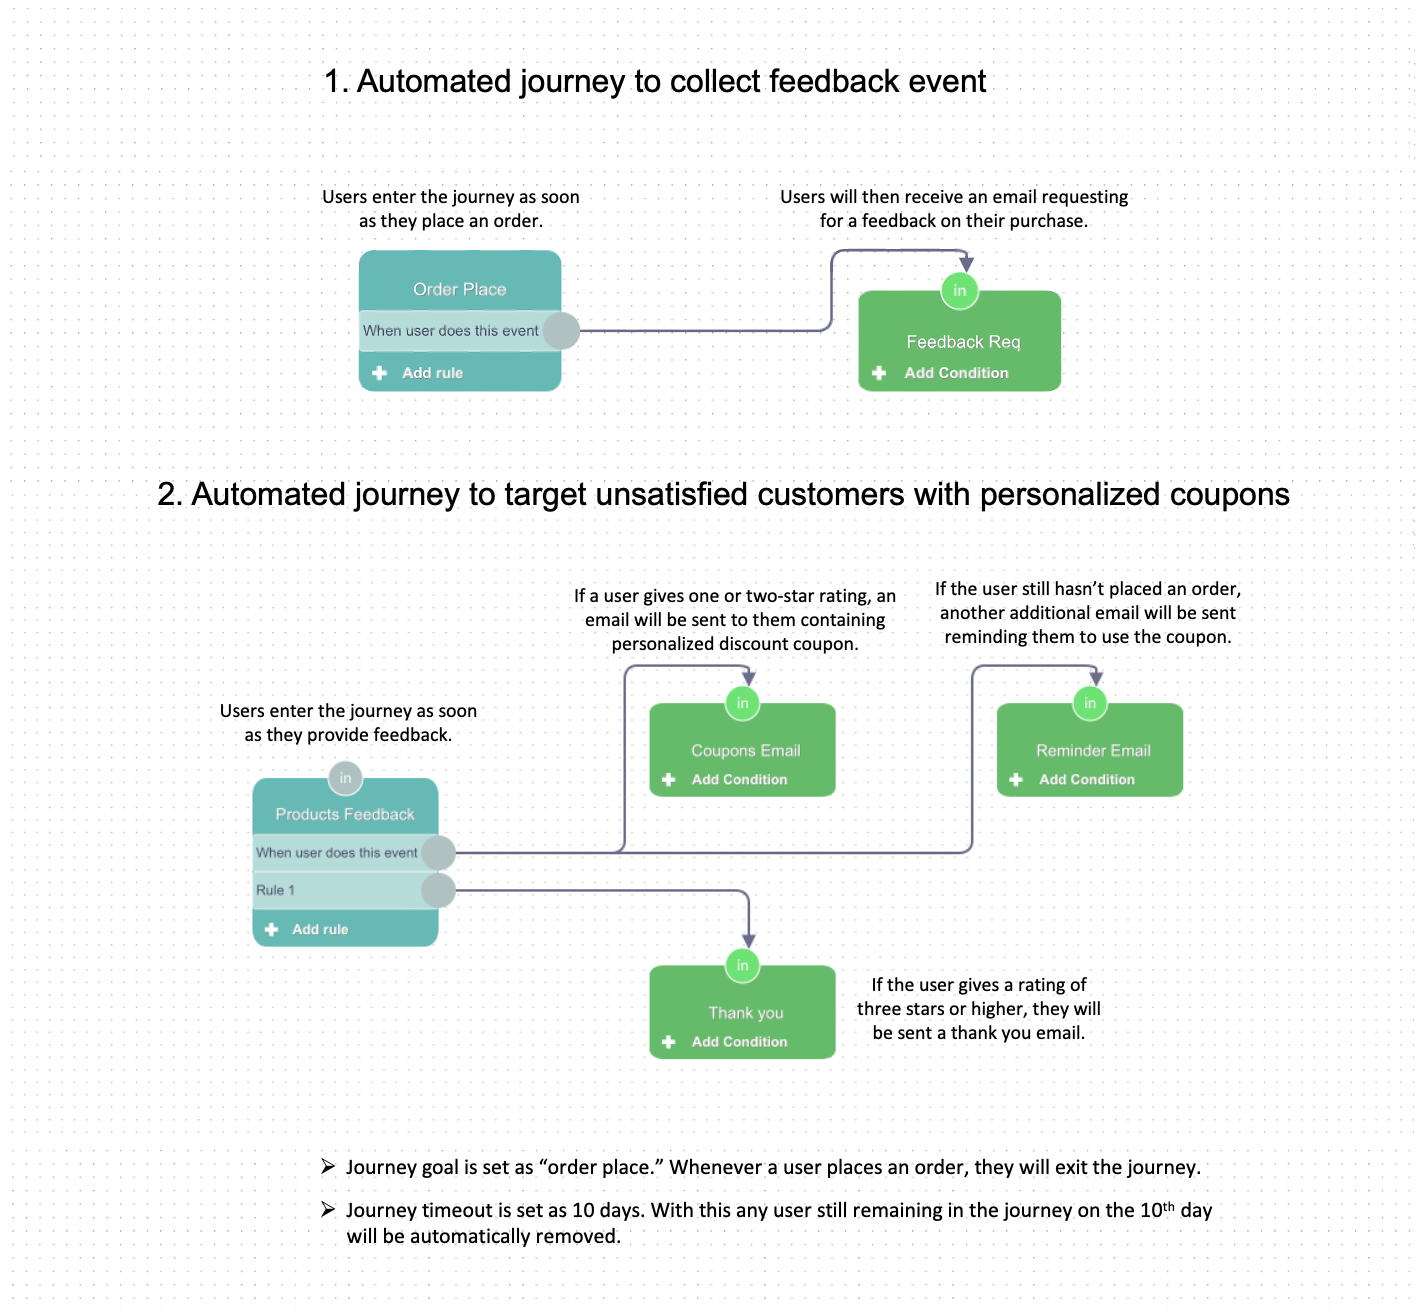
Creating an automated journey to collect feedback event
This journey is critical for collecting a feedback event, along with ratings value as an attribute. Firstly, make sure your website or store has a feedback event configured. Once you start tracking this event on your website or store, you need to enable its synchronization with NotifyVisitors.
Now, to collect feedback events, we have to encourage customers to leave their feedback on your store. For this, we will create an automated journey where when a user places an order, they will automatically receive an email asking for their feedback.
To do this, click on “create journey” and then select “create from scratch” followed by “create sequence.” Give your journey a name and click on “create journey.” You will then be taken to the journey builder board.
Now drag and drop an event block to the board and select the order place event from the “Select Event” dropdown.
Next, drop the email block to the board and craft the email content as asking for feedback along with a link to your feedback page.
Make sure to link the event block with the email block and adjust the time frame to 10 days so that the feedback email is sent out after the product has been delivered. Typically, deliveries take around 5-7 days after the order is placed, so we’ve allowed for 10 days to account for any potential delays. Feel free to customize this timeframe according to your own delivery schedule.
Your journey is now ready. Whenever a user places an order, they will enter this journey and receive a feedback email. Once they provide their feedback, our system will record this feedback event along with any related attributes such as ratings, stars, etc.
Creating an automated journey to target unsatisfied customers with personalized coupons
Now, based on the feedback event collected above, we can create another automated journey to target customers who left one or two-star ratings on your platform. For this, we will use the feedback event as a trigger for our journey and dispatch emails with personalized coupons automatically.
To do this, create a new journey from scratch followed by “create workflow.” You will then be taken to the journey builder board.
Now follow the steps below to build your journey:
Step 1: Add event block for feedback event and ratings attribute:
Firstly, we will set up a trigger for the journey based on the feedback event. To do this, simply drag and drop the event block onto the journey board.
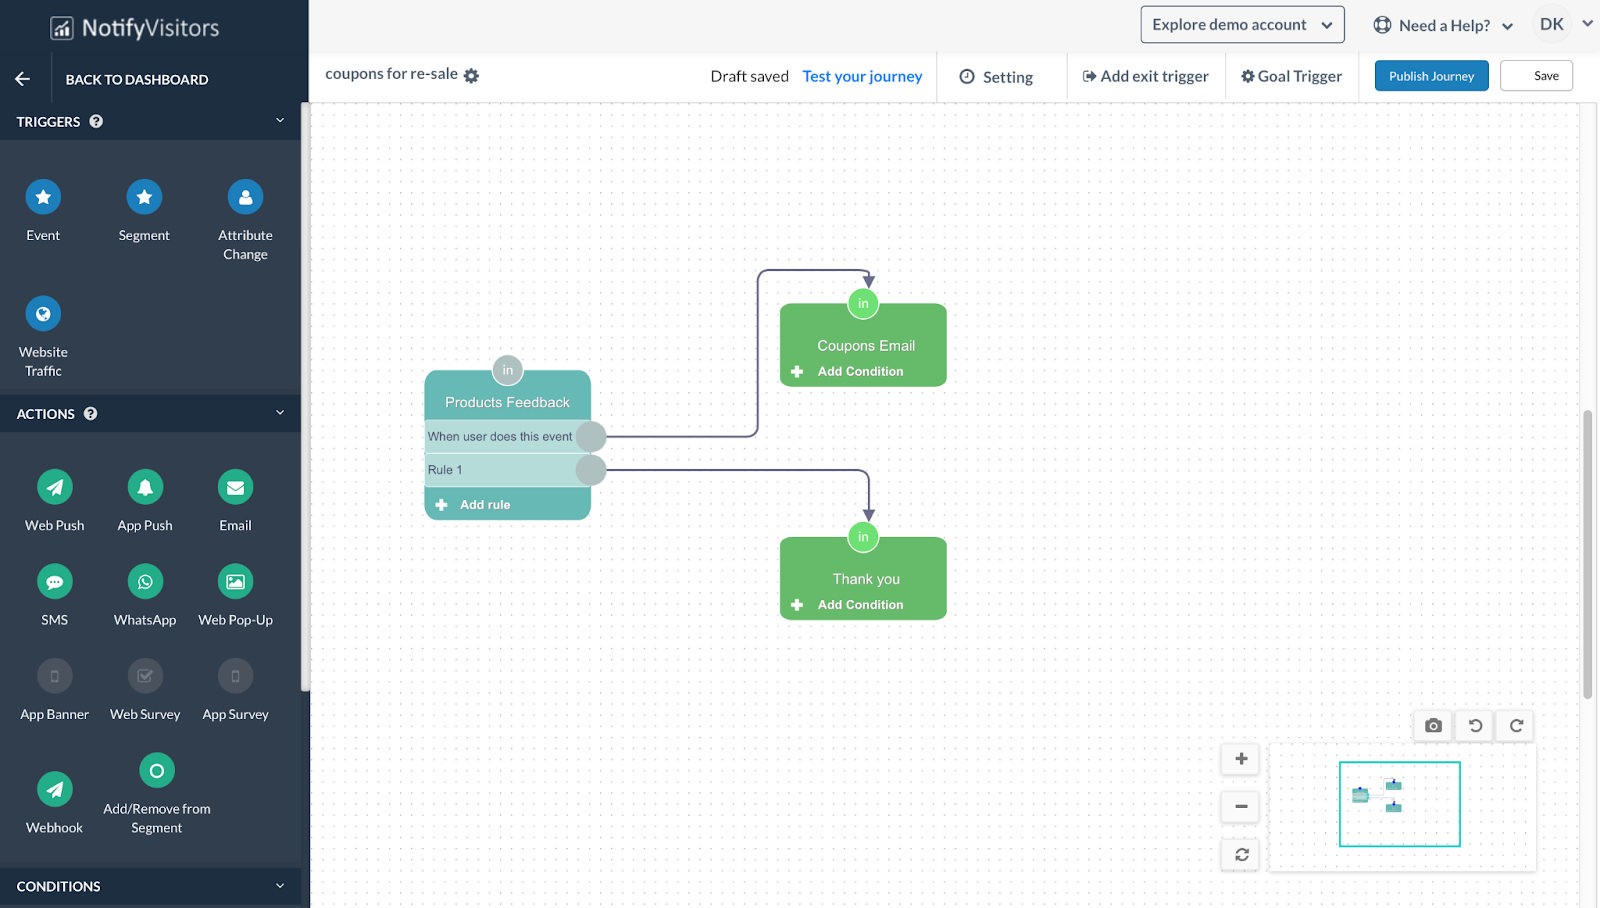
A popup titled “edit main event” will then appear. Here, you can select your custom feedback event. For example, we will be using our custom feedback event called “Products feedback.”
Next, from the conditions dropdown, scroll down to the bottom and choose the attribute for ratings. In our case, the attribute name is “Stars”. Apply the condition of less than 3, as shown in the image below. Once done, click on save.
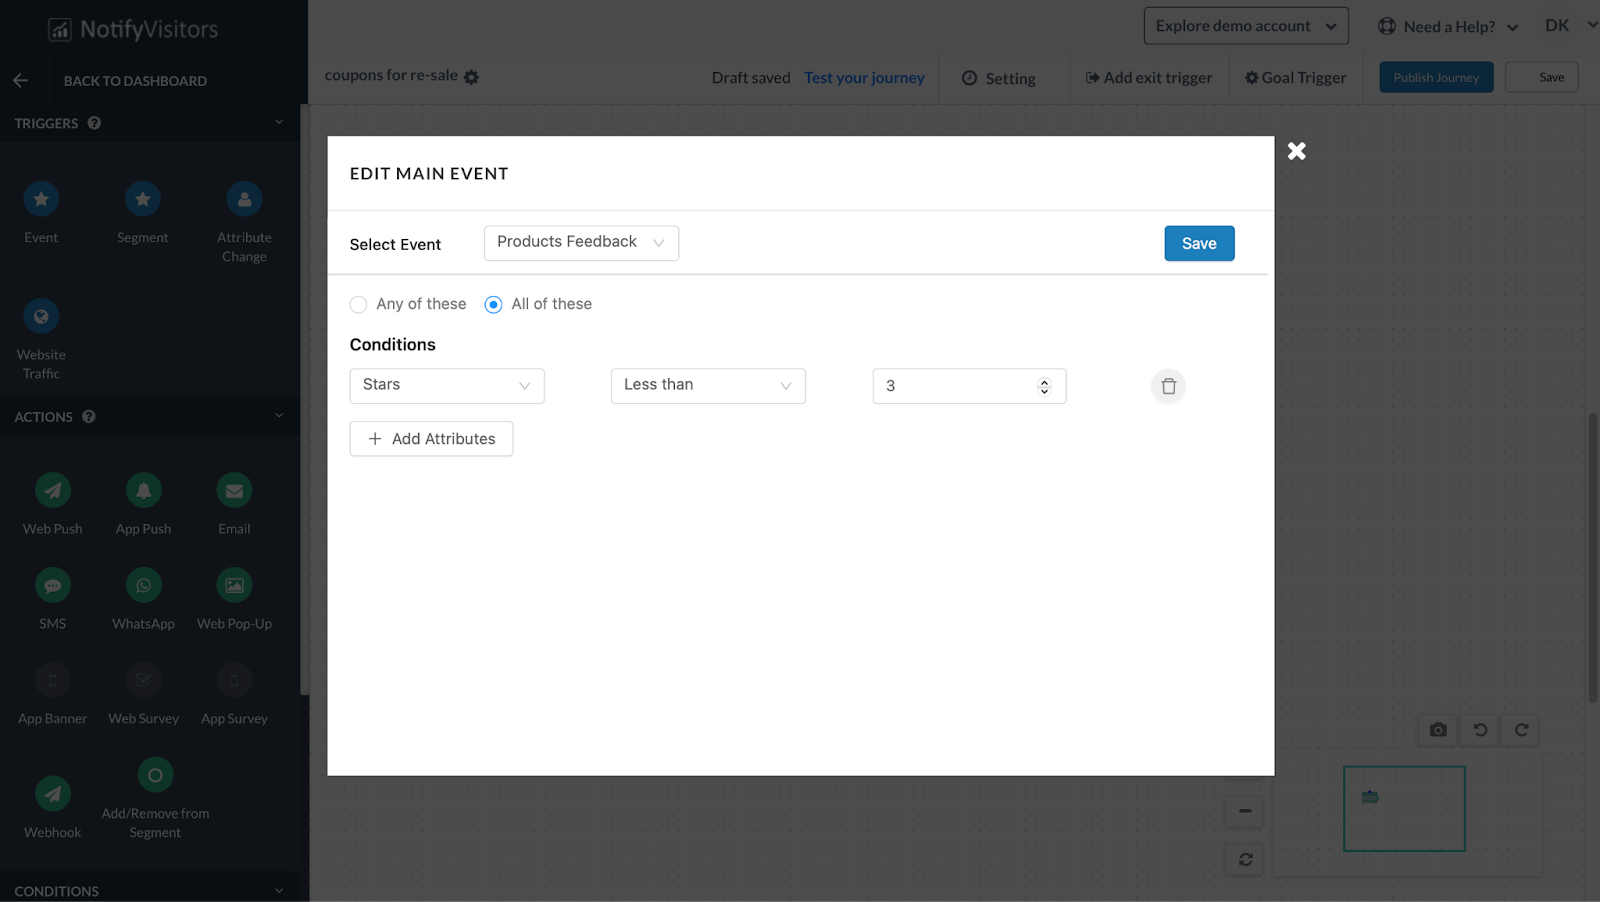
By doing this, all customers who have given a rating of 1 or 2 stars will be added to this journey, allowing us to target them with personalized coupons.
If you also wish to send a thank you or any other email to customers who have rated 3 stars and above, you will need to add another separate rule.
To do this, click on the “add rule” option in the event block. Once again, select the rating attribute from the dropdown, which in our case is “Stars,” and add the condition of greater than 2. Finally, click on save.
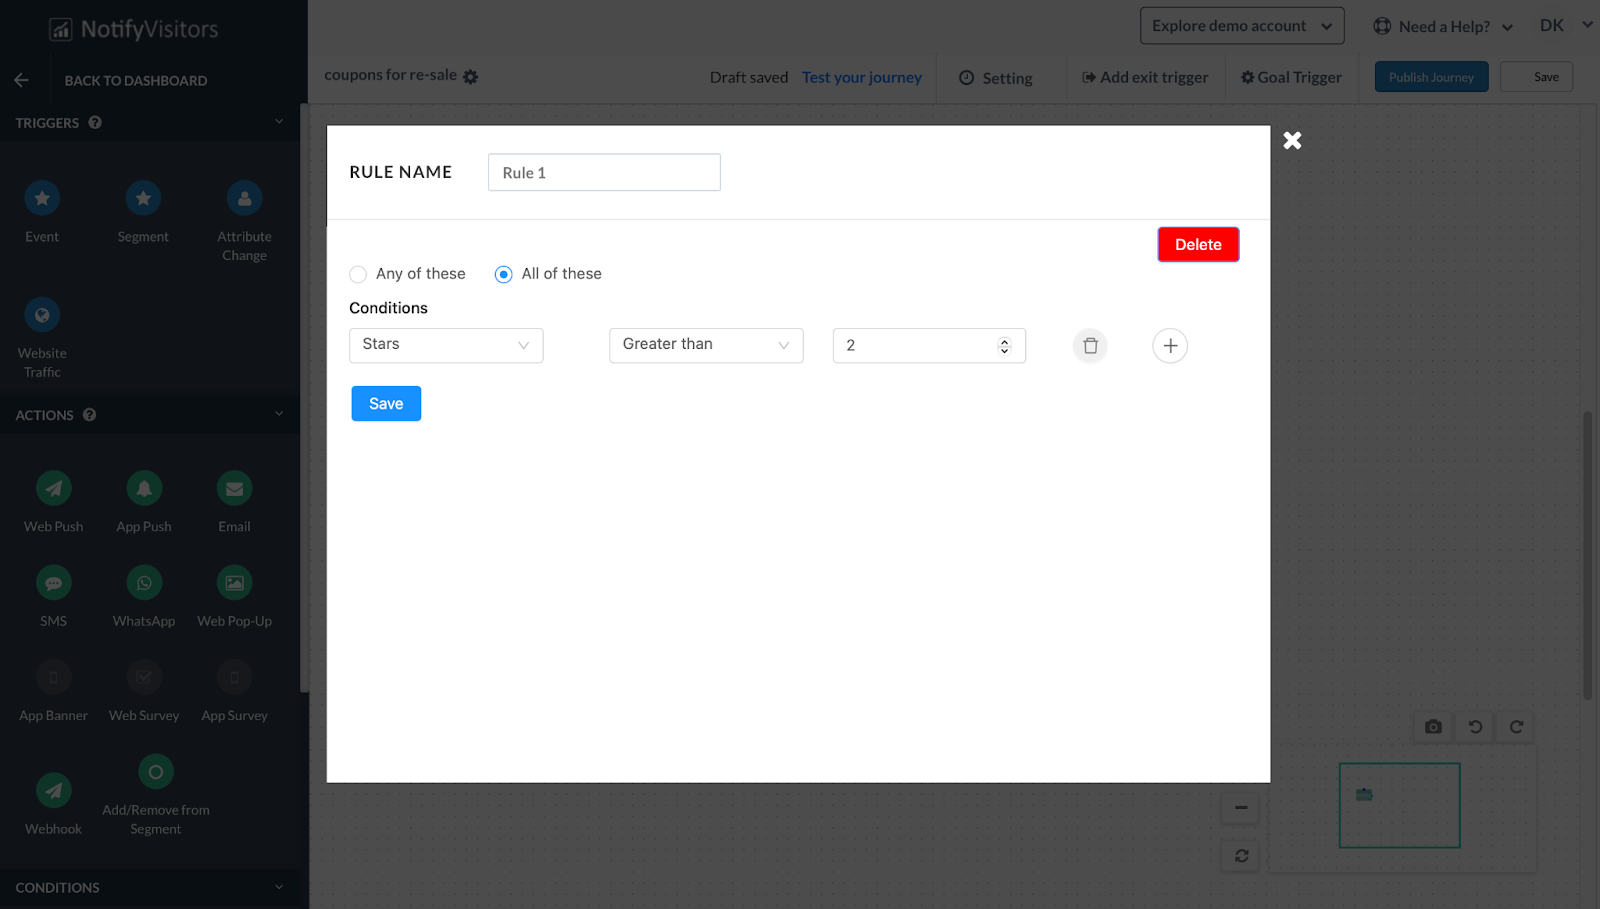
With this additional rule, all customers who have rated 3, 4, or 5 stars will also be added to the journey, but with the option to target them separately.
Step 2: Add an email block for sending personalized coupons
Next, we need to add an email block to send personalized coupons to users who rated 1 or 2 stars and a thank you email to users who rated 3 stars and above. Simply drag and drop the email block onto the journey board and click on “Create email.” If you already have an email with personalized coupons, you can select it from the dropdown and make any necessary modifications.
If you choose the “Create email” option, begin by filling in the recipient’s page with details such as the campaign name, label, and tracking options. Once you’ve filled in the required information, click on “Continue to content.”. On the content page, provide the email subject, sender name, sender email address, and select drag and drop editor to design your email. Click here for an in-detail tutorial on crafting an email via drag and drop tool. As you design your email, you can also add dynamic coupon codes.
To add coupons to your email template, simply choose the specific row where you’d like to insert them. Then, click on “More” in the toolbar and select “Coupon Code.”
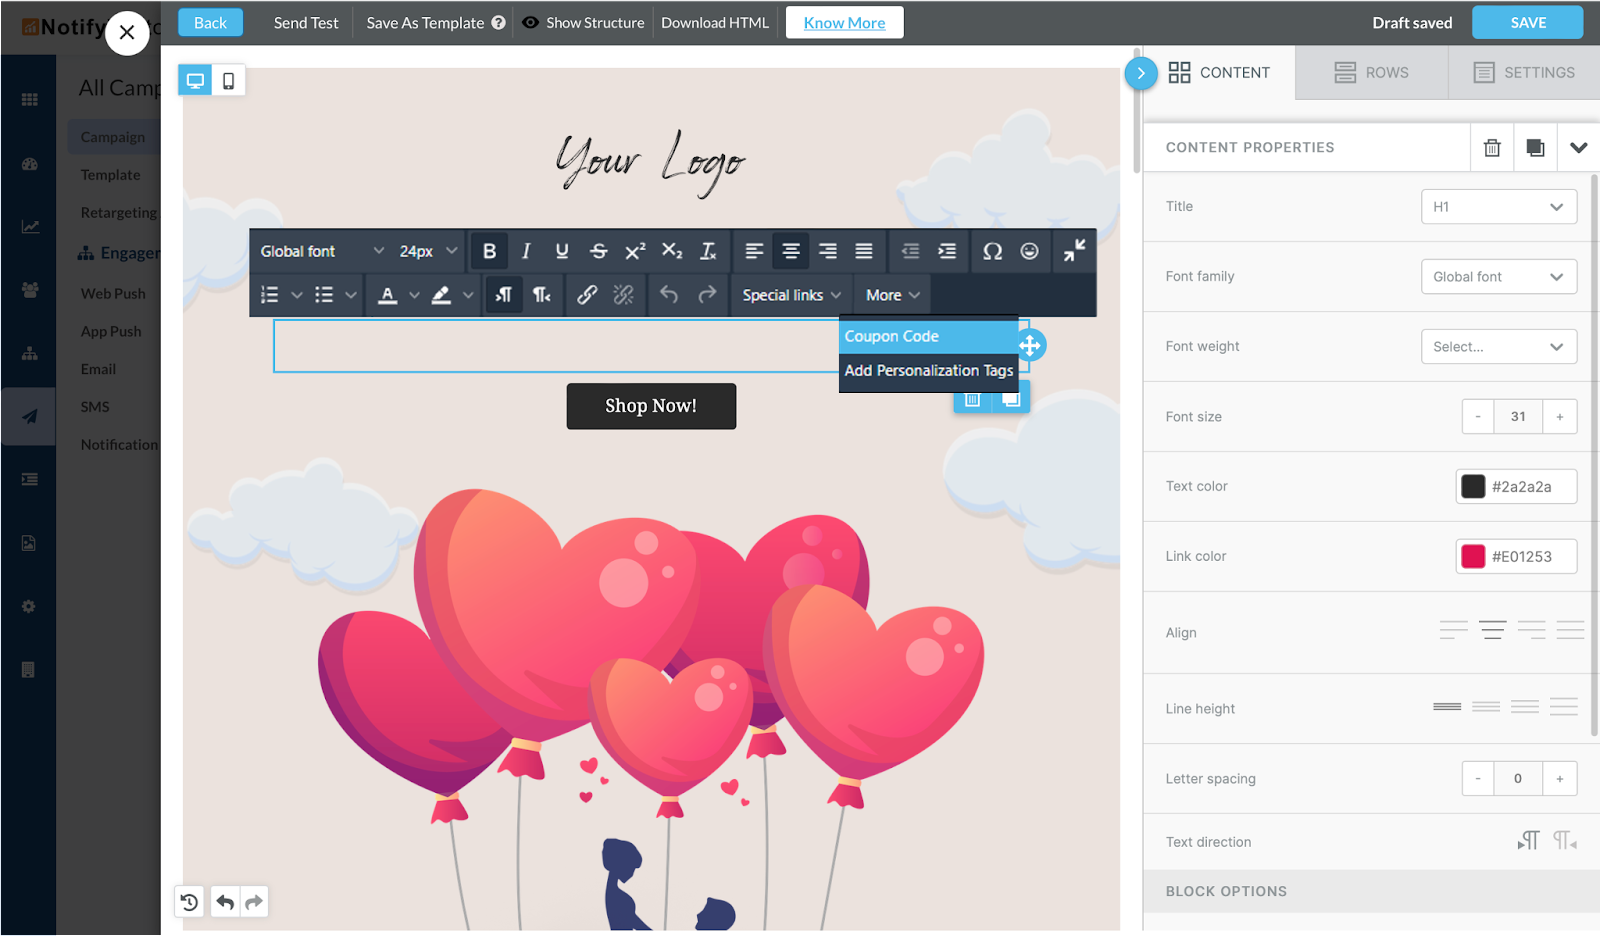
To select your desired list of coupon codes, just click on the dropdown menu labeled “Select Coupon Code.” If you’re new to this feature and haven’t created a coupon list yet, you can refer to our comprehensive guide titled “Coupons codes: Introduction” for step-by-step instructions. Once you’ve created your coupons, they will be conveniently available in this dropdown menu.
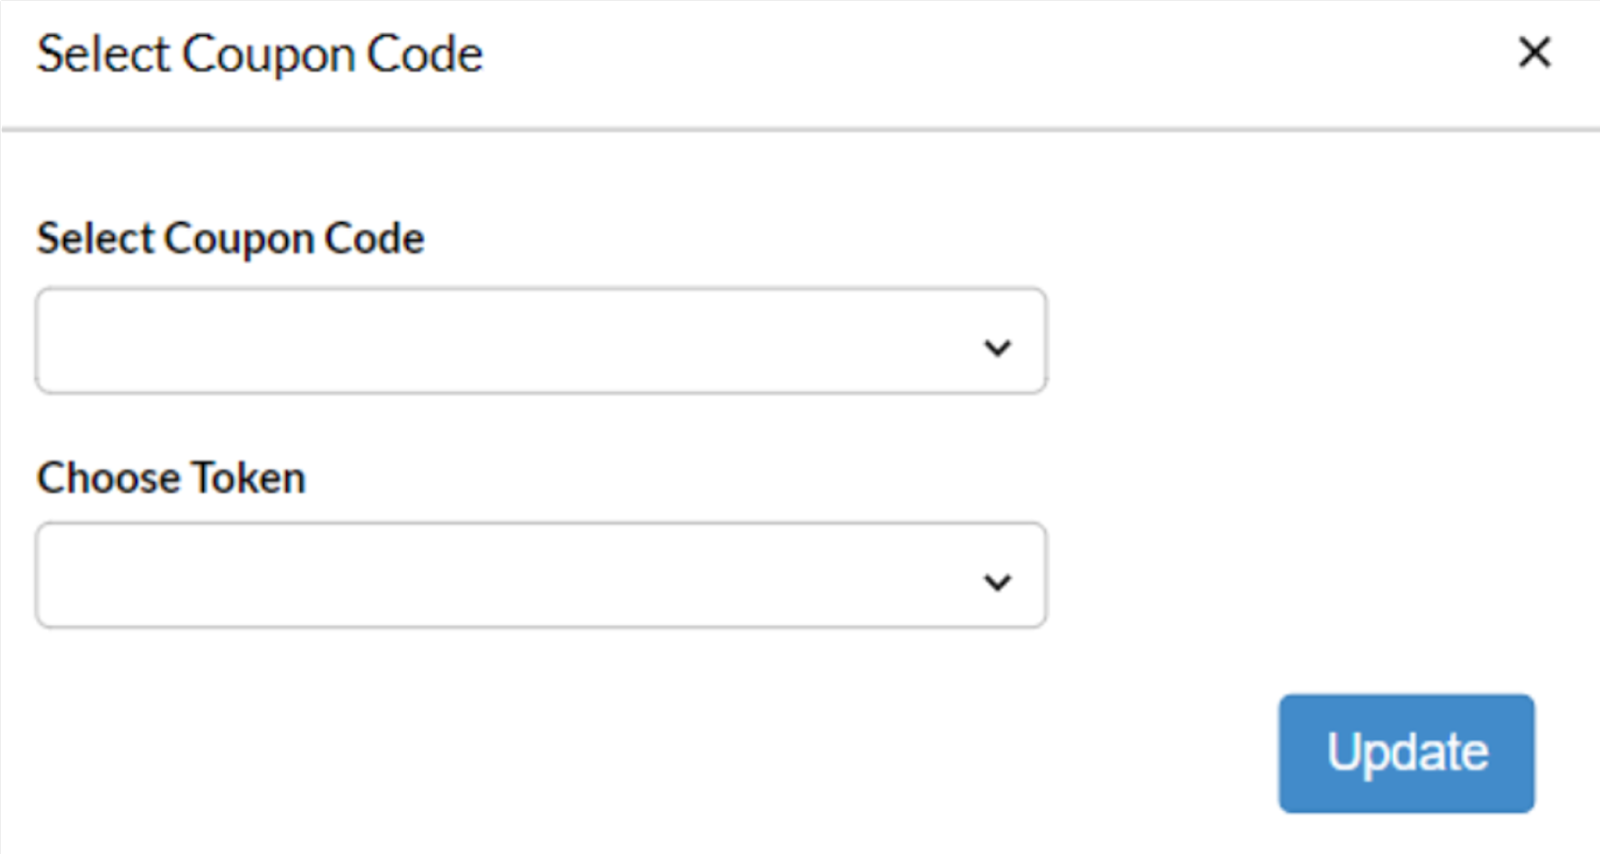
After choosing a coupon list, simply select a token from the available options and click on “Update.”. This process will smoothly blend a dynamic coupon code into your email template.
When the email is sent out, this code will automatically be replaced with a unique code for each recipient. Now, it’s time to finalize your email by adding engaging content and relevant information.
Once you have created a personalized coupon email, simply drag and drop another email block. Follow the same steps as mentioned above for creating an email, but instead of adding coupon codes, create a thank you email for customers who have provided positive feedback. You can either create from scratch or use our predefined thank you template and customize it according to your needs.
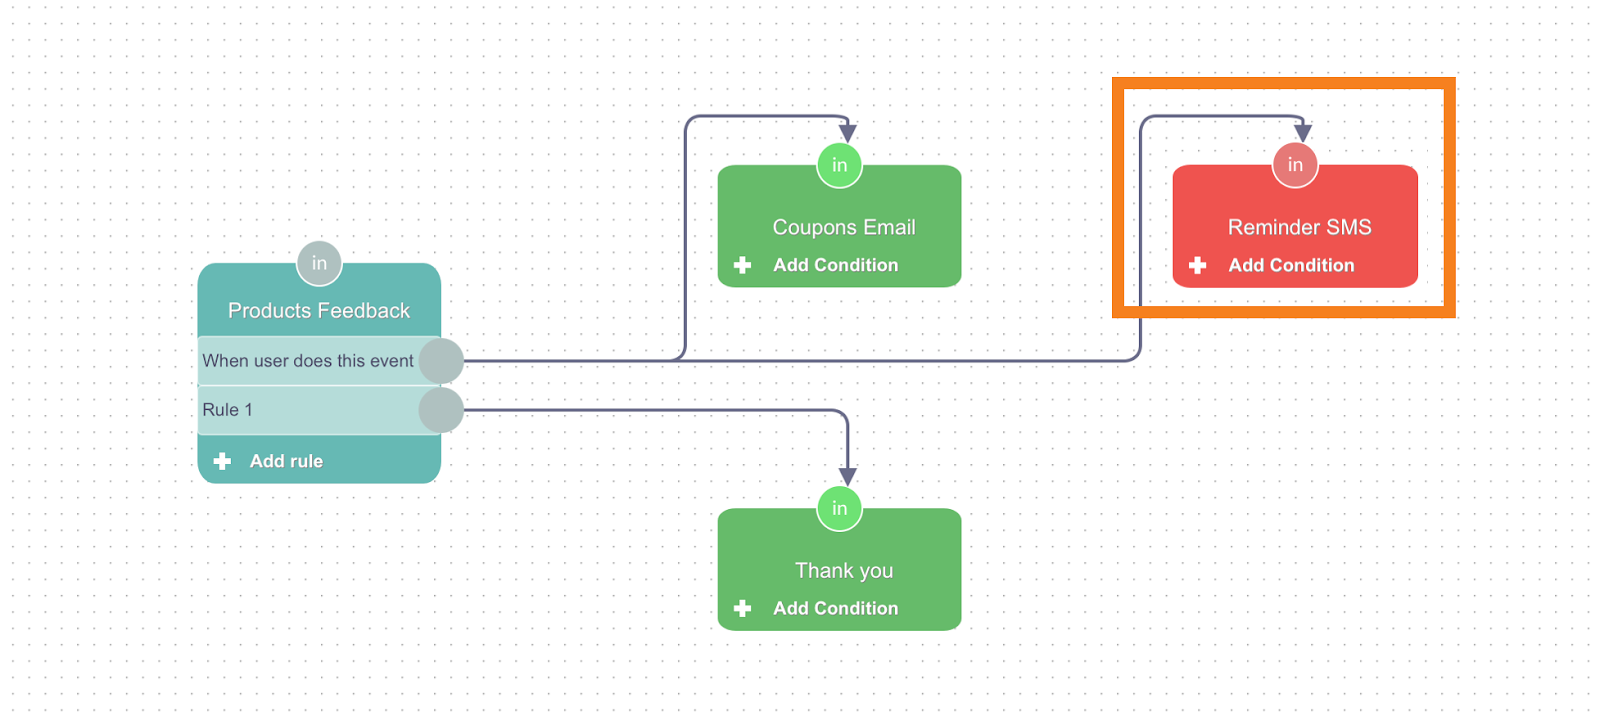
Finally, connect the event block with the email blocks. Connect the rule for negative reviews (1 or 2 stars) to the personalized coupon email block, and connect the rule for positive reviews (3 stars and above) to the thank you email block, as shown in the image below.
Step 3: Reminder email
There is a possibility that some customers may not place an order after receiving the coupon email or might completely skip the mail. To address this, it is recommended that you send an additional email containing the coupons as a reminder.
To add the reminder email, simply drag and drop another email block and follow the same process as the original email for the personalized coupon. When crafting this email, it is important to create a sense of urgency by mentioning a “limited period deal” or that their coupon code will expire soon. Also, make sure to select the same coupon list used in the first email so each user will receive the same coupon code as before.
Lastly, join the negative rating condition of trigger (Product feedback) block with reminder email and set the time period to 7 days. With this condition if the user has not placed an order with initial email in 7 days, then they will automatically receive a reminder email.
Step 4: Set journey goal
In some cases, users may have already made a purchase after receiving the initial email with the coupon code. As a result, sending them a reminder email would be unnecessary.
To prevent this from happening, we have to set the goal of the journey as “order place.” This means that whenever a user makes a purchase at any point during the journey, they will be automatically removed from the journey and will not receive any further communications, such as reminder emails in our case.
To set the journey’s goal, click on the “Goal Trigger” button in the top bar. Then, choose the “order place” event from the drop-down menu and click submit.
Step 5: Journey timeout setting
We have set the journey goal as “order place,” but if the user hasn’t placed an order, they will remain in the journey indefinitely. To prevent this, we have to add a journey timeout condition.
To achieve this, just click on the “Setting” button located on the top bar. Then, in the journey timeout section adjust the time period to 10 days. Our reminder email is sent on the 7th day, but we have allowed for an additional window in case the last email is scheduled with a ramp up over multiple days.
Lastly, don’t forget to select the option “Allow users to re-enter in journey.”
Your journey is now ready! To make it live, click on the “Publish Journey” button.
Complete process summary
We have developed two journeys for this recipe, which rely on each other.
Initially, we have set up a journey where a user enters after placing an order. Subsequently, an email is sent to them, requesting their feedback.
If the user provides feedback, they proceed to the second journey. In case the feedback is rated 3 stars or higher, they will receive a thank you email. However, if the feedback is negative, rated 1 or 2 stars, they will receive an email containing a coupon code, encouraging them to give our product another try. In case the user hasn’t placed an order, a reminder email with coupon codes is sent.
Now, if the user makes a purchase, they will once again enter the first journey, as it is triggered by placing an order. This allows them to receive another email asking for feedback, providing them with an opportunity to reconsider their feedback after the second purchase they made using a personalized discount offer.
Using SMS as a channel to send personalized coupons
Instead of email, you also have the option to use SMS to send personalized coupons. However, it is advisable that instead of using 2 SMS, i.e. one for sending personalized coupons and then another as a reminder, you can send an email initially and then follow up with an SMS reminder if the order is not placed.
To use SMS, just drag and drop the SMS block, fill in the necessary information, and include a dynamic coupon code. Remember to use the same coupon list as you’ve used in the email, to ensure each user receives the same coupon.
Conclusion
In this recipe, we’ve walked you through a systematic approach to gathering feedback events and leveraging them as triggers for an automated journey to distribute coupons. Through this automated process, you can motivate dissatisfied customers with personalized coupon codes. Additionally, once they make a purchase, they will receive a feedback request again, all managed automatically.
It’s important to recognize that while personalized coupons serve as an incentive, they alone may not guarantee positive feedback. If a customer expresses dissatisfaction due to issues such as faulty products, poor customer service, or delivery problems, it’s crucial to address and resolve these issues before implementing the automated journey outlined above. Effective resolution of underlying concerns enhances the chances of turning dissatisfied customers into satisfied ones and contributes to building a positive brand image.