Email
Email SMS
SMS Whatsapp
 Web Push
 App Push
 Popups
 Channel A/B Testing
  Control groups Analysis
 Frequency Capping
 Funnel Analysis
 Cohort Analysis
 RFM Analysis
 Signup Forms
 Surveys
 NPS
NPS Landing pages personalization
  Website A/B Testing
  PWA/TWA
 Heatmaps
 Session Recording
 Wix
Wix Shopify
 Magento
 Woocommerce
 eCommerce D2C
  Mutual Funds
 Insurance
 Lending
  Recipes
  Product Updates
 App Marketplace
 Academy


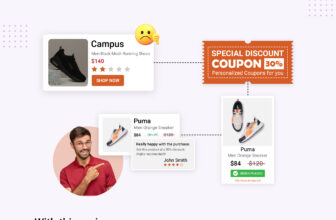
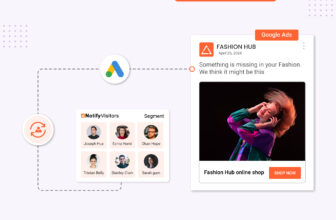
In this recipe, we will explore various methods of NotifyVisitors that can help you with cross-selling and upselling your products.
Cross-selling involves suggesting complementary or enhancing products that go well with the items a customer is currently interested in. For example, if a customer is browsing an online gadget store for a new smartphone, a cross-sell recommendation could suggest adding a high-quality phone case and a set of premium headphones to enhance their overall device experience.
On the other hand, upselling is a strategic approach that encourages customers to consider upgraded or premium versions of the products they are considering. Imagine a customer looking for a smartphone; an upsell recommendation could gracefully present a more advanced model with additional features, appealing to their desire for a cutting-edge and more satisfying technological experience.
You might already know about cross-selling and upselling techniques used by popular online stores such as Amazon or eBay. However, these strategies are mostly adopted by big brands as it requires automation because manually suggesting each and every product to a customer is almost impossible, even for small businesses. And to implement automated cross-selling, a complex system with advanced algorithms needs to be developed, which requires significant resources and infrastructure. This capability is usually only available to major brands.
However, here at NotifyVisitors, we have developed such automated algorithms for you, removing the necessity of investing in software development. Our aim is to make this technology available to each and every online store out there.
In this guide, we will cover how you can create an automated cross selling and upselling journey with two different methods to populate your email with related products. By adopting this automated journey, you can deliver personalized, real time suggestions to your customers based on their unique shopping preferences.
Table of Contents
Cross sell and upsell automated journey
To streamline the process of creating a cross-sell and upsell automated journey, we recommend utilizing our predefined template, saving you valuable time and effort that would otherwise be spent building a journey from scratch.
Start by navigating to the “Journey” section, then click on “Browse Predefined Journeys.” Within the “Browse by Goals” section, choose “Cross Sell” > “Standard Post Purchase.”
1. Selecting order place event
Once you’ve selected the standard post purchase template, you’ll be prompted to name your journey and pick an order place event as trigger for the journey. Ensure that your website or store is configured to collect the order place event, and that it is also integrated with our platform. Only then will you see this event in the list.
After choosing the order place event as the trigger, proceed to create the journey. This action will seamlessly transition you into the journey builder tool. Once you enter the journey builder tool, the next step is to configure your cross sell/upsell emails.
2. Email configuration
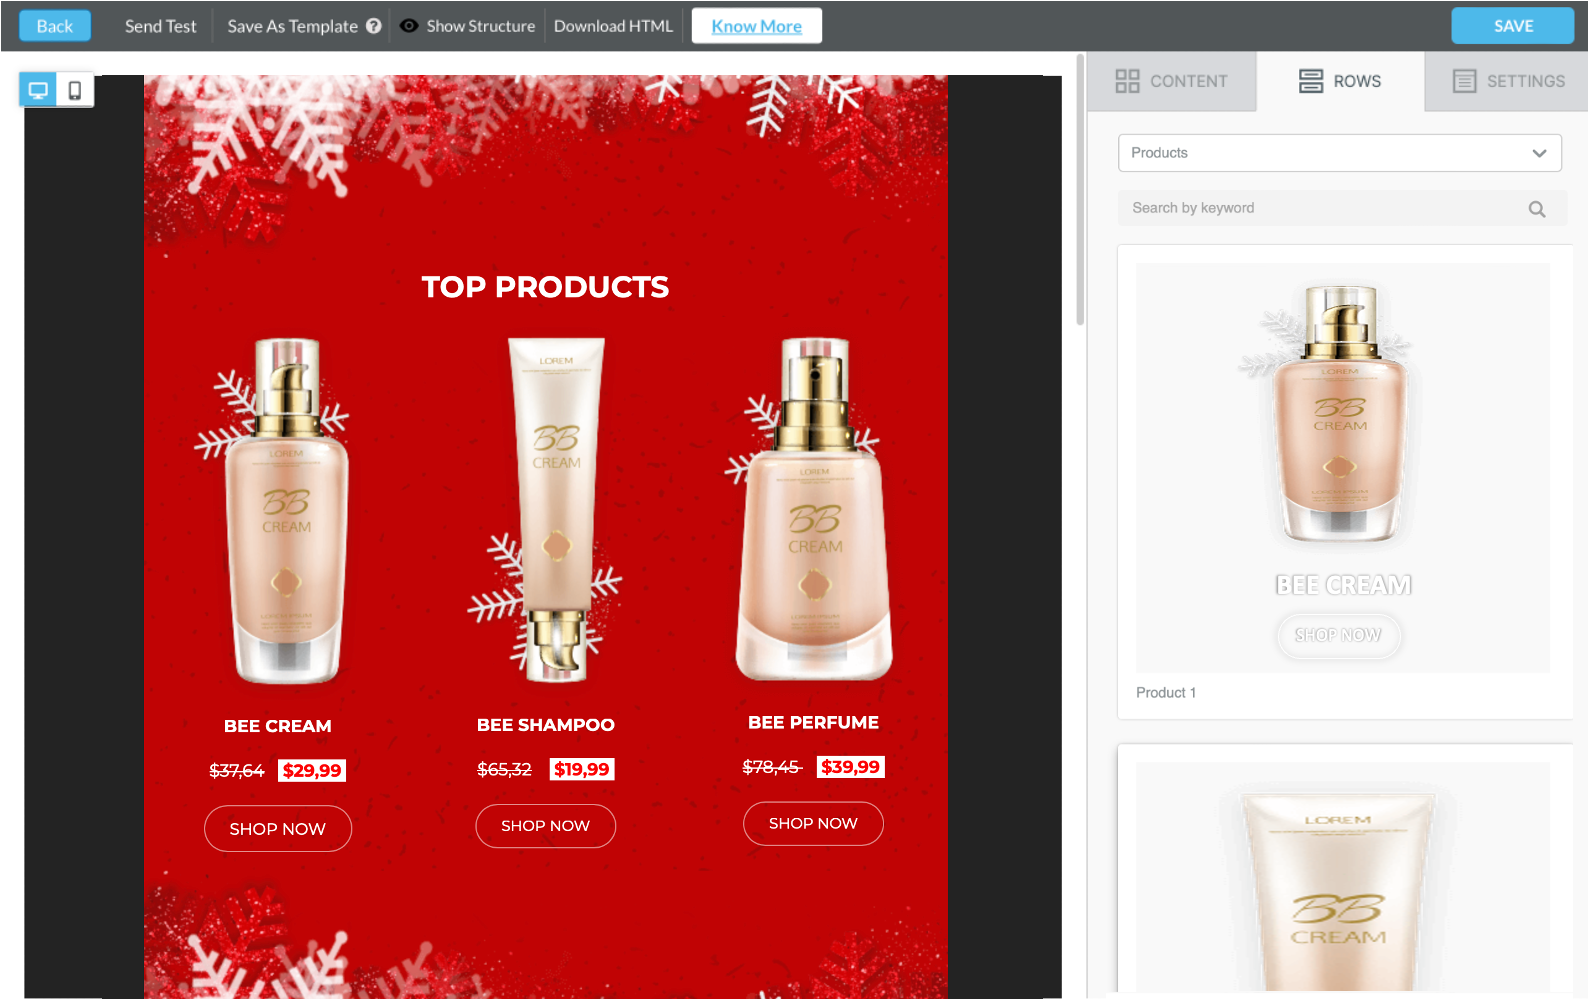
To configure an email, click on the email name. Fill in the required details on the recipient page and click on “continue to content” On the content page choose drag and drop editor to create an email template. Select a prebuilt template of your choice or create one from scratch. Next to add product catalog for cross sell or upsell, click on rows tab and then from the dropdown select search products.
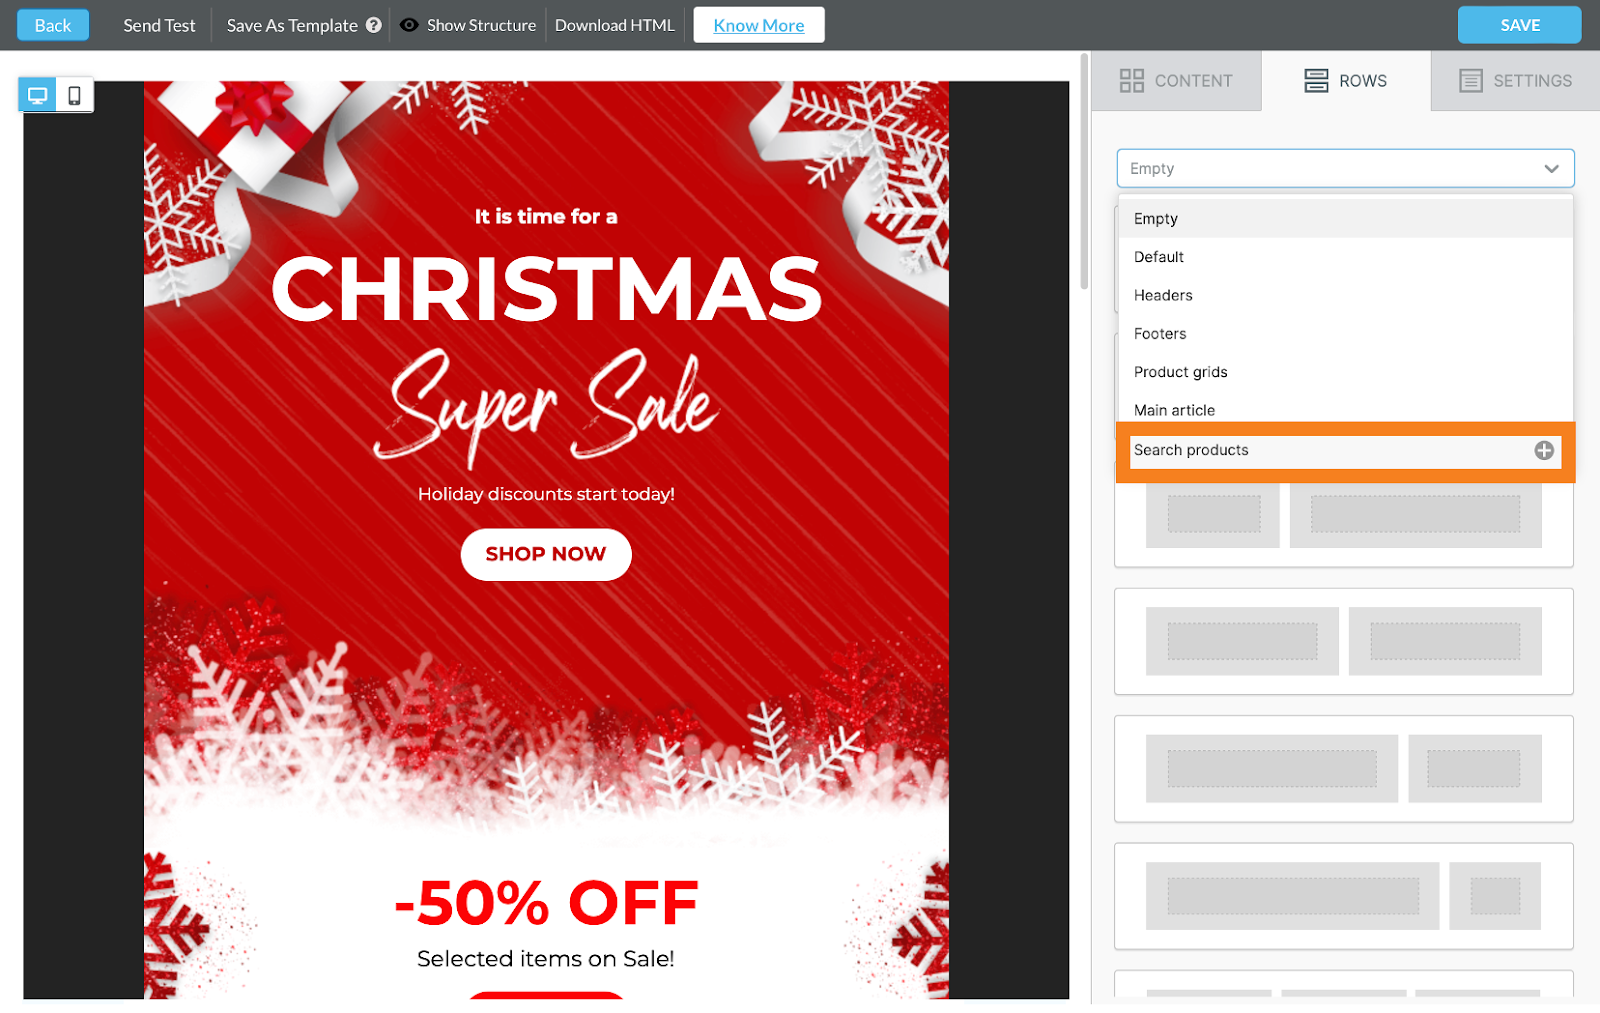
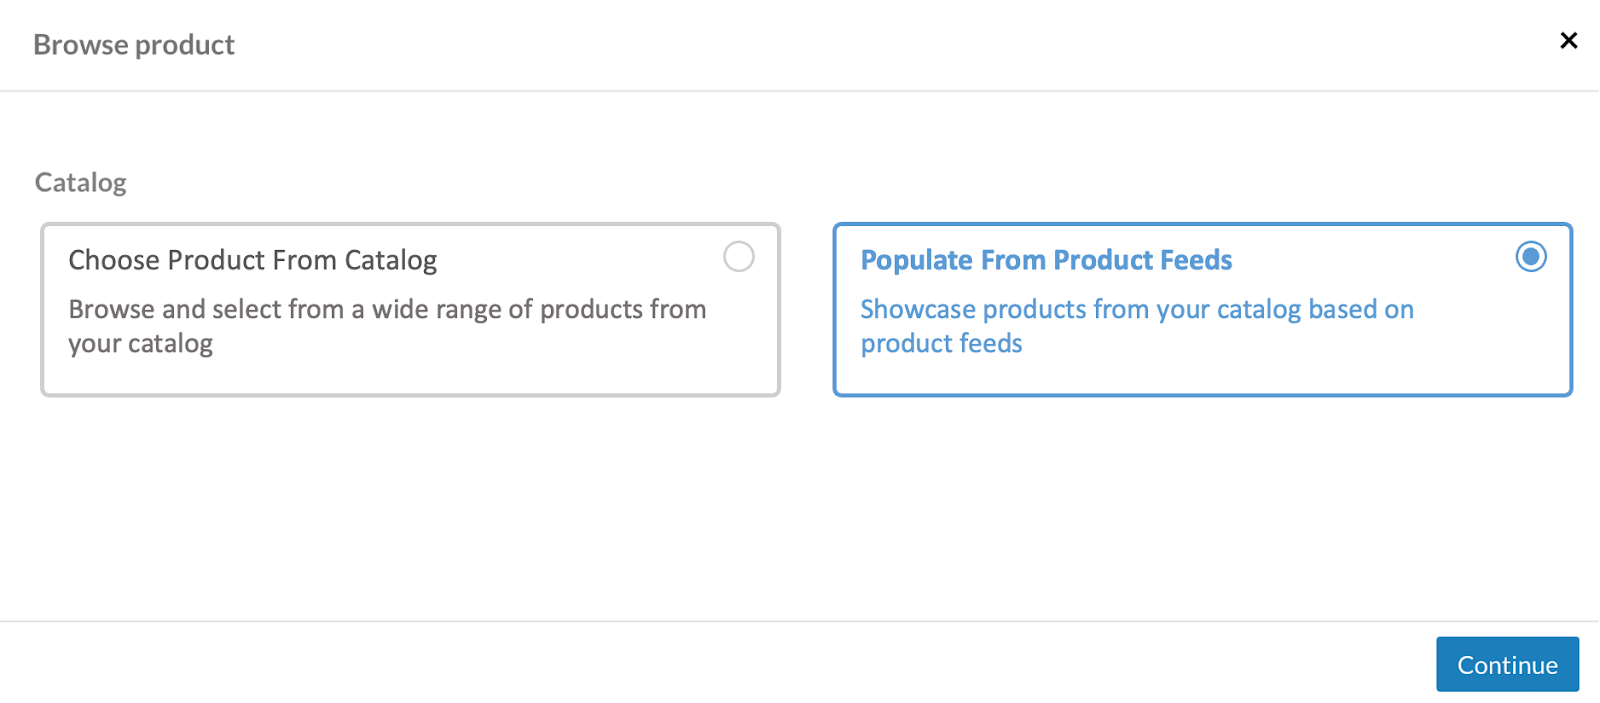
Here you have 2 methods to choose from:
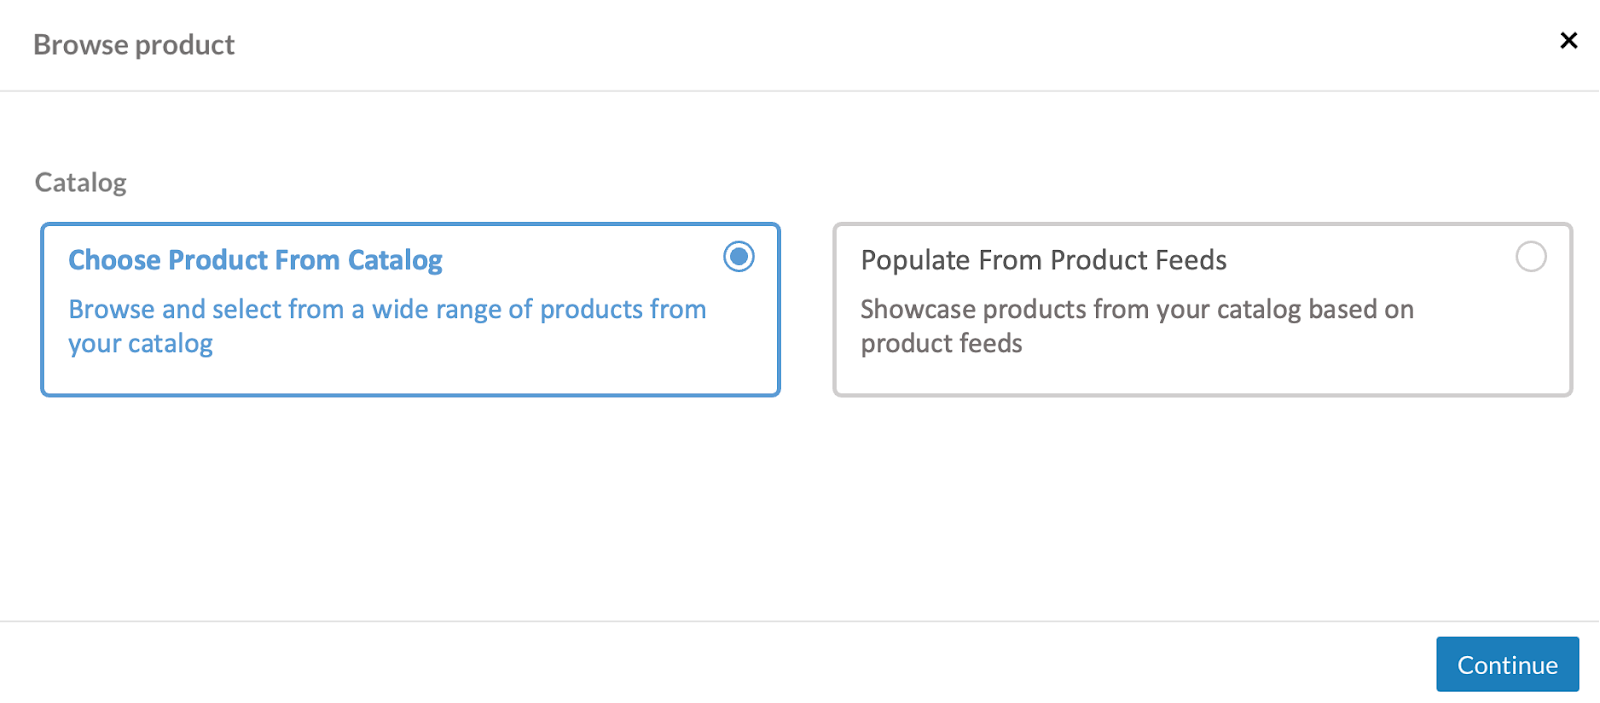
Method 1: Product catalog
This feature allows you to manually incorporate product recommendations from your Shopify catalog into your email campaigns.
Once you’ve selected the “Search Products” option from the dropdown menu, simply click on “Choose Product From Catalog” and proceed by clicking continue.
Afterwards, a catalog window will pop up where you can choose various products to include in your email template. Once you’ve made your selections, simply click on the next button to proceed. From there, you can customize your arrangement, fields, layout, and more. Finally, click on the add products button to complete the process.
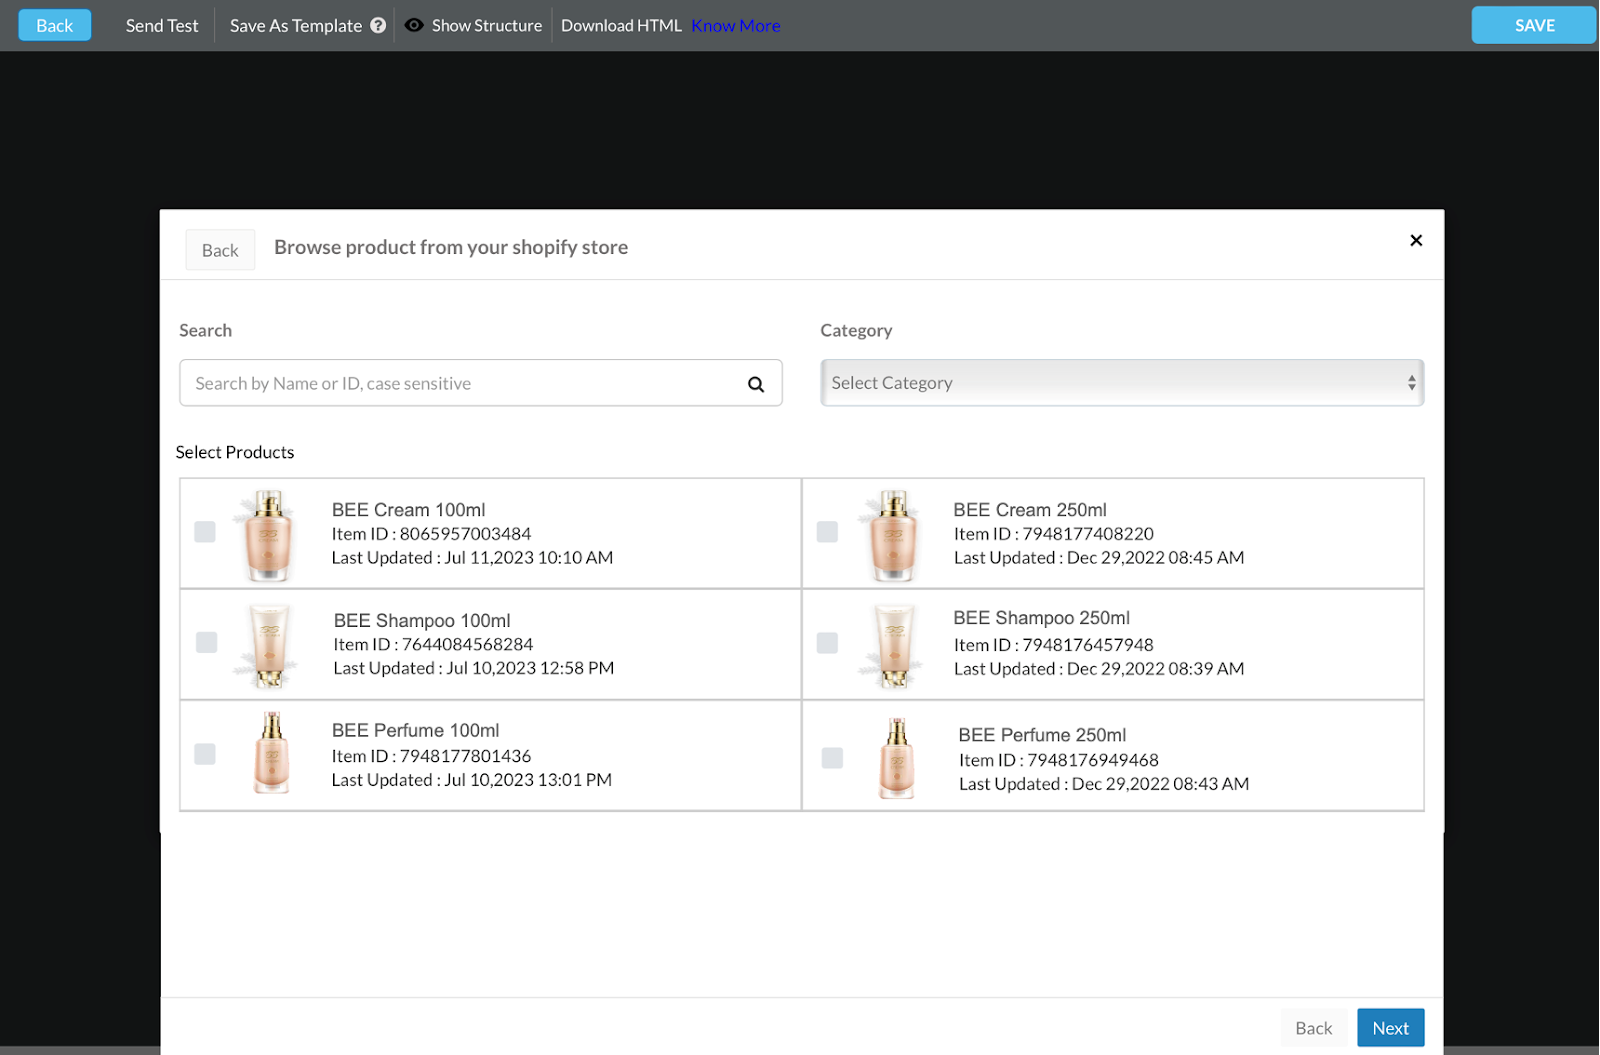
Once you’ve selected your products, they will be added to the rows panel on the left. Drag and drop these products into your email template.
Next, save your email template and proceed to input the remaining essential details for your email campaign. Click here to explore our knowledge base guide for a detailed, step-by-step tutorial.
It’s important to note that since this option is reliant on the Shopify catalog, your Shopify store must be linked with NotifyVisitors.
Also make sure to enable catalog synchronization for your Shopify store. If it’s not enabled, you won’t be able to see the “Choose Product From Catalog” option in the “search products” section. To check this, go to settings > store integration > CMS. Click on the configure button next to Shopify. Scroll down to the bottom and make sure the “Sync Shopify Catalog” option is enabled. If it’s not, please enable it.
Method 2: Product feed
Utilize the product feeds option to implement cross-selling and upselling strategies based on your customers’ purchase history or website behavior. In contrast to the static nature of a product catalog, the product feed option is dynamic. This implies that instead of receiving emails with identical products, each customer will receive a personalized email tailored to the products they have shown interest in.
In the same way as mentioned earlier, once you choose the “search products” option from the rows dropdown, you can then select the “Populate from product feeds” option.
Next, select your preferred product feed. The product feed selection option will appear blank if you haven’t created any product feed.
To generate a product feed, navigate to brand assets > product feed and click on “create product feed.”
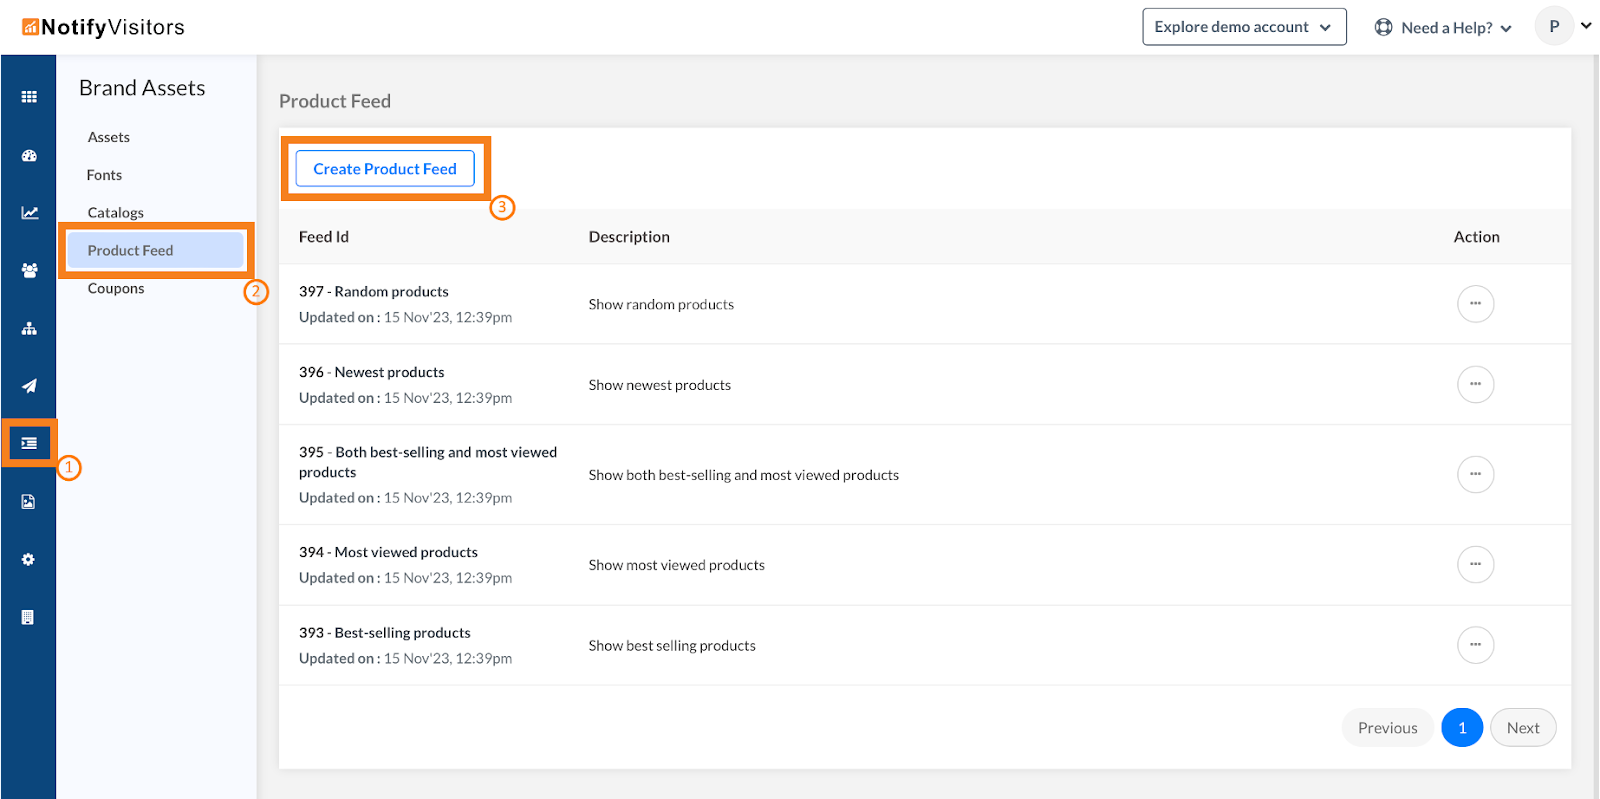
Assign a name to your product feed and choose a preferred catalog from your list by clicking the dropdown menu. Finally, specify the criteria for how products should be presented to your customers.
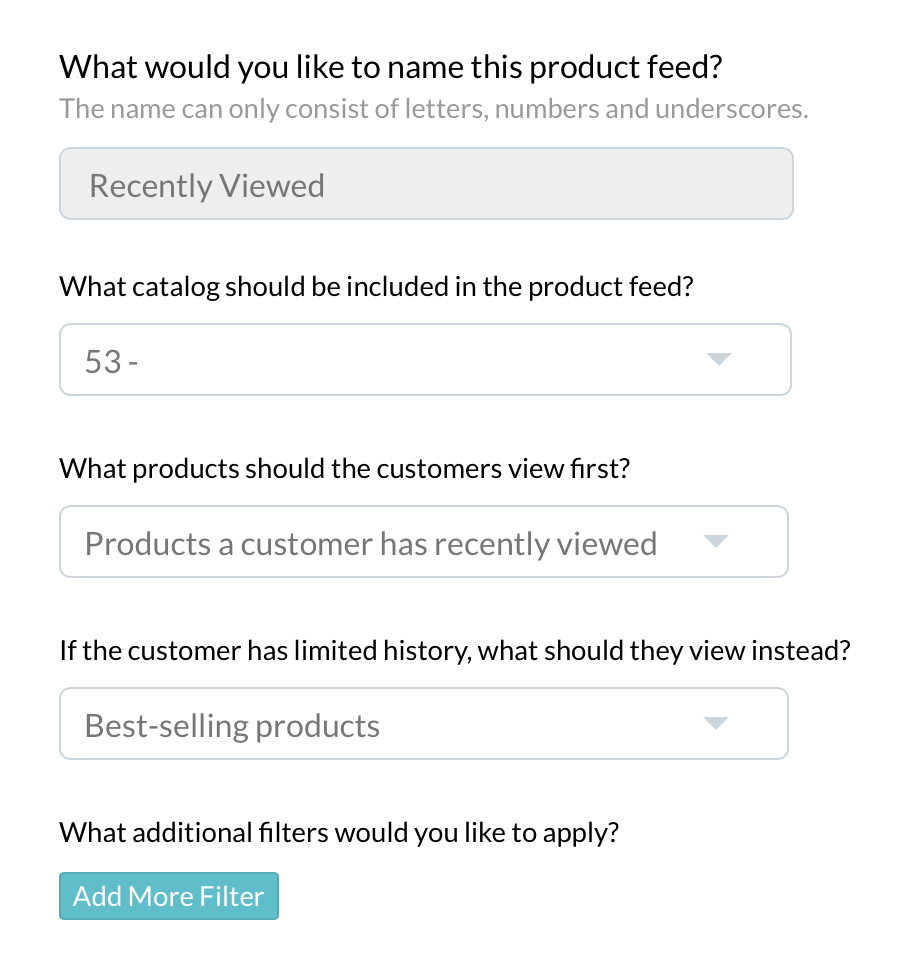
There are 8 distinct criteria divided into two categories for creating a product feed, including:
A. Classic
- Best selling products
- Most viewed products
- Both best selling and most viewed products
- Newest Products
- Random Products
B. Personalized for each customer
- Products a customer has recently viewed
- Products a customer may also like
- Customer recently added product to cart
Once your product feed is generated, you can seamlessly incorporate it into your email, as mentioned above.
That’s all there is to it. Now, save your email template and proceed to input the remaining essential details for your email campaign.
3. Configure delay time
Finally, you will need to establish the duration for the delay time. This timeframe determines when the email should be sent after the order has been placed. To accomplish this, simply hover over the arrow tip as shown in the image below and click on the settings icon. From there, you can define your desired time period.
You have the flexibility to customize the time period based on your business needs. For instance, if you’re sending a cross-sell email, you may opt for a shorter time frame like 1 minute, 6 hours, or 1 day. On the other hand, if you’re upselling, you might consider different time periods such as 1 month for replenishable products, 2-3 months for clothing and household items, and 1 year for electronics like mobile phones and laptops. Ultimately, in case of upselling the duration depends on the lifespan of the product.
Once you have determined the delay time, you can proceed to publish your journey. If you wish to set up a second email to resend recommendations after the initial email, you can do so by following the same steps mentioned earlier to configure an email and specify the delay time. For instance, if the initial email was scheduled to be sent one month after the order was placed, you may consider sending the second email 2-3 months after the order placement. However, it ultimately depends on the type of products you offer. If you don’t want to use a second email, just go ahead and delete this block.
4. Publish the journey
Once you have configured the delay time, simply tap on the publish journey button located at the upper right corner. This action will make your journey live and ready to go. From now on, whenever a customer makes a purchase on your website or online store, they will seamlessly enter this journey and receive the cross sell or upsell email after a specific delay period that you have set.
If you only need to send a one-time email broadcast campaign for cross-selling or upselling instead of setting up an automated journey, you can easily do so. Simply go to the campaign section and click on “Create new” > “email”. From there, you can configure your email in a similar way as we did in the journey above.
5. Analyze the success
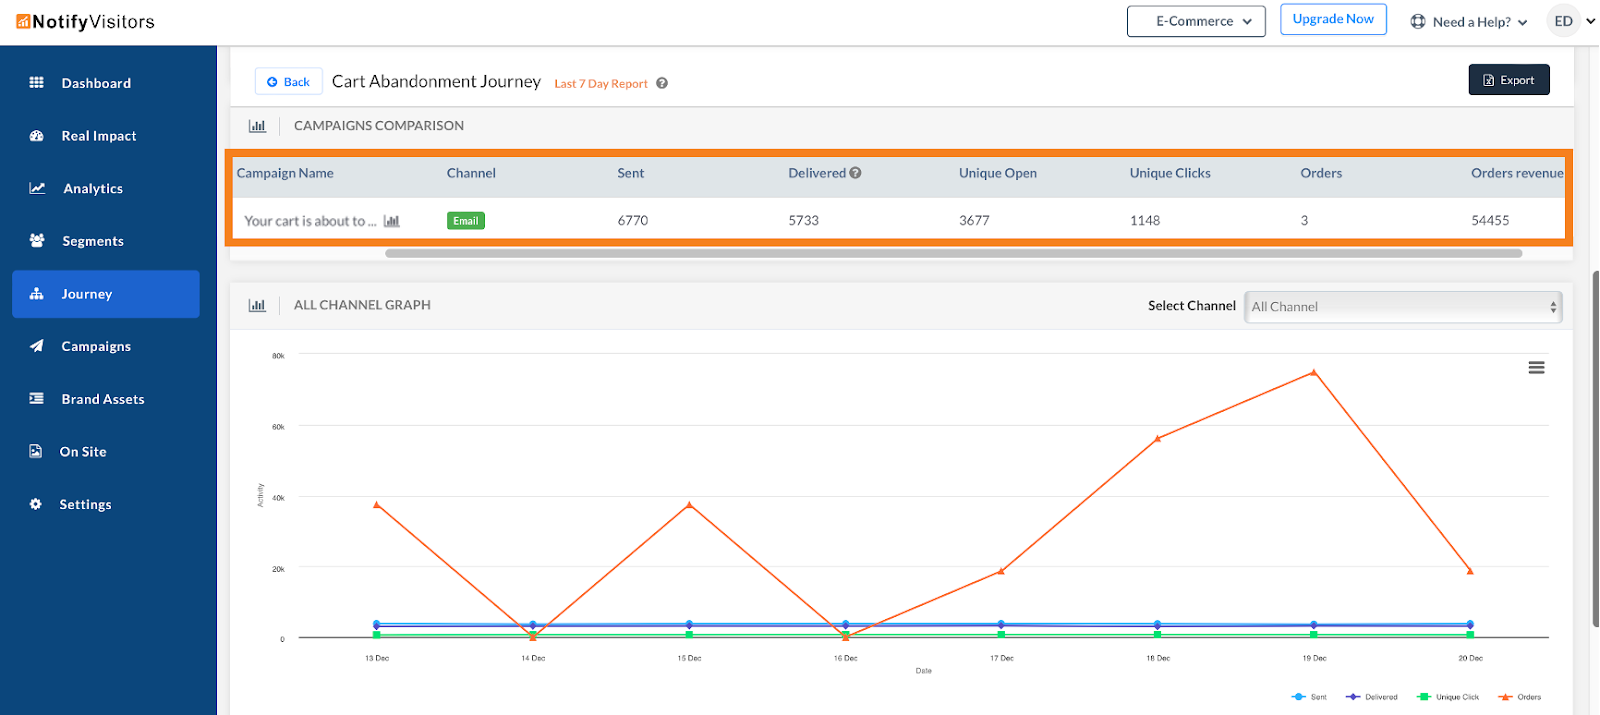
To assess the effectiveness of your cross-sell/upsell campaign, you can review the journey analytics for emails sent through a journey or campaign analytics for broadcast campaigns.
Analytics for journey : Head to the journey section, click on the three-dotted button next to your journey, and select “Analytics.” Scroll down to the campaigns comparison section to examine analytics for your email campaign, including metrics such as sent, delivered, open rate, click rate, orders placed, and revenue generated. Explore more by referring to our guide “Understanding Journey Reports.”
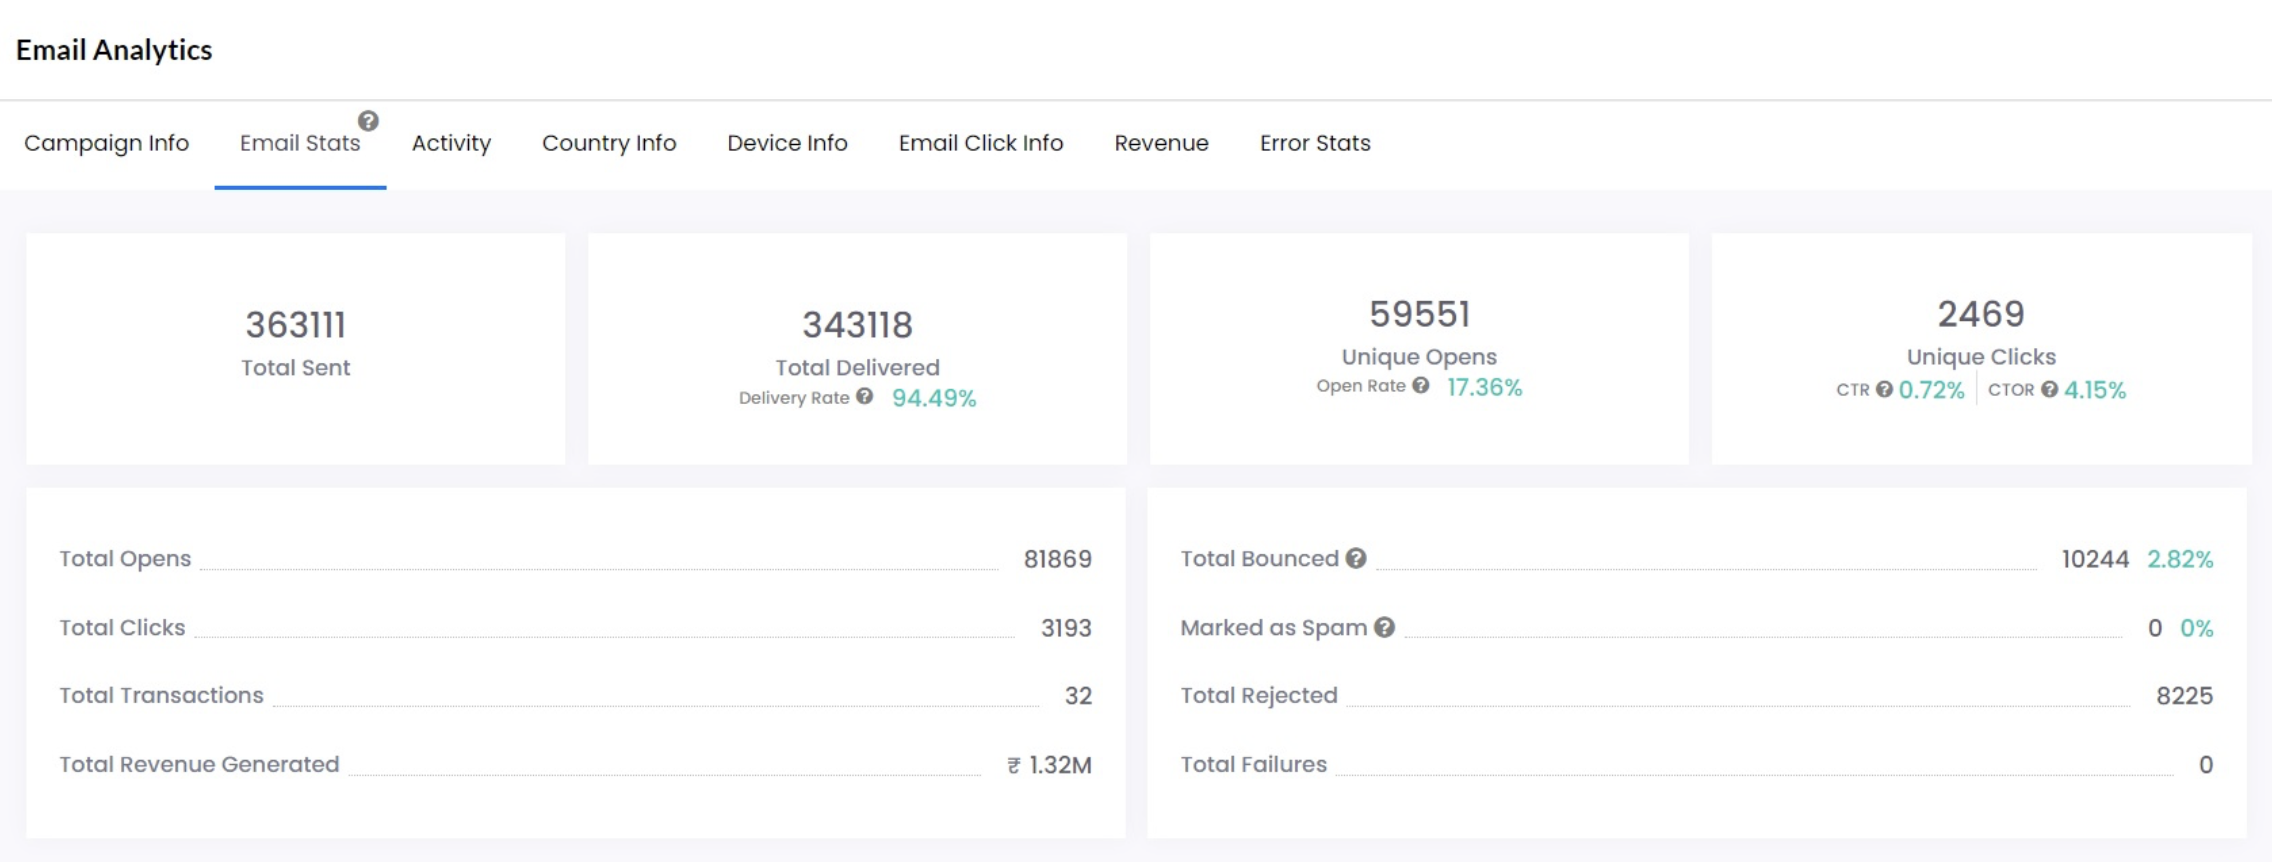
Analytics for email broadcast campaign: Navigate to the campaign section, and next to your email campaign, click on the three-dotted ellipsis icon. Choose “Analytics” and then “Email Stats” to access information such as total sent, total delivered, unique opens, unique clicks, total revenue generated, and more. For a detailed guide, click here.
Conclusion
In this guide, we’ve explored two approaches to implement cross-selling or upselling automated journey. The Shopify Product Catalog method is exclusive to Shopify merchants and is characterized by its static nature. When we say “static,” we mean that you can manually create an email by selecting and arranging products from your catalog, resulting in all recipients of that email receiving the same set of product recommendations.
On the other hand, the Product Feed option is dynamic. This dynamism ensures that each recipient receives a unique email, personalized according to their individual browsing history on your website.
Select the method that aligns best with your specific needs and goals. Tailoring your approach to suit your unique requirements ensures a more effective and personalized experience for your customers.