


 Email
Email SMS
SMS Whatsapp
 Web Push
 App Push
 Popups
 Channel A/B Testing
  Control groups Analysis
 Frequency Capping
 Funnel Analysis
 Cohort Analysis
 RFM Analysis
 Signup Forms
 Surveys
 NPS
NPS Landing pages personalization
  Website A/B Testing
  PWA/TWA
 Heatmaps
 Session Recording
 Wix
Wix Shopify
 Magento
 Woocommerce
 eCommerce D2C
  Mutual Funds
 Insurance
 Lending
  Recipes
  Product Updates
 App Marketplace
 Academy
The eCommerce market is growing rapidly. Starting your business on an online platform is the best idea. Opening an eCommerce store on Shopify is the first smart decision. Shopify’s website creates an environment that makes it a quick and easy process to start generating sales online.
Shopify uses many templates and images & many valuable plug-ins and add-ons to make the website easier. Start uploading products for selling on Shopify with a few simple steps as soon as possible.
Contents
What is Shopify?
Shopify is the one of best-hosted eCommerce platforms that helps users start their online store easily. Shopify manages all the complex source code so that users don’t need to worry about any technical things and launch the business easily. Shopify provides tutorials for beginners to use the eCommerce platform. In the 14-day free trial, beginners can upload their available products on Shopify to test the platform.
How to Add products to Shopify
Now we’ll be giving you a detailed guide on how to add products to Shopify. Here is the step to step guide for adding products.
Step 1: Log in to your Shopify Account
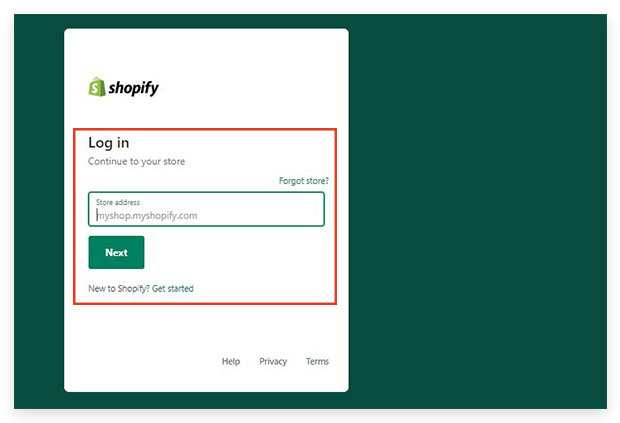
Step 1 is just to enter login details to the Shopify store domain. After entering login information click “log-in”. Then you will reach the Shopify dashboard for admins. On the right of the dashboard, click on the “Add your products” button to start adding products to Shopify.
Step 2: Enter the Product Details
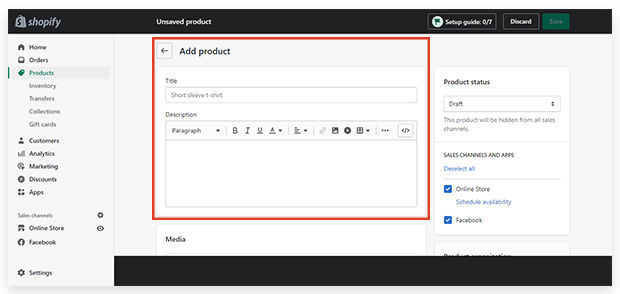
It is an important part of the steps for “add the product to Shopify”. Now you have to enter the product details like title, description, and other options like size, color, etc. Product information that you have to enter is: –
- Title: – Title of a product means Product name. The product name should be short and easy to remember as it becomes easy for you and your customer to call it. It should not have all the details of the product and you should be consistent while naming your product.
- Description: – This is the part where you have to enter the detailed description or information of your product. Enter the information that attracts your target audience, enter the useful information that shows your customer that it is worth buying that product. Content is the key to attracting your customer, make sure the description should be rich in content to impress your customer.
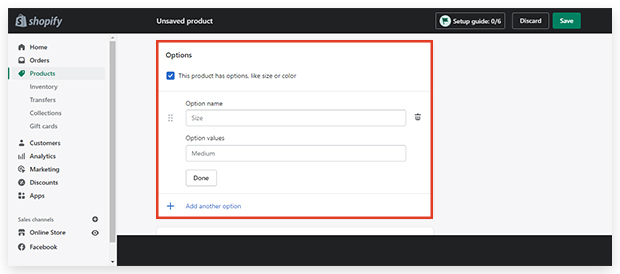
- Options: – On the screen now you have to tick the box “This product has options, like size or color”. Then it will show you the blank options like size, color, and material and you can also add “option” according to your product like weight, transparency, etc. then add values to these options. After that then click on “done”.
- Vendor: – Here you have to enter the name of the brand if you are selling a self-made product then enter your brand name otherwise enter the name of suppliers or manufacturers.
Step 3: Add Images for Product

After entering all the descriptions now scroll down to “images” and click on “upload images”. Start uploading photos from your device. You should upload at least 3-4 images of your product from all angles so that customers get satisfaction. The images should be impressive and according to the brand. The correct image enables the customer to view your product. Another important thing is that you should name your product image very consistently. Use SEO keywords so that customers navigate to your online store easily via search engines.
Step 4:- Input pricing of a product
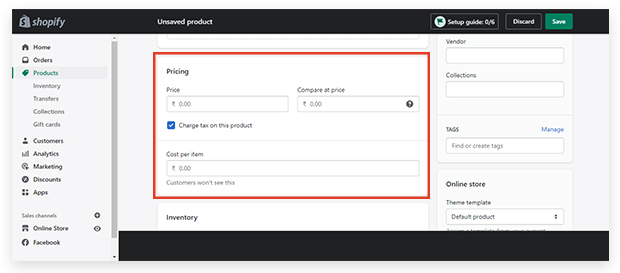
Be careful when pricing your product. It should not be too high or too low, set pricing according to your brand positioning. You can also give a discount offer for your product. Shopify provides a setting to its user when customers can apply the discount code. You can also compare price and cost per item.
Step 5: – Enter Inventory information
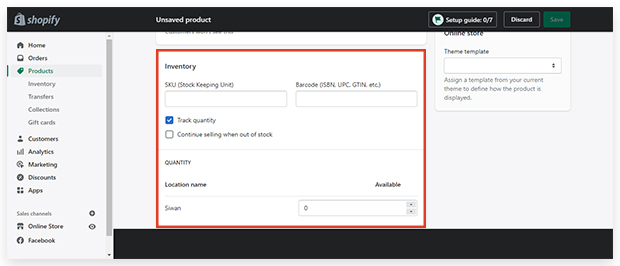
Now enter inventory information like SKU (Stock Keeping Unit), Barcode, and Inventory Policy.
- SKU: – It means Stock Keeping Units. SKUs are the unique codes that help you to identify the product within your company. Each product has its own code in your store.
- Barcodes: – Barcodes are the identifiers. If you are a reseller or you want to sell globally. These unique identifiers locate product information. Global Trade Item Number (GTIN) is required in some channels before a product is published. There are other product types that vary in length using UPC, EAN, and ISBNs; these are different facets of the GTINs.
- Inventory policy: – Enter the desired Inventory Policy in this bar.
Step 6: – Add shipping details

In this step add shipping details if your product requires shipping. You can tick the “this product requires shipping”. After that, enter details like weight, Country/Region of origin, HS (Harmonized System) code, and Fulfillment Service.
- Weight: – Now enter the weight of the product and set the weight as pounds (lb), ounces (oz), kilograms (kg), and grams (g) according to the product.
- Country/Region of origin: – The country/ region where your product is manufactured.
- HS (Harmonized System) code: – HS code is a code used for products when you sell your product overseas. With this appropriate tariffs will be applied to the customer’s order.
- Fulfillment Service: – Scroll down to see “Custom Order Fulfillment” if you are using fulfillment service and click on “Add Fulfillment Service”.
Step 7: – Add variants of the products
Add the variants of your product. A product has different properties like sizes, colors, and weight. You can create up to 100 variants with a combination of different properties. For example, a t-shirt in many sizes like small, medium, large, extra-large, and in many colors like white, blue, yellow, etc. so you can combine properties of a t-shirt like a white small t-shirt or white large t-shirt or yellow small t-shirt or blue small t-shirt. Add the variant’s details and then see a preview.
Step 8: – SEO (Search Engine Optimizer) listing preview
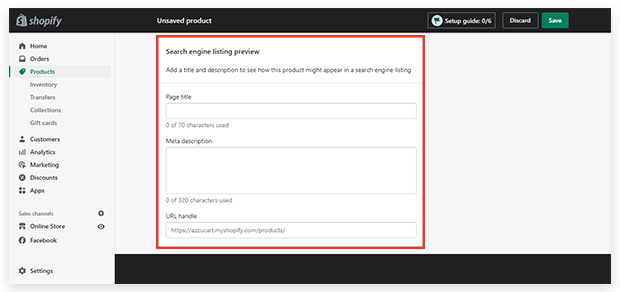
SEO will help you to navigate your customers to your online store. After entering all the relevant information about your product, entering keywords for search engines is the goal to attract customers. Generally, Shopify automatically generates meta descriptions and page titles. Click on “Edit website SEO” and now edit your Meta Title and Meta Description with useful keywords which will appear to your customer when searching for your product.
- URL and Handle: – In this section, you can edit your website address. Here you can add keywords but remember URLs can’t contain any spaces.
Step 9:- Enter Product Availability on Platforms
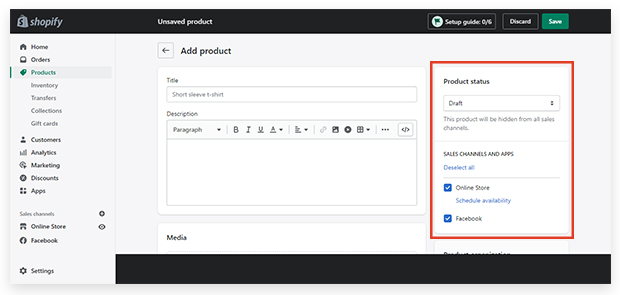
In this section, you can manage the availability or visibility of your product on different platforms. You can choose the sales platforms where you want to show your products. Click on the “manage sales channel visibility” and tick on the options. You can also set a particular time for a particular product to be visible at that time.
Step 10:- Product Organization
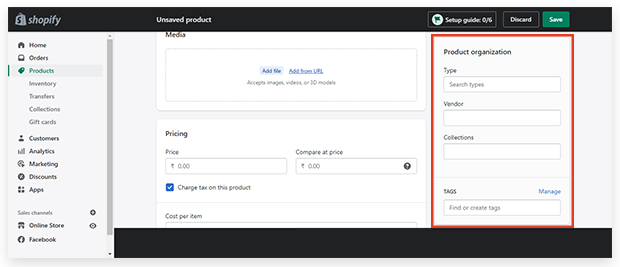
A product can be ordered in different methods.
- Product Type: – Product type is used to categorize your product. You can create or enter product type by clicking on the textbox and saving. There are some automated product types, you can choose from them and save.
- Vendor: – Vendor is the product’s vendor, wholesaler, or manufacturer of your product. You can select or enter vendors from the list.
- Collections: – Collection means the group of your product. You can add your product to an automated list or you can add a collection manual according to your product. Just click on the collection textbox and enter.
- Tags: – Tags are the keywords that are searchable. Use the keywords that associate well with your products. They help your customers to find your product online through the search option. You must add at least 5-6 tags for your products.
Step 11:- Publish your product and view
This is the last step before saving, just review all the details and information that you have entered, take a quick review, and scroll up and down to the pages. Before clicking on the “Save Product” button on the right of the screen, Shopify allows you to see the preview of your product. Click on the “View on your website” option and you will see the preview of your product on your website. You can edit anything if you find something is wrong or missing by just going to the first step. And then just click the “Save” button.
You can edit your product details at any time. To edit a page, just login into your Shopify admin page and click on Products and then click on the name of the product which you want to edit or modify. Change the details accordingly, and then click Save.
Conclusion
That’s all you need to do to add products to Shopify. To build your online store adding your products is one of the most important steps for you. Adding products to Shopify isn’t difficult if you follow the step to step guide. Present the best version of your products to your customers and let’s make them know and love what you got in store for them.
Adding a product to any eCommerce site isn’t a big deal. You just need to follow the guide. If you have the right product and the right place to publish it then you get the best sale and customers for your products. Shopify is the biggest eCommerce platform now.
It provides plug-ins and tools to its customers. Shopify experts say, we understand what it takes to come up with a great online store.

