


 Email
Email SMS
SMS Whatsapp
 Web Push
 App Push
 Popups
 Channel A/B Testing
  Control groups Analysis
 Frequency Capping
 Funnel Analysis
 Cohort Analysis
 RFM Analysis
 Signup Forms
 Surveys
 NPS
NPS Landing pages personalization
  Website A/B Testing
  PWA/TWA
 Heatmaps
 Session Recording
 Wix
Wix Shopify
 Magento
 Woocommerce
 eCommerce D2C
  Mutual Funds
 Insurance
 Lending
  Recipes
  Product Updates
 App Marketplace
 Academy
Shopify is an ecommerce platform that helps people to set up their online store where they can sell their products online and offline both. It allows small businesses to grow on their platform. Shopify is now becoming a leading ecommerce platform that helps businesses of all sizes.
Shopify merchants can start their modern online store and sell on social media sites, seller marketplaces, other blogs and websites and via email, text and chat.
Shopify allows its users to start their online business from scratch. Shopify has a custom registration form for your store. But it also allows you to edit or customize the sign up form of your business for email. Shopify has themes that have signup form with Name, Email, and Password fields.
So, without any further ado let’s move forward and learn how to add email signup form to Shopify store.
Contents
How does newsletter help in email marketing?
It is important for an e-commerce business to build an email list of their subscribers to run their business. Newsletter helps in email marketing in many ways. Here we listed four points:
- You can share some exclusive deals with your subscribers.
- You should send letters of appreciation to engage them more.
- You should inform your current customers about other products in your store.
- You can also retain visitors who abandoned their cart.
Customization of the Customer Registration Form In Shopify
Shopify has a basic plan which includes a custom registration form. There are ways that you can create or customise a Shopify custom registration form. Before starting, let us tell you about the different styles of ‘Sign Up form’
Signup form styles: –
There are 4 styles of Sign Up form which are mentioned below: –
- Slideout tab: – In this style you can position a floating tab on the screen like at the top left, top right, bottom left or bottom right any one of them where you want to place it. And by clicking that floating tab a signup form will slide out.
- Lightbox: – In Lightbox style, a signup form will overlay the page of the site and dim the background. This will happen after a specific time, or when a user scrolled down on a certain point of the page. You have to specify the time or certain point of the page for lightbox style.
- Bar: – Bar is like a simple bar or strap that will be put along on the top or bottom of a page. This bar contains all the fields that are needed for sign up.
- Embedded: – You can insert a signup form in a Shopify page by generating an embed code. You can have detailed information about it on Shopify.
Now, it’s time to learn how to add email signup form to Shopify Store.
How to add email signup form to Shopify Store?
You can add email signup form in two different ways-
- Using the Shopify Signup form offered by the Shopify team.
- Using a third-party email signup form that integrates with Shopify.
Here we explain two methods to add or to customize email sign up form to shopify:-
Method 1: Editing Code
Shopify has plenty of themes and has a different file structure for all. In this method you can add the desired criteria like vat validation, email, etc. but you need to have knowledge of coding. This method has lots of coding so it requires coding knowledge.
Following are the steps that will help you to change the default registration form of Shopify store theme.
Step 1: Open the Shopify Admin panel
To create a Shopify custom registration form, you must open the Shopify Admin panel.
Step 2: Edit code
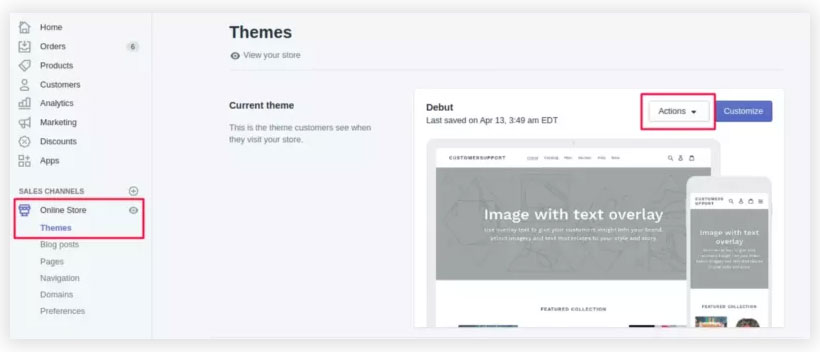
Now, in the Shopify admin, navigate to the Online Store. Then, the Themes (Published theme) page will occur – at the right of the page, select action to start editing code.
Select the online store on the left side of the admin dashboard to edit the code of the Shopify custom form.
Next, open the file customers/register.liquid under Templates.
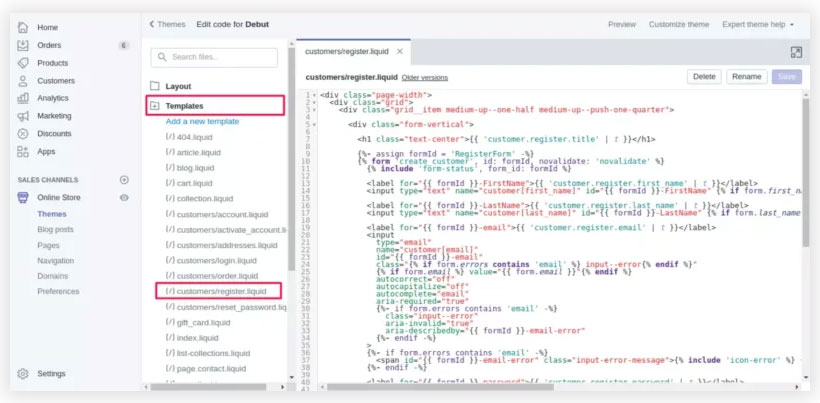
The next part will be complex as you need to work with code sequences, so again you have to ensure that you understand the coding and don’t mess up your online store, which is running fine.
Step 3: Find the schema tag
Find the schema element “{% form ‘create_customer’ %}” and “{% endform %}” in the file. You can see this in the picture below.
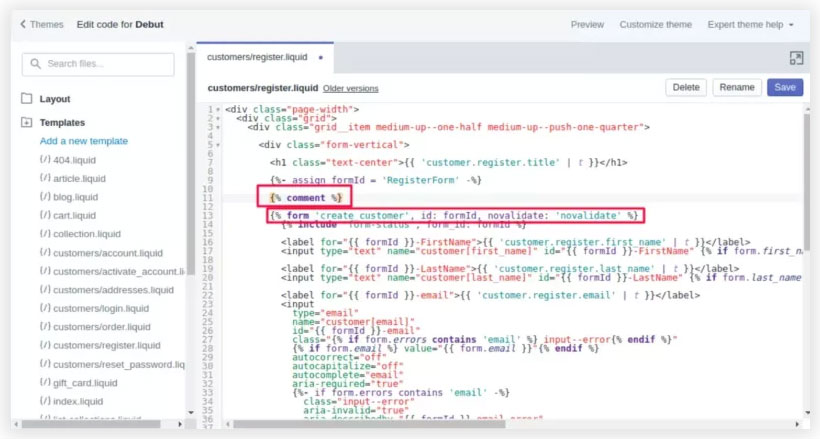
Step 4: Paste the new code to the contact form code
The contact form code can be located between the Liquid tags in the previous phase. The default form fields are located, separating each area by an empty line. Each theme is unique, but a client registration form field generally looks like this.
Depending on your preference, the code for the Shopify customs form will be pasted after, before, and between available areas. The code you enter determines the form field you want to generate. Some of the categories of form fields that you can apply, such as:
Please copy and modify the following code to create a text box for the client registration form.
- Text field:
<label for=”CustomerFormAllergies”>Allergies</label>
<input type=”text” id=”CustomerFormAllergies” name=”customer[note][Allergies]” placeholder=”Allergies”>
- Radio buttons:
<label>Do you prefer tea or coffee?</label><br>
<input type=”radio” id=”CustomerFormTea” name=”customer[note][Tea or Coffee]” value=”Tea” /> Tea<br>
<input type=”radio” id=”CustomerFormCoffee” name=”customer[note][Tea or Coffee]” value=”Coffee” /> Coffee
- Drop-down menu:
<label for=”CustomerFormFlavor”>Choose a flavor</label>
<select id=”CustomerFormFlavor” name=”customer[note][Flavor]”>
<option>Chocolate</option>
<option>Vanilla</option>
<option>Strawberry</option>
</select>
- Check box:
<label for=”CustomerFormKitten”>Would you like a free kitten?</label><br>
<input type=”checkbox” id=”CustomerFormKitten” name=”customer[note][Kitten]” value=”Yes, please!” /> Yes, please!
Step 5: Save
Finally, you need to save it after adding the custom registration form, and you will have a new Shopify custom registration form.
Method 2: Integrating A Third Party Shopify App
To add a signup form to your Shopify store:
1. Log in to your Shopify account.
2. Click on Apps in the left sidebar.
3. Click on NotifyVisitors Email Marketing
4. Then Click on Manage forms at the top right.
5. Now select any one of them, “Lightbox“, “Bar“, “Embedded” or “Slideout tab” style, and then click Create form.
6. To create the form for your site use the signup form generator. When you edit its settings a preview of your signup form will be shown to the right side.
7. Click Create form when done.
Conclusion
After reading this blog, you may have understood how to add email signup form to Shopify Store. To run a successful online business you need to focus on the areas of the sales funnel that will give the best results.
Shopify custom registration forms are essential for your online store to get important information from customers. You can create your own form with two methods but it needs a little time and coding knowledge otherwise it is a waste of time and will affect your store business.
FAQs
1. What is Shopify and what does Shopify do?
Shopify is an ecommerce platform that helps people to set up their online store where they can sell their products online and offline both. It allows small businesses to grow on their platform. Shopify is now becoming a leading ecommerce platform that helps businesses of all sizes.
2. What are the 4 styles of Sign Up form?
- Slideout tab: – position a floating tab on the screen like at the top left, top right, bottom left or bottom right. And by clicking that floating tab a signup form will slide out.
- Lightbox: – a signup form will overlay the page of the site and dim the background. You have to specify the time or a certain point of the page for it.
- Bar: – a simple bar or strap that will put along on the top or bottom of a page that contains all the fields that are needed for sign up.
- Embedded: – insert a signup form in a Shopify page by generating an embed code.

