
 Email
Email SMS
SMS Whatsapp
 Web Push
 App Push
 Popups
 Channel A/B Testing
  Control groups Analysis
 Frequency Capping
 Funnel Analysis
 Cohort Analysis
 RFM Analysis
 Signup Forms
 Surveys
 NPS
NPS Landing pages personalization
  Website A/B Testing
  PWA/TWA
 Heatmaps
 Session Recording
 Wix
Wix Shopify
 Magento
 Woocommerce
 eCommerce D2C
  Mutual Funds
 Insurance
 Lending
  Recipes
  Product Updates
 App Marketplace
 Academy
At NotifyVisitors, we are constantly working to bring new features and improvements to our platform, based on the feedback and suggestions of our customers. Our team of experts is dedicated to providing the most advanced and user-friendly tools to help our clients succeed in their marketing endeavors.
Let’s have a look at some of our recent upgrades.
Attributes added while selecting event Email Opened
1. MPP (Mail Privacy Policy) Attribute –
Apple has implemented a new feature called Mail Privacy Policy (MPP) for its various devices operating in and above iOS 15, macOS Monterey, iPadOS 15, and WatchOS 8 in order to protect users’ privacy. This feature prevents email senders from tracking certain behaviors, such as email opens, location data, and click-through activity. By default, MPP is turned off, but users can enable it manually from the settings.
From an email marketer’s perspective, this means that we may not be able to collect certain data about their email campaigns on devices with MPP enabled. However, NotifyVisitors offers an MPP attribute that can be added to segments to differentiate the number of users with MPP enabled. This attribute allows users to understand the impact of MPP on their email campaigns without violating Apple’s privacy policy or collecting individual user data.
To add the MPP attribute to a segment, users can create a new past behavior segment and select email opened. Next, click on add attribute and select MPP. At last select the condition true or false, i,e if you select true all users with MPP enabled will be included in this segment and if you select false all MPP users will be excluded from this segment.
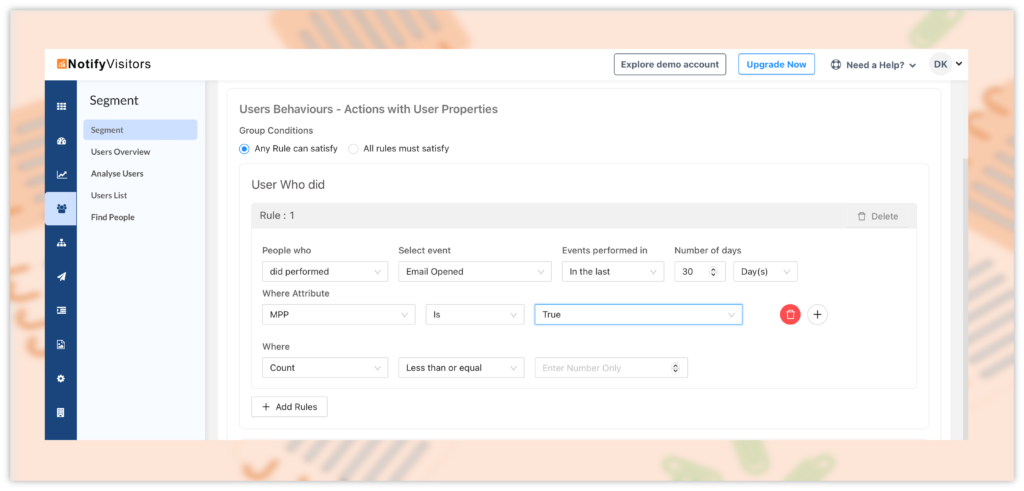
By using this segment, our email marketers can adjust their strategies accordingly and understand the number of profiles impacted by MPP.
It’s important to note that while this attribute can differentiate between users with MPP enabled and those without, it does not provide any individual user data. Additionally, enabling the MPP feature is the user’s choice, and they can turn it off or on at any time from their device settings.
2. Unique Attribute –
The unique attribute feature enables you to collect data on the unique opens of your email messages. This means that if a user opens the same email multiple times, the unique attribute feature will only count it as one open.
This allows you to accurately track the engagement and performance of your email campaigns by providing you with a more precise count of the unique opens, rather than simply tracking the total number of opens.
To add the “Unique” attribute, users can create a new past behavior segment and select “Email Opened” as the event. Next, you can click on “Add Attribute” and select “Unique.” Finally, you can choose the condition as either “True” or “False,” depending on whether they want to include users who have had a unique open or not.
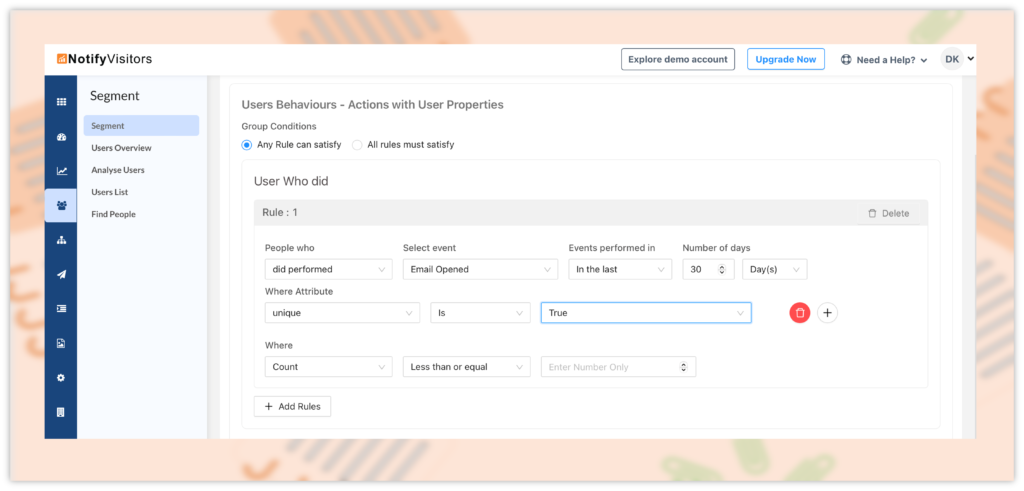
By using segments with “Unique” attribute, users can accurately track their email open rates and identify truly engaged subscribers, without the interference of false opens.
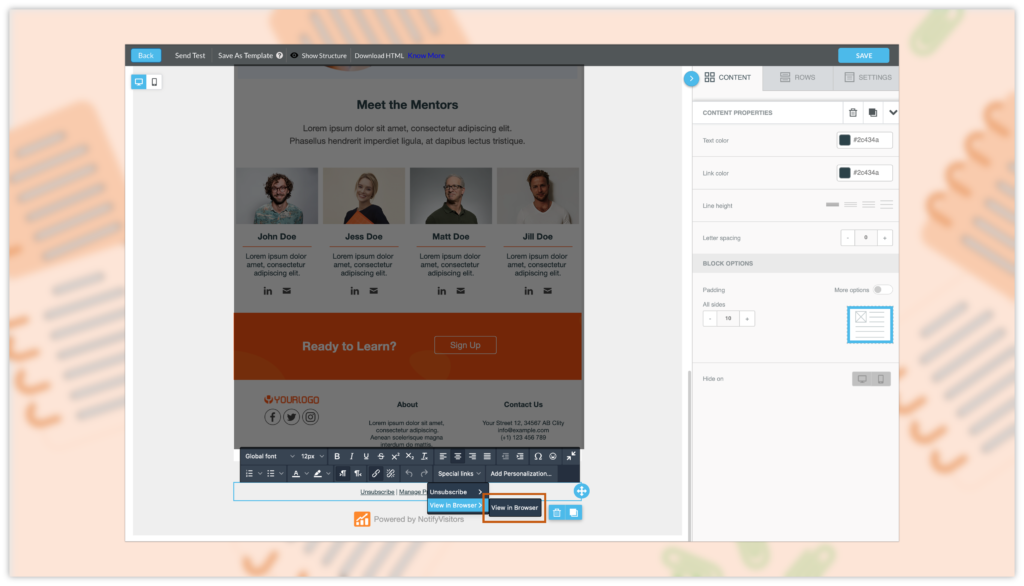
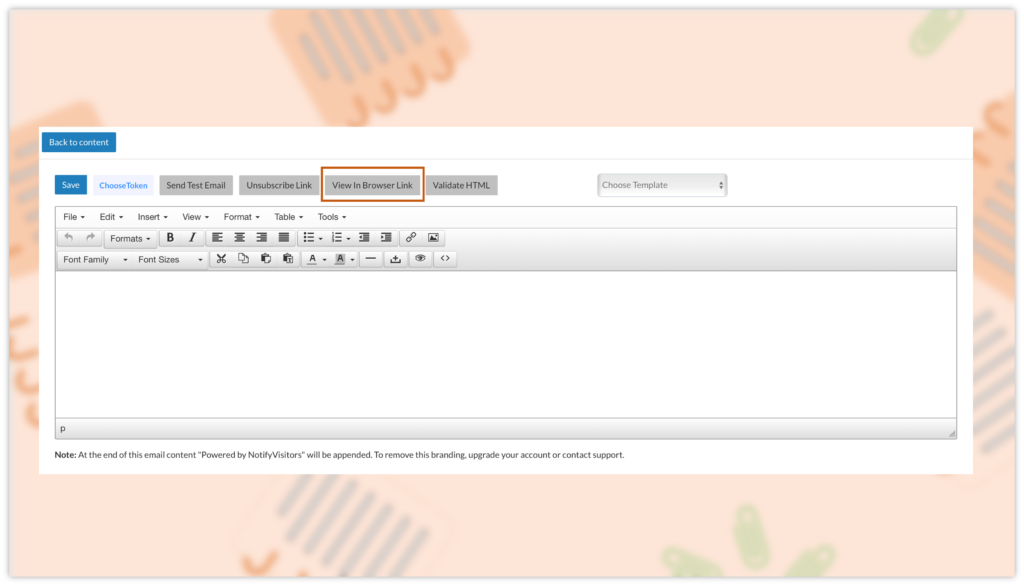
“View In Browser” Option In Emails
Sometimes emails do not load properly in a user’s mail client, which can be due to various reasons such as third-party email restrictions and preload image restrictions. This issue can vary from email client to email client. To resolve this problem, NotifyVisitors has introduced a “view in browser” link that can be added to your email templates, including graphical, rich text, and custom HTML based emails.
By adding this link, if a customer is unable to view the email correctly in their mailbox, they can simply click on the “view in browser” link. This will open the email in a web browser, without any limitations or restrictions.
It is important to note that the “view in browser” link is not added automatically to emails. You need to manually add this link to your emails.
To add the view in browser link to your emails, there are different methods depending on the type of email you’re creating.
For graphical template emails, start by creating an email campaign and selecting the drag and drop tool on the content page. Choose a template or create your own, and click on the block where you want to add the link. A customization box will appear, where you can click on “special links” and select “view in browser link” to add the link.
If you want to add a “view in browser” link to your Rich text or HTML-based email, you can follow a simple process. Firstly, create an email campaign and select the rich text or HTML email option from the content page. During the creation process, you will see a “view in browser” link button, available in the top tabs. Just click on it and the link will be added to your email.
Introducing Campaign Label Along With Label-Wise Reports
NotifyVisitors now allows you to add labels to your campaigns to help you organize and categorize them based on their purpose or content. For example, if you send let’s say transactional and promotional emails, you can add a “transactional” label to your transaction-related emails and a “promotional” label to your promotional emails.
Once you’ve added labels to your campaigns, you can easily sort and filter your campaigns by selecting a particular label from the campaign label dropdown available on the main campaigns page. This makes it easier to find and analyze campaigns that are similar in nature or serve a similar purpose.
In addition, you can view label-wise reports for your campaigns by navigating to the campaign section and under the engagement section, select the campaign type you want to analyze such as web push, email, sms, etc. Next, scroll down to the label-wise report section to see a combined report of all the email campaigns categorized in labels.
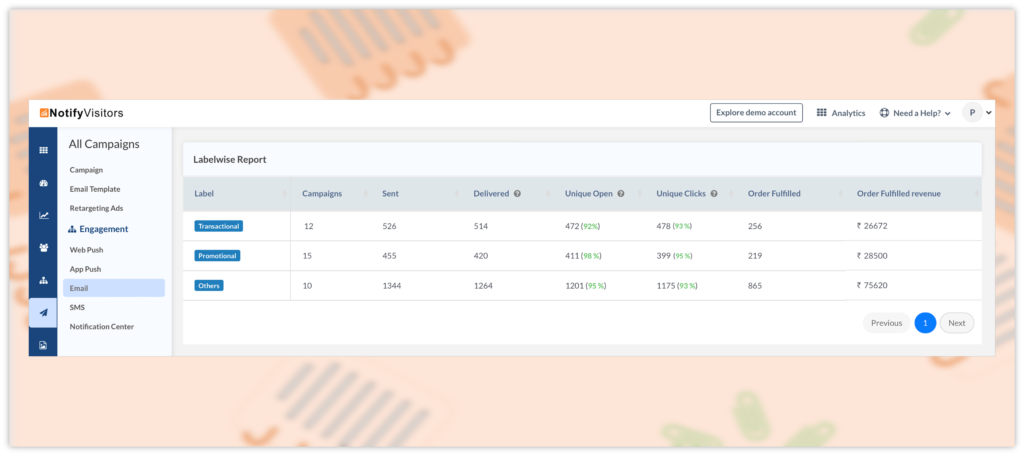
It’s important to note that if you add multiple labels to a campaign, the campaign’s data will appear in the report for all the labels that have been added. For example, if you send an email containing both transactional and promotional content and add both “transactional” and “promotional” labels to it, the data for that campaign (such as sent, delivered, clicks, etc.) will appear in the report for both labels.
Past Behavior Segments Added In Journey
NotifyVisitors has introduced a new feature that allows users to select past behavior segments as a trigger to enter a journey or as a condition in the “is in segment” block. Previously, users were only able to select list-based segments for this purpose.
To use this new feature, simply drag and drop the segment trigger block while creating a journey, and then click on the “select segment” dropdown menu. You will see that your existing past behavior segments are now visible in the list of available options. Choose the one you want to use and click “update.”
It is important to note that, past behaviour segments are updated once every 24 hours when used in a journey. This means that any changes to the segment will only take effect after 24 hours have elapsed.
Facebook Advertising
NotifyVisitors has introduced a new Facebook retargeting ads option that allows you to sync your NotifyVisitors segments with your Facebook business account’s audiences list. This feature enables you to target your existing customers or people familiar with your business through Facebook advertising.
By leveraging your customer’s shopping behavior, email engagement, and other collected data with NotifyVisitors, you can build a Custom Audience in Facebook. With the recurring campaign feature, you can automate the synchronization of your contacts. This means that as soon as a customer satisfies the rule in your Segment settings and is added to the segment, your Facebook Audience will automatically populate with a new contact.
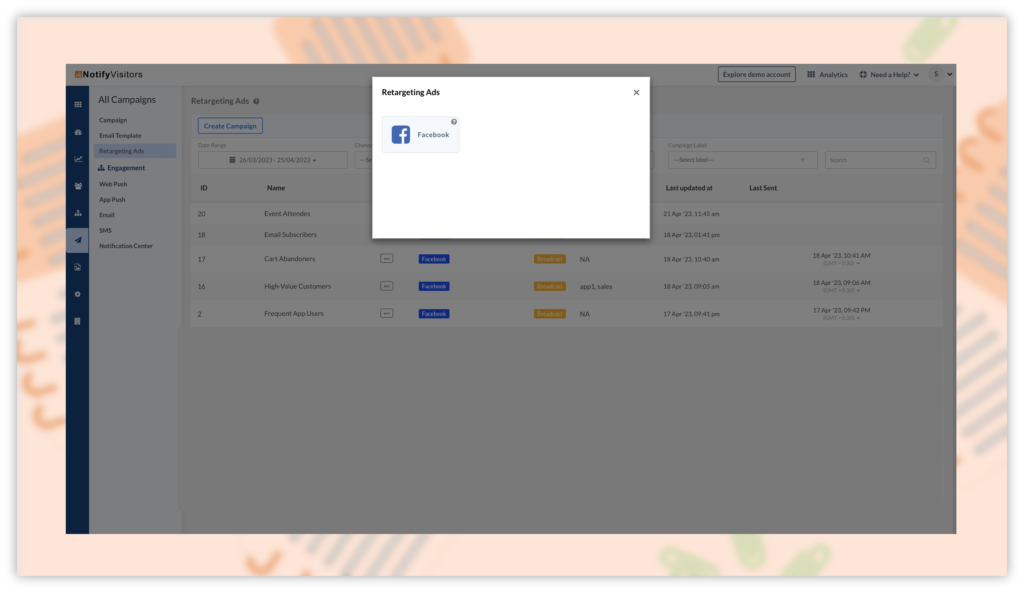
This feature provides a great opportunity to reach out to your customers with relevant ads and increase your conversions.
NotifyVisitors Extension for Shopify Store
Previously, when you connected your Shopify store with NotifyVisitors using our app, some files were created on your Shopify store. However, when you uninstalled the NotifyVisitors app, some of these files were left behind in your store. This may have caused some concerns regarding the cleanliness of your store’s file system.
To address this concern, NotifyVisitors has developed a new extension that you can enable after installing the NotifyVisitors app. The extension does not create any files on your store, so you can easily uninstall NotifyVisitors without worrying about any leftover files.
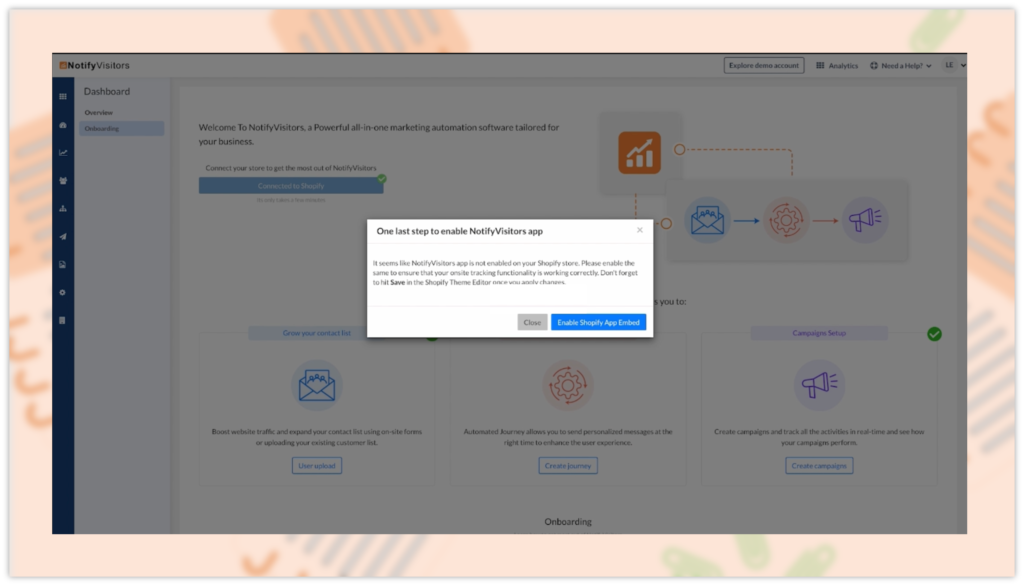
To enable this extension, simply install the NotifyVisitors app from the Shopify app store. Once your store is connected to NotifyVisitors, you will see a popup with the option to “Enable Shopify App Embed”. Click on this option, and you will be redirected to your Shopify store.
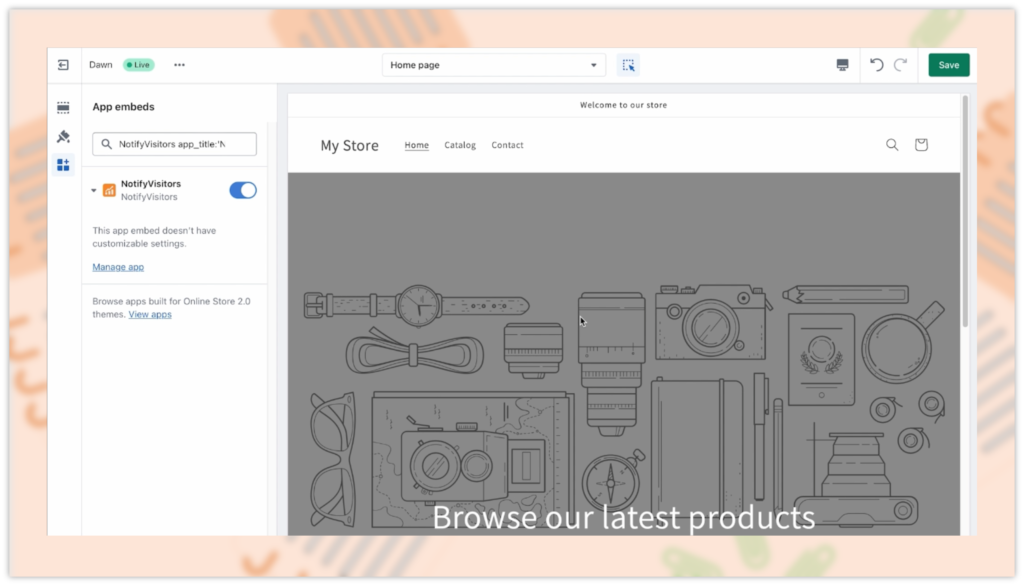
And on the left panel of this page, you can see the NotifyVisitors extension is now enabled. With this extension enabled, you can rest assured that your store’s file system will remain clean even after you uninstall the NotifyVisitors app.
Engagement Reports Updated
We have recently made some updates to our campaign analytics reports to make them more user-friendly and easier to navigate. To view these reports, simply go to the campaigns section in our panel and then under the engagement section click on any campaign that you want to analyze.
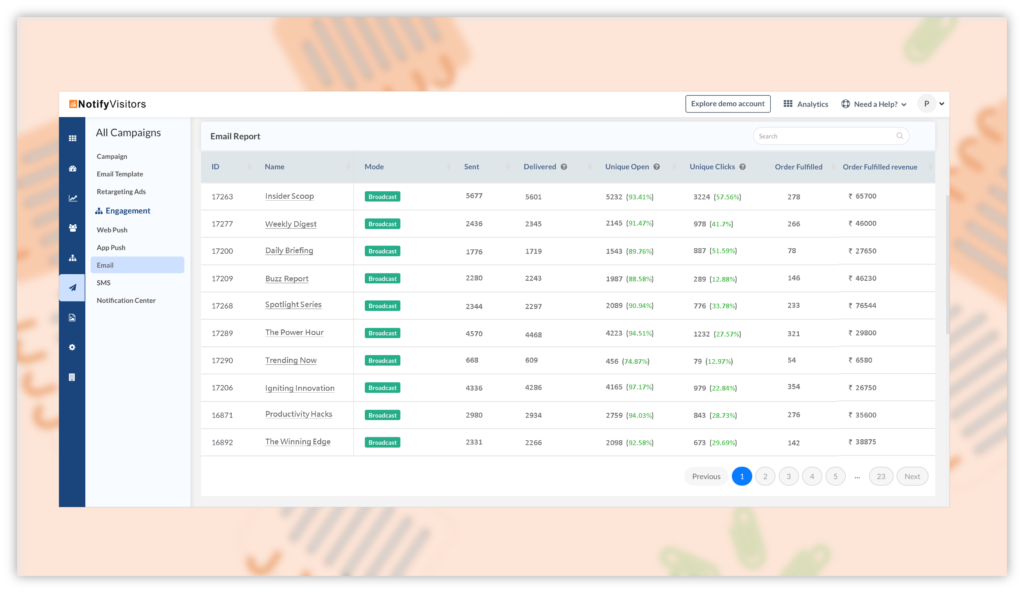
The new analytics page shows minimalistic and important data only, while all other data can be accessed by clicking on the name of a particular campaign.
To achieve this, some sections of the report have been combined to provide a more streamlined view of the data. For example, the “Delivered Count” and “Delivery Rate” sections have been merged into one section called “Delivered.” This section displays both the delivered counts and delivery rate, with the delivery rate shown in brackets next to the delivery count. Similarly, the “Click Counts” and “Click Rate” sections have been merged into one single section.
These changes make it easier for users to quickly see the most important data about their campaigns, without being overwhelmed by too much information. By clicking on the name of a specific campaign, users can access more detailed data about that particular campaign.
These are all the most significant upgrades we have made this month.
We are committed to ensuring that our customers have access to the latest and greatest tools and features that will help them grow and succeed.
With our ongoing commitment to innovation and excellence, we will continue to provide our customers with the tools they need to stay ahead of the curve and achieve their marketing goals.
If you have any suggestions for new features or would like to request a free demo, please do not hesitate to contact us at support@notifyvisitors.com. We would be happy to assist you..

Here are some of the latest upgrades made by our team of top-notch developers this month. We take pride in Read more

Introducing the May Release Notes – a roundup of the top upgrades and enhancements we've made to our platform this Read more

